


Patching systems and applications is a risk/reward balancing act. On the one hand, patches and updates can improve system stability, fix security vulnerabilities, and add new features. On the other hand, patches and updates can worsen system stability, introduce new security vulnerabilities, and break existing features. While Microsoft, Google, and other developers generally have decent track records of releasing quality patches, there is always the risk that the next update could be the one that turns your Monday into a severe case of the Mondays. Let’s not forget the Windows 10 October 2018 update that deleted user files.
Mitigating Risk With Test Group
One of the most important steps you can take to mitigate the inherent risk associated with deploying updates is to have a good group of test subjects. This approach can be taken in a couple of different directions. You can have a dedicated lab of test systems that represent your production environment, or you can have a dedicated group of production systems that are used to evaluate new updates. As with most things, both of these approaches have their pros and cons. It’s difficult to reproduce a production environment in a lab, resulting in less accurate testing. Alternatively, if you test with a production group, there’s always the chance you could encounter issues resulting in system downtime. If you have adequate resources, you can set up a lab test environment and have a dedicated production test group. While we can’t tell you which approach is best for your network, here are some recommendations when planning out your test group.
Test with local systems: It’s always a good idea to test with systems that are physically located nearby and easily accessible. If crap does ever hit the fan, you’ll thank yourself that your test machines are near and not located at a remote site.
Don’t let users know: Letting users know they are part of a test group could have a placebo effect resulting in those users blaming every computer issue they have on the most recent updates. If users don’t know they are part of a test group, their support requests will be more natural.
Let users know: “Wait… But you just said…” I know, I know. I’m contradicting myself. Here’s the thing, if you have a few users who are tech-savvy and know the difference between a random computer issue and one that might be related to the newest updates they received, they can be a valuable asset in the testing process.
Include systems that represent your overall environment: Make sure you select an assortment of devices that are a good representation of your network. If you support a mixture of operating systems, make sure you have the same mix in your test group. Include devices that encompass a majority, if not all, of the various applications you support. Also, include devices from varying groups and departments.
Know your limits: While you want to incorporate a wide range of systems, make sure you don’t include more than you can handle. You need to be able to respond quickly if things go south after a new update is released.
Don’t include critical systems: Don’t shoot yourself in the foot by including a machine in your test group that is mission-critical. Mission-critical systems should be the last to receive updates after the updates are thoroughly tested.
Don’t include users that can fire you: You know, just to be safe.
How To Configure Test Group Collections In PDQ Inventory
Once you’ve established which systems you want to include in your test group, you can use PDQ Inventory to group those devices into a static collection, allowing you to target these specific devices for deployments. Let’s go through the process of setting up a static collection for a test group.
If you don’t already have PDQ Inventory and PDQ Deploy and you want to follow along, we don’t want you to feel left out. You can download a free trial version and if you need help setting it up, check out these simple tutorials that will get you started: PDQ Inventory Setup, PDQ Deploy Setup.
To create a static collection in PDQ Inventory:
Click on the New Static Collection button
Name the collection something descriptive, like Test Group
Holding the CTRL key, select each computer you want to add to the collection
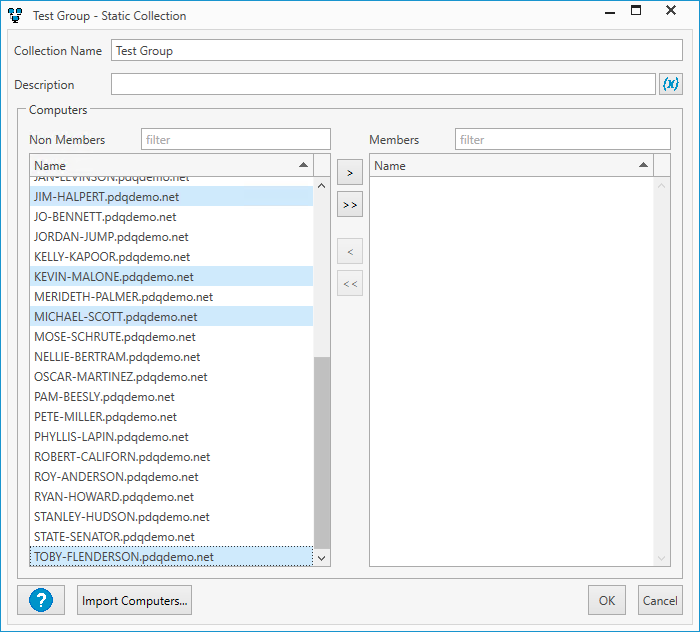
Click the arrow > button and click OK


You should see your newly created test group collection in the collection tree. You may want to consider making multiple test groups collections and grouping them buy OS versions or application needs. Remember, the goal is for your test group or groups to represent your overall environment.
Customizing Deployments For Test Groups
By default, PDQ Deploy is configured to automatically approve and download new auto download packages seven days after becoming available in the package library. You can configure this setting in PDQ Deploy by clicking Options > Preferences and clicking on Auto Download.

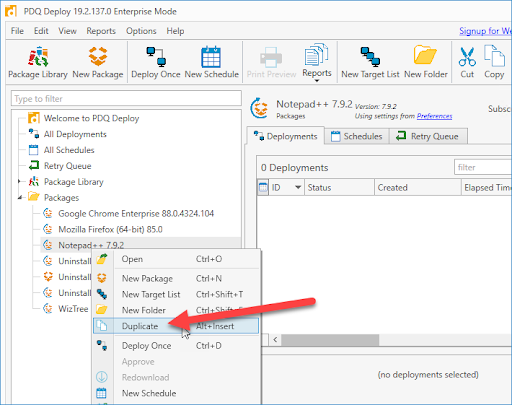
Seven days is sufficient in most cases; however, this is the test group we’re talking about. We want our test group to have a head start on the latest and greatest updates. We could change this setting to one day, but we don’t want to mess up our standard deployments. Instead, we can duplicate our existing auto download packages and configure the auto download settings on each package. I’ll use the Notepad++ auto download package for this example, but these steps will be the same for any auto download package.
With PDQ Deploy open, right-click on an auto-download package and click on Duplicate
Double-click on the duplicated package to open the package properties
Rename the package. I like to append (test) to the end of the package name

Click on the Options tab
Uncheck Auto Download Use Settings From Preferences
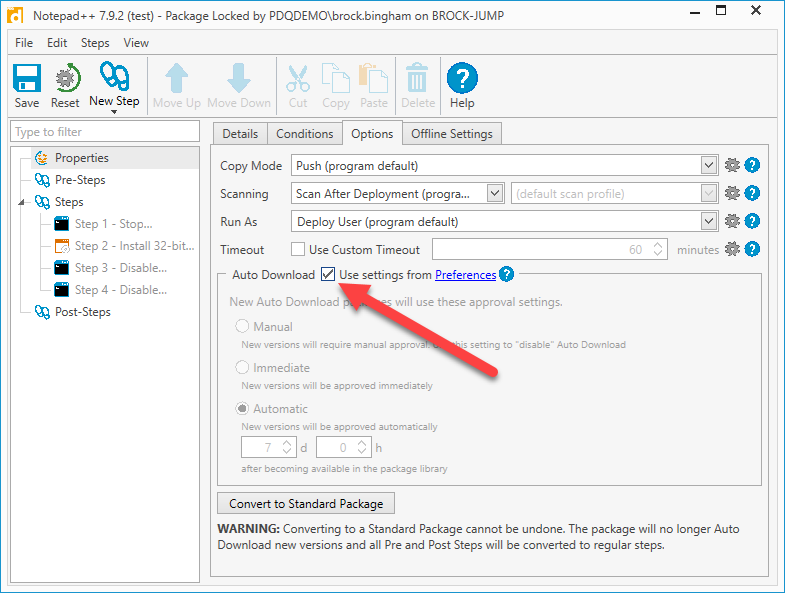
Select Immediate and click Save


This package will now be approved and downloaded immediately, giving our test group more time with the newest updates before they’re deployed to the standard groups.
Configuring Deployment Schedules For Test Groups
With the package set to an aggressive download schedule, it’s time to create an equally aggressive deployment schedule. Again, setting an aggressive schedule will ensure that the test groups have adequate time to assess the newest updates.
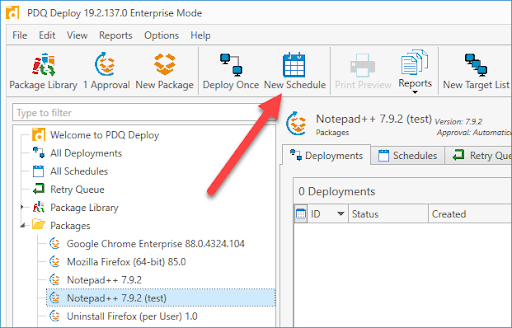
With the test deployment package selected, click on New Schedule
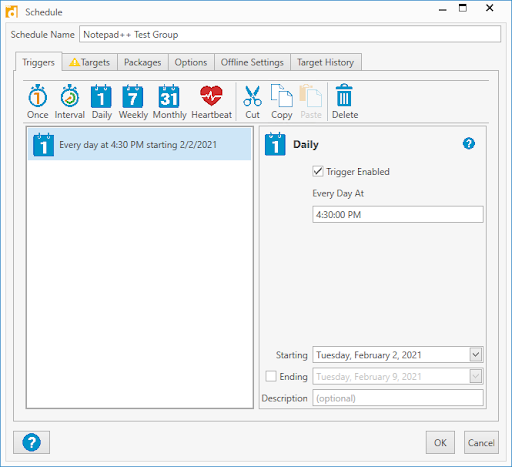
Give the schedule a name. If you are only deploying one package with this schedule, you can associate the package’s name with the schedule name. If you deploy multiple packages with the same schedule, you can name the schedule something generic like “Test Group Schedule” or something similar. I’ve called my schedule Notepad++ Test Group
Next setup the schedule triggers by clicking on the Triggers tab
Since we want an aggressive schedule, we will select the Daily trigger
Configure the time of day you want this schedule to run. You probably want to configure this to run during a time that won’t conflict too much with your user’s work schedule (unless you are a firm believer of full contact IT)
Next, click on the Targets tab
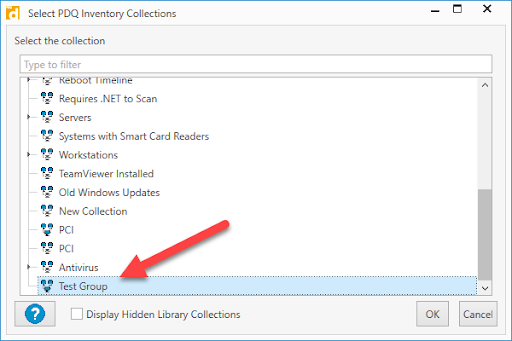
Click Choose Targets > PDQ Inventory > Collection
Select the Test Group collection and click OK
Click on the Packages and review which packages will be attached to this schedule. You can include more packages by clicking on the Attach Packages button
Click on the Options tab and make sure Stop deploying to targets once they succeed is selected. This setting will ensure that the package doesn’t continue deploying to the same machines repeatedly. Click OK to finalize the schedule


Congratulations! Your package and schedule is all set for your test group.
Stopping Schedules
Every once in a while, an update may not agree with your environment. In these cases, it’s best to pause the schedule to limit the impact on your network. The easiest way to do this is to click on the All Schedules option in PDQ Deploy, find the schedule you need to stop, right-click on it and select Disable.

Wrapping Up
The most crucial step of testing in your environment is the planning phase. Thoroughly planning out your testing methods will save you time, energy, and stress in the long run. The second most crucial step is using PDQ Deploy and PDQ Inventory to automate your test deployments. These days, updates are released more frequently than ever before, making it hard to keep up with. Let PDQ take care of that for you. Why work harder when you can work smarter?