


If you’re anything like me, you already think PDQ Inventory is pretty great. What’s not to love? It can collect all that sweet, sweet data from your workstations and organize it in a way that is easy to digest. It can uninstall applications remotely with just a few clicks. It can automatically generate reports for you, and since it’s not an AI, it won’t get mad when you take all the credit when your boss congratulates you on always having those reports done on time. It’s also been known as a really great way to diagnose DNS issues. So it may be hard to believe when I say this, but we can make PDQ Inventory even more powerful than it already is. “How,” you ask? With the help of custom tools.
PDQ Inventory Tools
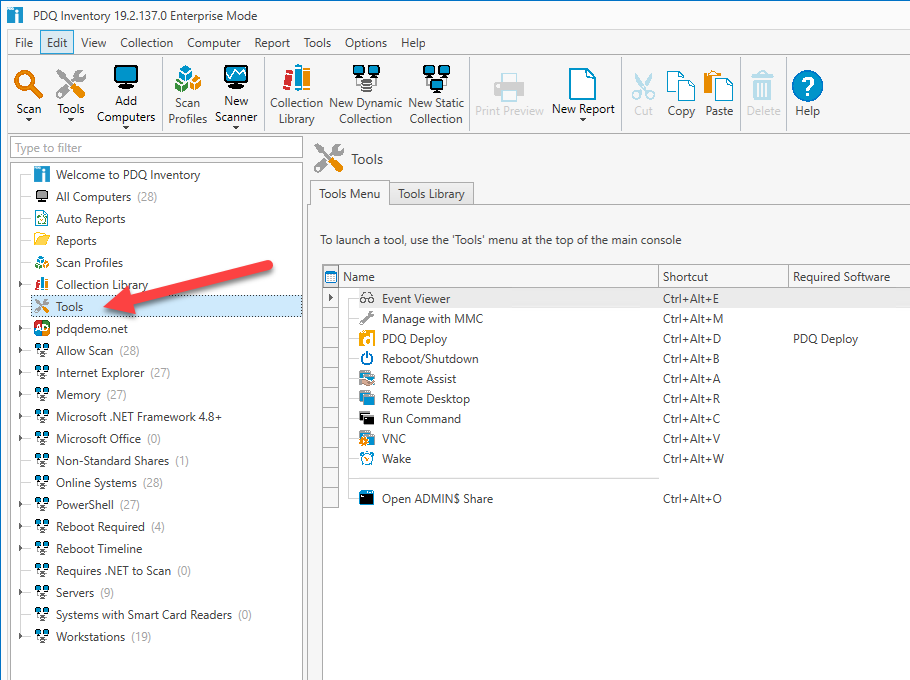
PDQ Inventory comes pre-packaged with a lot of useful tools. You can view this list by clicking on the Tools option in the menu tree on the left.
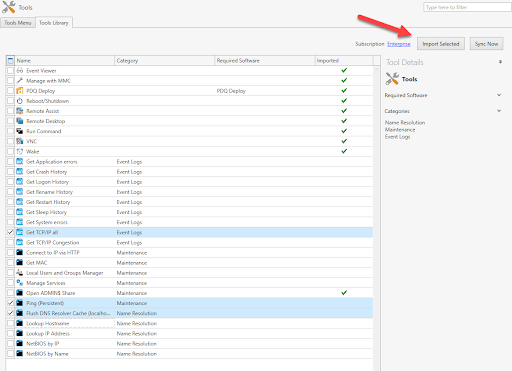
You can also check out the Tools Library tab for even more pre-built tools. Here, we’ve added several common management commands you can run remotely to your workstations. To make these tools available to use, select the tools you want to add and click Import Selected.
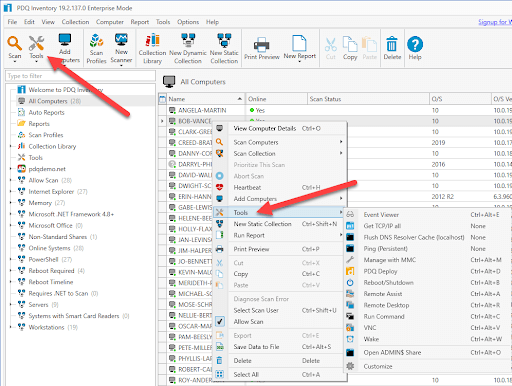
Once imported, you can run these tools just like any other built-in tool by selecting a workstation and clicking on the Tools menu located in the upper left corner of PDQ Inventory or by right-clicking on a workstation and selecting Tools in the context menu.
Creating custom tools
If you need tool “x” for problem “y” and don’t see it in the Tools Library, don’t lose hope. With the custom tool creator’s help, you can create robust tools to solve a wide range of rage-inducing tech problems.
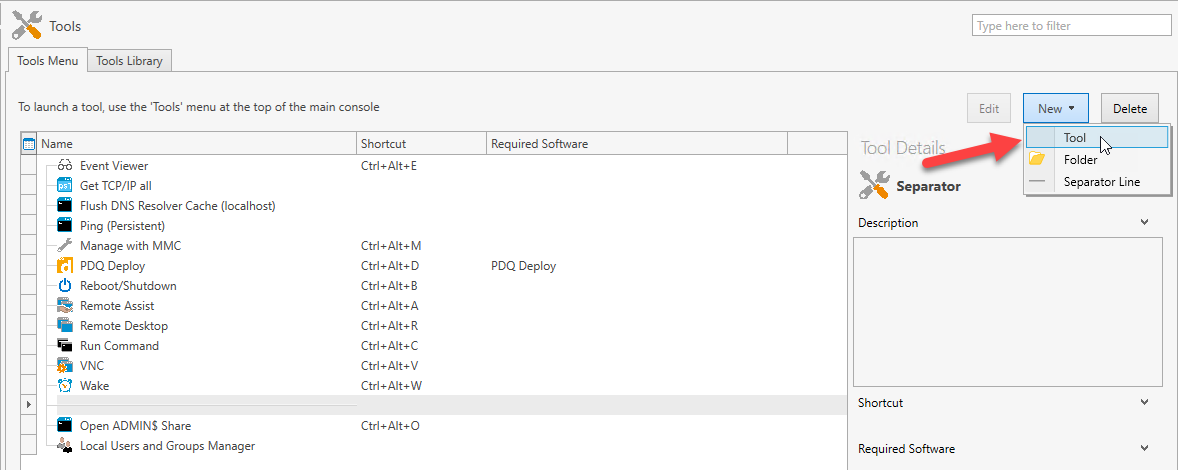
To create a new tool, click on the Tools option in the menu tree on the left, ensure the Tool Menu tab is selected, then click on New > Tool.
With the new tool edit window open, let’s go over the different fields and options we have.
Name: This one might be kind of obvious, but this is where you would put that super awesome name you’ve been mulling over for a week, like “Cool Tool!”
Run Type
Local: Local means the application or script will run locally from the console machine. Variables or UNC pathnames will allow the tool to run against target machines. For instance, you could launch explorer.exe locally and pass the parameter of a remote share to access. Example: explorer.exe “\\$(Computer:TARGETHOSTNAME)\ADMIN$”
System: The system run type is similar to local. The key difference is System is designed to only run locally on that system. A system tool can run without selecting a computer in PDQ Inventory because it’s only going to run locally.
Remote: Lastly, the Remote run type will execute scripts or executables remotely on a target machine.
Run As
Credentials User: Runs the tool on target computers using the credentials specified in the tool.
Credentials User (Interactive): Similar to Credential Users, however, the Windows process running the tool is run in interactive mode. This setting is applicable when the tool requires user input.
Local System: The tool runs using the local system account on the target computer.
Logged on User: Runs the tool in interactive mode as the logged on user of the target machine. Use this setting when the tool is per user or requires the logged on user’s input to succeed. Useful for modifying the HKEY-CURRENT-USER registry hive and accessing user-specific settings such as %APPDATA% or the logged on user’s User directory.
Command: This section is for the instructions of the tool. You can choose between Command (cmd) or PowerShell.
Shell
Tool Window - Capture Output: After launching the tool, the Run Command window is opened and captures the command’s output.
No Shell - Ignore Output: No shell is opened, and output is ignored.
Close Shell on Completion: The shell is displayed while the command runs and closes upon completion.
Leave Shell Open: The shell opens when the command runs and remains open upon completion.
Timeout: The time in seconds given for a command to run before the command automatically aborts. This option is only available for remote tools.
Success Codes: By default, 0 is selected, which means the command was successful. You can provide additional success codes in a comma-separated list.
Scan After
Do not scan: A scan will not be initiated after the tool runs.
Scan After: A scan profile can be selected to run after the tool runs. This will occur whether the tool was successful or not.
Credentials These are the credentials used to run the tool. The user must be a local administrator on the target machine.
Wake-on-LAN: Initiates a distributed Wake-on-LAN (WOL) event on all listed computers prior to running the remote command.
Icon: You can choose an icon to associate with the tool. If no icon is selected, the icon will default to the Command or PowerShell based on which shell type you’ve chosen.
Shortcut: The shortcut field allows you to assign a keyboard shortcut to launch the tool. No sysadmin is complete without a wide array of keyboard shortcuts. The shortcut takes the form of Modifier + Key and is created by selecting this field and then pressing the keys in the correct order. The valid modifiers are Shift, Ctrl, and Alt. The Shift key cannot be used by itself. (Example: Ctrl+Alt+T)
Custom tool Example 1: Retrieve GPResults from a remote machine
Let’s start with something easy. We’ll create a tool that will retrieve the GPO’s of a remote machine, specifically from the computer scope.
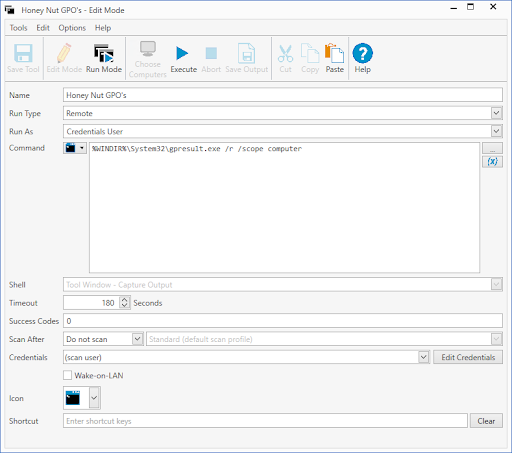
With the new tools window open, we’ll name our new tool. I like to be creative with my tool names. For this example, I’ve named my tool Honey Nut GPO’s.
Select Remote as the Run Type. This will launch the command from the remote machine.
For credentials, select Credentials User.
Select Command as your shell type.
Input the following command into your command window: %WINDIR%\System32\gpresult.exe /r /scope computer
I’ve kept the rest of the settings as default. Feel free to configure the rest of the settings to your needs.
Click Save Tool, and your new tool is ready to use. Here’s my custom tool window for reference.
To test our tool, select a workstation in PDQ Inventory and run it as you would any other tool. Alternatively, if you still have the edit tool window open, you can click on Run Mode and then click Choose Computers to add some computers to run the tool against. After you’ve added some computers to the list, click Execute. After the tool runs, you can click on each computer in the list to see the results. You can also highlight all the computer and view all the results in one list.
Custom Tool Example 2: Scan Disk Usage Of A Remote Machine With WinDirStat
For our second custom tool example, we’ll add a little more complexity. This tool will require a third-party application called WinDirStat that can analyze disk usage. If you have PDQ Deploy, we have a pre-built WinDirStat package you can download from the package library.
Open up a new tool window.
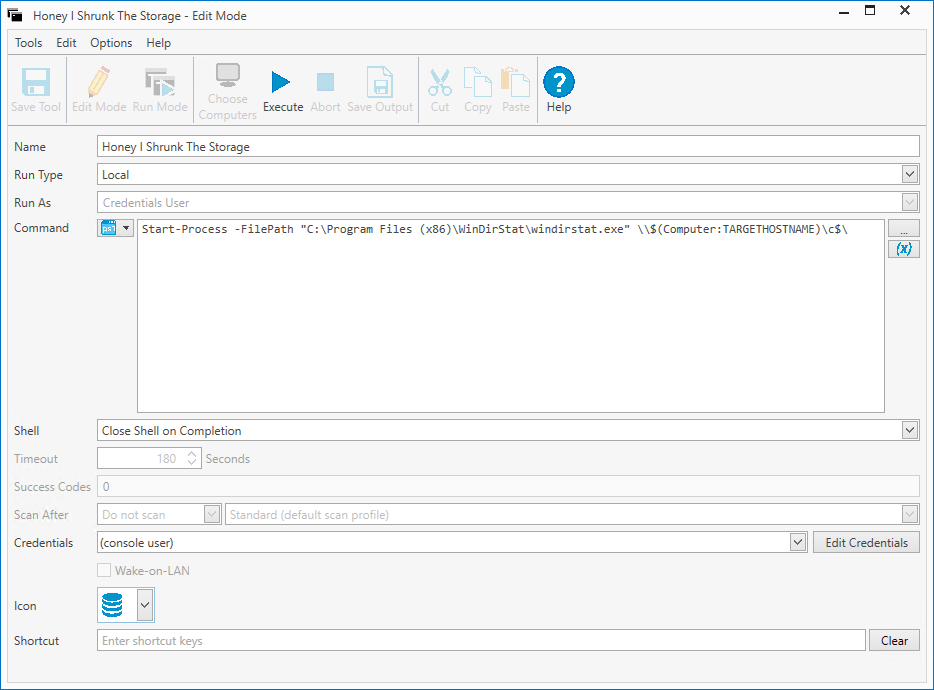
Name the new tool. Remember, really flex those imagination muscles. I’ve used one of my favorite childhood movies as a reference and came up with Honey I Shrunk The Storage. I doubt Rick Moranis will mind if we use this for our tool’s name.
Next, we want to select Local as the run type because we will be running the application locally from the console machine, then we will pass it a hostname variable to scan a remote machine.
Select PowerShell as the command.
Input the following command into your command window: Start-Process -FilePath "C:\Program Files (x86)\WinDirStat\windirstat.exe" \\$(Computer:TARGETHOSTNAME)\c$\
Select Close Shell on Completion
I’ve changed my icon to the disk icon, but you can keep the rest of the settings as default.
Click Save Tool and then test the tool as you did in the previous example. Here is a screenshot of my new custom tool.
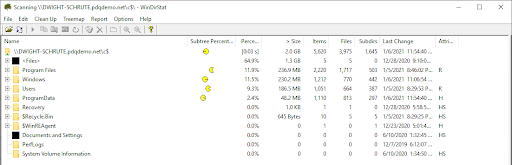
If all goes well, you should see WinDirStat open up, and at the top of the window, it will show which computer it is scanning.
Custom tool example 3: Launch a TeamViewer session from PDQ Inventory
For our last example, let’s create something a little more advanced. This tool will utilize TeamViewer to initiate a remote session. Since TeamViewer uses client IDs to connect, we’ll first need to create a Scan Profile to populate that information into the PDQ Inventory database. It’s important to note that TeamViewer will first need to be launched on the client computer to populate an ID value in its registry.
In PDQ Inventory click on Options > New Scanner > Registry
Make sure HKEY_LOCAL_MACHINE is set for the hive and add these patterns: SOFTWARE\WOW6432Node\TeamViewer\ClientID SOFTWARE\TeamViewer\ClientID
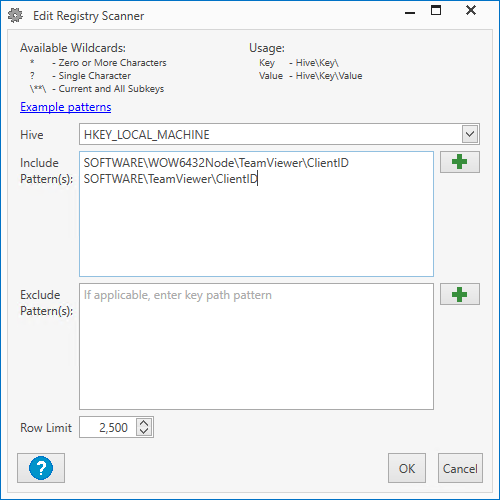
Name your new Scan Profile, then click OK. I’ve named mine TeamViewerID.
You can click the Triggers tab to set the scanner to run on a schedule, or you can add these registry settings to the Standard scanner instead of making a new scanner, which will automatically scan every seven days.
Run the scan against your computers. If you want to scan all computers, right-click on All Computer and select Scan Collection > TeamViewerID (Your New Scan Profile)

After the scan runs, the TeamViewer client IDs will be stored in the PDQ Inventory database. Now, let’s create our custom tool to query the database and automatically populate the client IDs into our TeamViewer Session.
1. Start by opening up a new tool window.
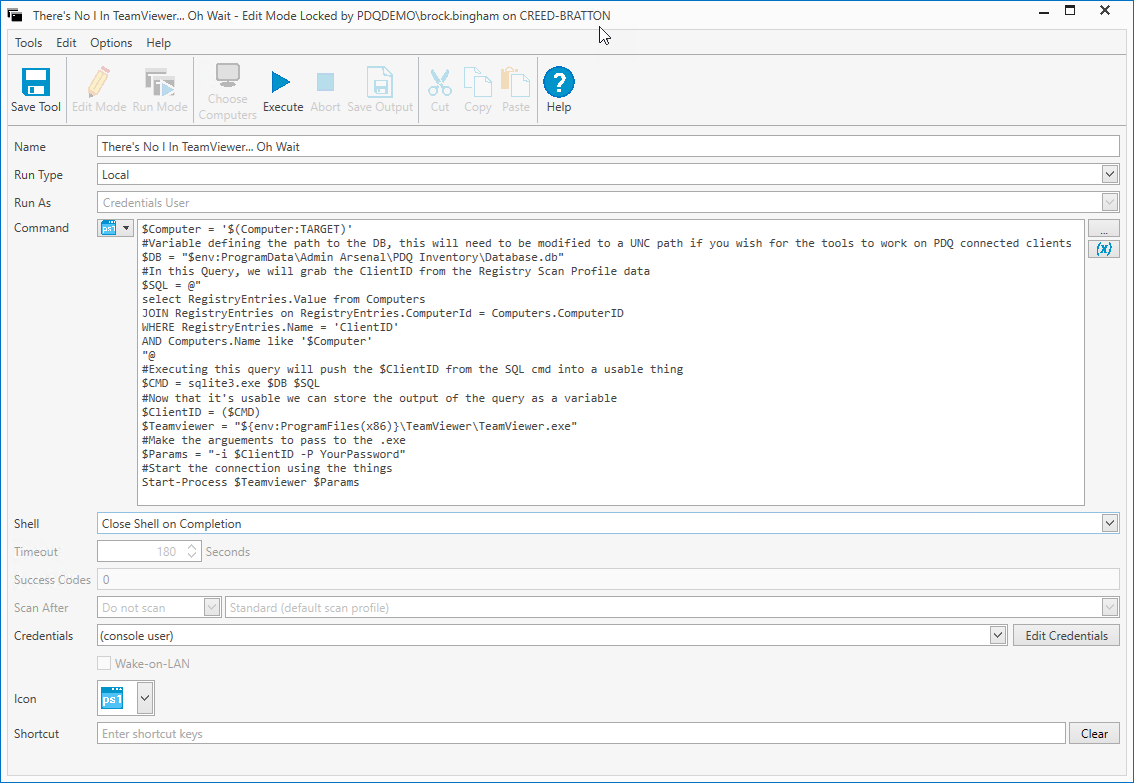
2. Name your tool. I’ve gone with There’s No I In TeamViewer… Oh Wait
3. For the run type, select Local.
4. Select PowerShell for our command
5. Here’s the PowerShell we’ll use for this tool:
$Computer = '$(Computer:TARGET)'
#Variable defining the path to the DB, this will need to be modified to a UNC path if you wish for the tools to work on PDQ connected clients
$DB = "$env:ProgramData\Admin Arsenal\PDQ Inventory\Database.db"
#In this Query, we will grab the ClientID from the Registry Scan Profile data
$SQL = @"
select RegistryEntries.Value from Computers
JOIN RegistryEntries on RegistryEntries.ComputerId = Computers.ComputerID
WHERE RegistryEntries.Name = 'ClientID'
AND Computers.Name like '$Computer'
"@
#Executing this query will push the $ClientID from the SQL cmd into a usable thing
$CMD = sqlite3.exe $DB $SQL
#Now that it's usable we can store the output of the query as a variable
$ClientID = ($CMD)
$Teamviewer = "${env:ProgramFiles(x86)}\TeamViewer\TeamViewer.exe"
#Make the arguments to pass to the .exe
$Params = "-i $ClientID -P YourPassword"
#Start the connection using the things
Start-Process $Teamviewer $Params
6. You’ll need to change YourPassword to whatever password you use to connect to your TeamViewer clients.
7. Your finished tool should look like this:
8. Click Save Tool
9. Before we run the tool to make sure it’s working, you’ll need to launch TeamViewer on the workstation you want to connect to. TeamViewer has to be running on the end-user machine in order to connect to it.
10. Once you’ve got TeamViewer running on a workstation, right-click on that workstation in PDQ Inventory and click Tools > There’s No I In TeamViewer… Oh Wait (Your TeamViewer Tool)
TeamViewer should now automatically launch and connect you to the remote computer. Isn’t that fancy? Now for a word of caution. It’s not recommended to store plain text passwords in your scripts. We’ve covered this topic extensively in our 2 part blog series, Secure Password with PowerShell: Encrypting Credentials – Part 1 and Secure Password with PowerShell: Encrypting Credentials – Part 2. This series will teach you all about encrypting your credentials using PowerShell and is definitely worth a read.
Conclusion
PDQ Inventory comes equipped with several tools right out of the box. However, every network environment is different, and each has its own unique challenges and needs. By utilizing custom tools in PDQ Inventory, you can simplify many of your administrative tasks and keep all of your commonly used commands and applications easily accessible in one place. Try it out for yourself with a 14-day free trial and discover how much you can accomplish with PDQ Inventory.