


Ever wonder what all that data traveling back and forth across the internet looks like? Or how about that email titled "Re: Re: Fwd: Fwd: Re: Fwd: Fwd: Fwd: Funny cat video!" actually getting from your dad's computer at The Villages in Florida, all the way to your smartphone's spam folder? Well, you're in luck. In today's "PowerShell Equivalent" blog post, we're covering a network utility that allows you to trace all that precious data as it travels the interwebs.
What Is tracert?
Tracert (pronounced trace route) is a very popular command-line utility for network and system administrators. Tracert traces the path of network packets as they travel across the internet to their destination. Each intermediate router encountered by these packets on their way to the destination is called a hop. Each hop is recorded and reported back to the console, allowing you to see the entire path the packets traveled to get to their destination.
I like to compare tracert to following the tracking information given to you by a courier after ordering a super sweet three wolf moon t-shirt online. The tracking record is updated each time that precious cargo reaches a new courier facility on its way to your doorstep. With this tracking information, you can follow the path your package took to get to your house from the point of origin. Tracert works similarly, just with network packets instead of t-shirts with three wolves howling at the moon, or 5lb bags of porcelain punishing gummy bears.
Using tracert
Tracert is very easy to use, but it can be a bit difficult to read the results. So let's take a look at an example and break it down. To use tracert, simply open up either Command Prompt or PowerShell and type in the command tracert followed by a hostname or destination IP address.
tracert <hostname/ip address>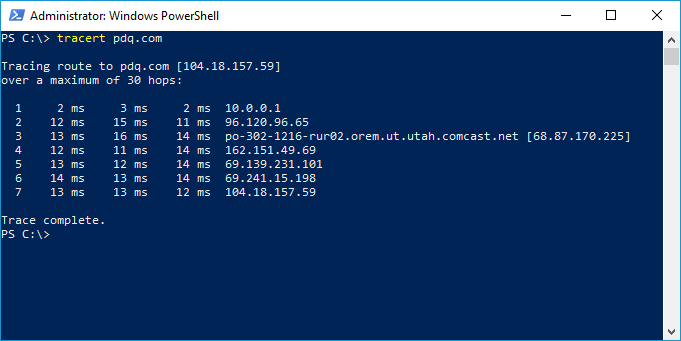
As you can see, I've done a tracert to PDQ.com. The first column is the hop count. This route took seven hops. The second, third, and fourth columns are the RTT or round trip times it took for the packets to reach the router and then return. Tracert sends out three packets which is why there are three columns. The RTT is recorded in milliseconds (ms). The last column is the IP address of the router encountered on the route.
If you encounter unusually high return times, such as several hundred milliseconds, that may indicate an issue with the route, such as an improperly configured or malfunctioning router.
Now let's look at the PowerShell equivalent of tracert.
The PowerShell Equivalent Of tracert Is Test-NetConnection -TraceRoute
NAME
    Test-NetConnection

SYNTAX
    Test-NetConnection [[-ComputerName] <string>] [-TraceRoute] [-Hops <int>] [-InformationLevel {Quiet |
    Detailed}]  [<CommonParameters>]

    Test-NetConnection [[-ComputerName] <string>] [-CommonTCPPort] {HTTP | RDP | SMB | WINRM}
    [-InformationLevel {Quiet | Detailed}]  [<CommonParameters>]

    Test-NetConnection [[-ComputerName] <string>] -Port <int> [-InformationLevel {Quiet | Detailed}]
    [<CommonParameters>]

    Test-NetConnection [[-ComputerName] <string>] -DiagnoseRouting [-ConstrainSourceAddress <string>]
    [-ConstrainInterface <uint32>] [-InformationLevel {Quiet | Detailed}]  [<CommonParameters>]


ALIASES
    TNC


REMARKS
    Get-Help cannot find the Help files for this cmdlet on this computer. It is displaying only partial help.
        -- To download and install Help files for the module that includes this cmdlet, use Update-Help.
You'll notice that this one is a bit different than some of the other commands I've covered in the past. That's because this command actually includes a switch with the base command. The base command Test-NetConnection displays diagnostic information for a connection. You'll need to include the -TraceRoute switch in order to perform the route tracing.
Let's take a look at a couple of examples.
Test-NetConnection -TraceRoute example 1
Test-NetConnection -TraceRoute "destination"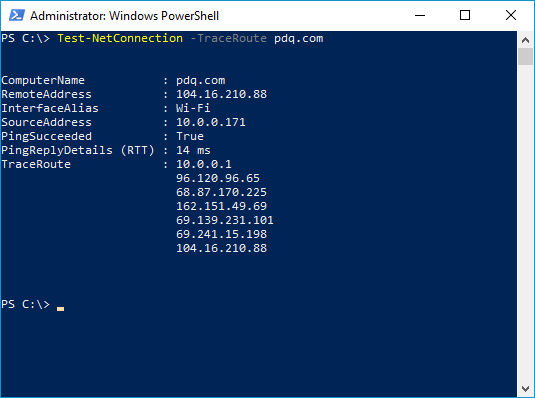
This example is the standard PowerShell route tracing command. In the screenshot, you can see the various routers the packets pinged on the way to the destination address of 104.16.210.88. You'll notice that, unlike the tracert command, this command doesn't include the RTT, which is unfortunate. There are some pretty complex methods to return the RTT of each hop, but I feel like this data should be returned by default.
When you run this command, you'll also notice a status bar the appears briefly while the route is being traced.
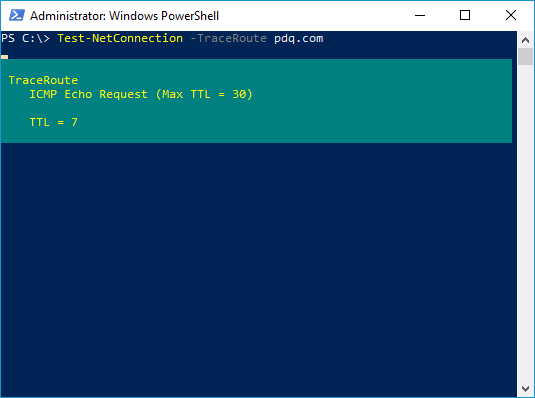
This status bar gives you a little more insight into the details of the route trace.
ICMP Echo Request is the type of request being sent. ICMP stands for Internet Control Message Protocol, and these types of messages are primarily used for diagnostic purposes.
Max TTL = 30 is the max time to live for the packets being sent. In other words, it's the maximum number of hops a route will take to try to reach the destination. If the route doesn't finish before the max TTL is reached, the route trace will fail. The TTL on a packet starts with an initial value of 1. Then, each hop or each time a packet hits a router, the TTL value will increase by 1. The default TTL is 30. The TTL is included by default to keep route traces from being stuck in an infinite loop if it encounters improperly configured routers which could be detrimental to routing performance.
TTL = 7 is the time to live number reached or the number of hops before the destination was reached.
Test-NetConnection -TraceRoute example 2
Test-NetConnection -TraceRoute "destination" -Hops "int" -InformationLevel Detailed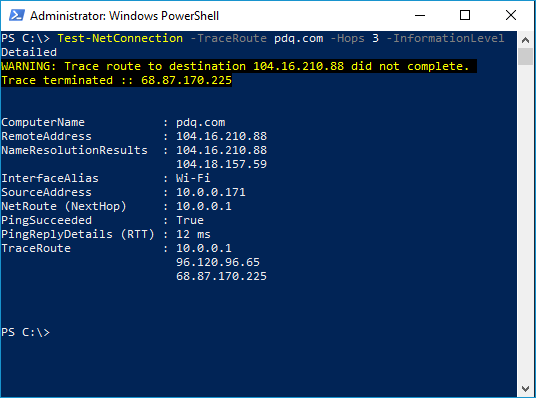
In this example, you'll notice that I added a couple of additional switches. The -Hops switch allows users to set the maximum number of hops or TTL for the trace route. In the example above, I set my maximum number of hops to three, which, as you can see, caused my trace route to fail because it needed more hops to reach the destination. The -InformationLevel Detailed switch returns additional information about the trace route.
Test-NetConnection -TraceRoute example 3
$List = "google.com","pdq.com","yahoo.com"

$output = ForEach ($Destination in $List){
    Test-NetConnection -ComputerName $Destination -TraceRoute
    }
$output | Out-File -FilePath "C:\Logs\trace_route.txt"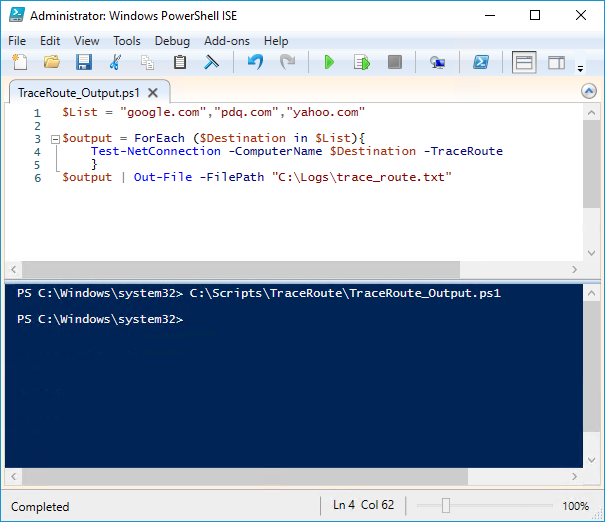
In this example, we are running the traceroute command against multiple destinations and exporting the results to a log file. First, we assign multiple destinations to the $List variable. Next, we use a ForEach loop to run the traceroute command against each destination in the $List variable and then assign the results of each loop to the $output variable. Lastly, we use the Out-File command to send the results contained in the $output variable to a text file.
Wrapping up
This is a tough one. On the one hand, I love PowerShell (don't let my skill reflect my love). On the other hand, I honestly prefer the output provided by the standard tracert command more than I do the PowerShell command. Usually, I'd say use the PowerShell command, no questions asked, but PowerShell doesn't currently provide the RTT (round trip time) of each hop, which is one of the more valuable bits of information returned by tracert. Hopefully, with time, the RTT will be provided by default with the PowerShell command. With that said, if you need something specific that only PowerShell can do, use PowerShell. If, however, you need that RTT information, use tracert.
Looking for other helpful network and system administrator tools? Check out PDQ Deploy and PDQ Inventory and PDQ Connect. Make manual patching a thing of the past. With dynamic collections, auto download packages, and automated deployments, your environment will be up to date and secure, and you won't have to lift a finger to do it. Download a free 14-day trial of our products to discover how we can help alleviate the stress of keeping your computers up to date.