

If you’re a privacy-minded individual, disabling Windows telemetry should be near the top of your to-do list. While there’s probably no guaranteed way to disable data collection completely outside of disconnecting from the internet, you can significantly reduce what gets sent to Microsoft.
Join me as I highlight several different methods to disable Windows telemetry. I’ll try my best not to spend the entire time criticizing Microsoft. Now excuse me while I scream into this pillow …
Some of these methods are geared towards personal users and some are geared towards business environments. Use the section navigation menu on the left to quickly navigate to the method you’re looking for.
What is Windows telemetry?
Windows telemetry collects system information like diagnostic, configuration, usage, and crash data. Microsoft claims the primary goal of Windows telemetry is to “improve your Windows experience and fix problems more quickly.”
While that sounds like an admirable cause, nothing says “personal computer” like sending your data off to one of the world’s largest companies.
How to disable Windows telemetry in the Settings menu
Disabling Windows telemetry in the Settings menu is probably the easiest way to get the job done. But it’s also a very manual process, meaning this method is geared more towards personal use cases and not for people managing hundreds of computers — unless you’re really bored and looking for something to do. In which case, this is the method for you! (Side note: Does anyone feel like they can’t deliberately use em dashes anymore because of AI?)
In Windows 11, right-click the Start button, then click Settings.

Click Privacy & security > Diagnostics & feedback.
Turn off Send optional diagnostic data.
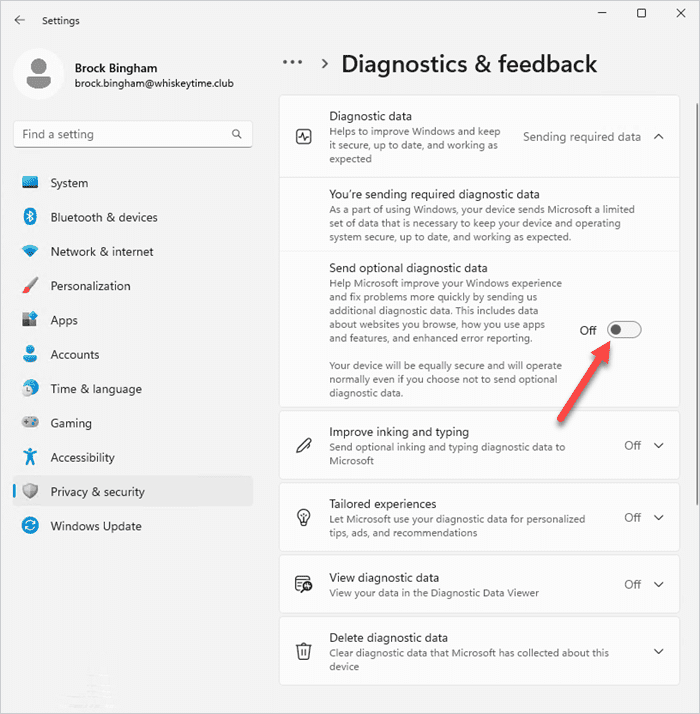


The optional diagnostic data setting is probably the most intrusive data collection setting that people should ensure is disabled. However, while you’re in the Settings menu, there are several other settings to consider disabling if you prioritize privacy:
Privacy & security > General
Let apps show me personalized ads by using my advertising ID
Let websites show me locally relevant content by accessing my language list
Let Windows improve start and search results by tracking app launches
Show me suggested content in the Settings app
Privacy & security > Speech
Online speech recognition
Privacy & security > Inking & typing personalization
Custom inking and typing dictionary
Privacy & security > Diagnostics & feedback
Send optional diagnostic data (covered above)
Improve inking and typing
Tailored experiences
In the Diagnostics & feedback menu, you’ll also find a setting to delete your diagnostic data which, you know, you should take advantage of since you’re reading this post.
How to disable diagnostic data using the Windows registry
If you’ve worked on Windows devices long enough, you’ll know that modifying the Windows registry is almost always an alternative solution to a problem. You’ll also know that modifying the registry can be a bit dangerous if you don’t know what you’re doing. While adjusting your telemetry settings via the registry should be relatively safe, it’s always good to trial changes on a test computer and back up the registry if you have any doubts.
With that ominous warning out of the way, here’s how to disable Windows 11 telemetry by modifying the Windows registry.
In the Windows search bar, type registry editor.
Select the Registry Editor app, then click Yes on the User Account Control warning dialog box.
Navigate to HKEY_LOCAL_MACHINE\SOFTWARE\Policies\Microsoft\Windows\DataCollection
Double-click AllowTelemetry and set the value data to 0.
If you don’t see the AllowTelemetry value, right-click on an open space in the right pane, then click New>DWORD (32-bit) Value.
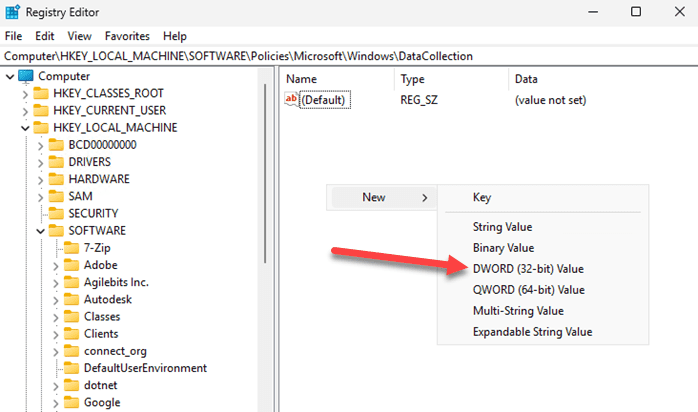
Name the new value AllowTelemetry.
Double-click on the AllowTelemetry value you just created, and set it to 0.
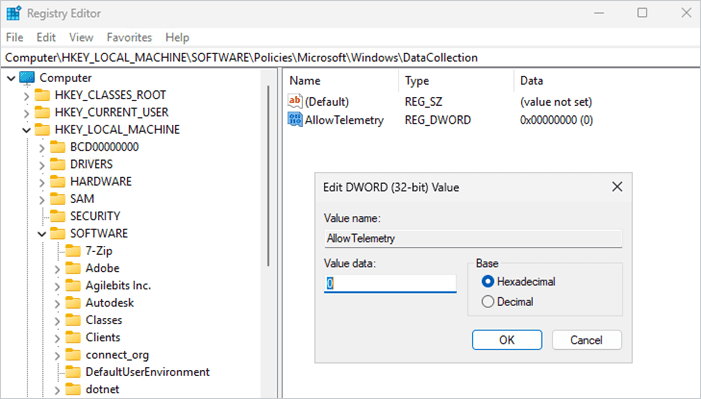


This Windows registry change effectively turns off and grays out the optional diagnostic data option.

How to disable Windows telemetry with third-party utilities
There are several third-party utilities for customizing your Windows 10 and Windows 11 experience. Many of them also include options to easily disable Windows telemetry. While there are tons of different apps and scripts to choose from, I figured I’d quickly highlight a couple of the more recommended solutions available.
A word of caution: While many third-party options come highly recommended, there is an inherent risk of modifying system settings outside of Microsoft’s approved methods. Forcing system changes that could disable or remove core OS components could have unforeseen and potentially undesirable consequences.
Disable Windows telemetry with Winaero tweaker
Download Winaero Tweaker.
Extract the downloaded zip files, then run the setup.exe file.
Once it’s installed, launch Winaero Tweaker.
Under the Privacy section, click Disable Telemetry.
Select Disable Telemetry and Data Collection.
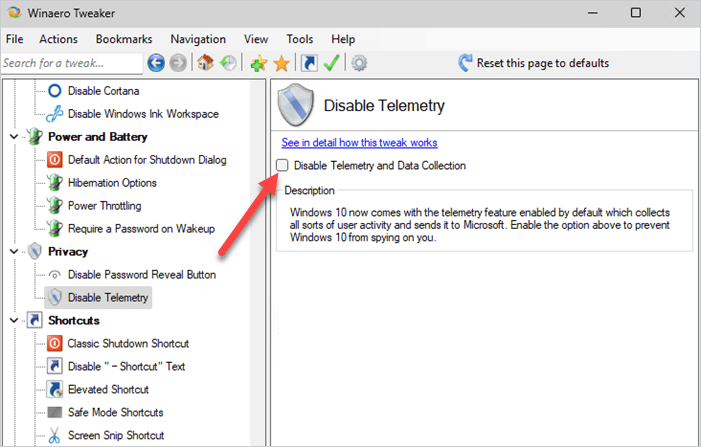

This tool essentially sets the same registry value that we covered in the previous section.
Disable Windows telemetry with O&O ShutUp10++
Download O&OShutUp10++.
Run the downloaded executable.
Click Yes if a User Account Control message pops up.

At this point, the world, or at least your PC, is your oyster. Inside O&O ShutUp10++, you’ll find a load of customization options that let you modify things like data collection, notification settings, Copilot, Windows Explorer, Ads, Edge, and many more. However, you’ll also receive a warning that you should create a system restore point before making any changes, which I also encourage, especially if you modify any settings that aren’t recommended.
How to disable Windows telemetry with Group Policy
Group Policy is a great way to manage your Windows telemetry settings, especially if you’re dealing with a lot of managed devices.
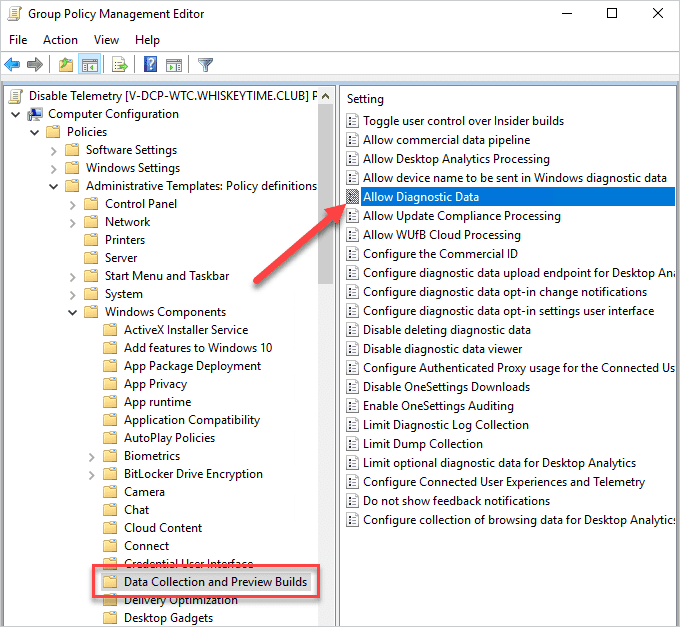
Open your Local Group Policy Editor or Group Policy Management Editor.
Navigate to Computer Configuration > Administrative Templates > Windows Components > Data Collection and Preview Builds.
Double-click Allow Diagnostic Data.
Select Enabled.
Set Diagnostic data off (not recommended) or Send required diagnostic data.
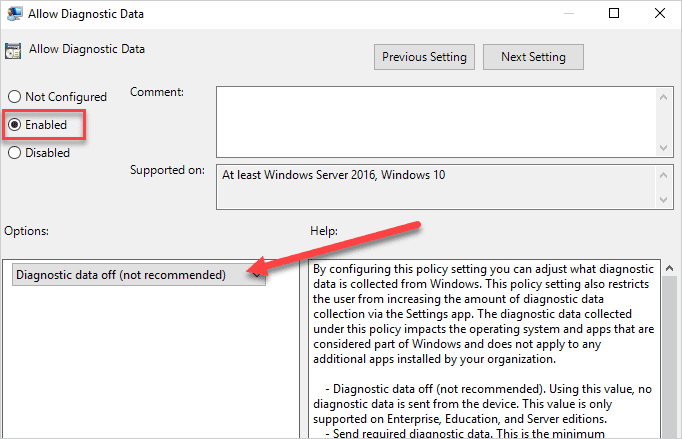


Keep in mind that setting diagnostic data to off is only supported on Windows Enterprise, Education, and Server editions. The minimum diagnostic data that you can send with Windows Pro is disabling optional diagnostic data and only sending required data.
How to disable Windows telemetry PDQ Connect
You can disable Windows telemetry remotely by deploying a PowerShell script with a tool like PDQ Connect. It’s an efficient way to manage those remote devices. Here’s how:

Centralize your endpoint management
With PDQ Connect, gain real-time visibility, deploy software, remediate vulnerabilities, schedule reports, automate maintenance tasks, and access remote devices from one easy-to-use platform.
In PDQ Connect, click on Packages, then click Create package.
Name the package, then add a Script step.
Make sure the type is set to PowerShell, then add this script to the terminal window:
$path = "HKLM:\SOFTWARE\Policies\Microsoft\Windows\DataCollection"
$name = "AllowTelemetry"
# Create Registry Key if it doesn't exist
If (-not(Test-Path $path)) {
New-Item -Path $path -Force
}
# Create Registry Value
New-ItemProperty -Path $path -Name $name -Value 0 -PropertyType DWORD -Force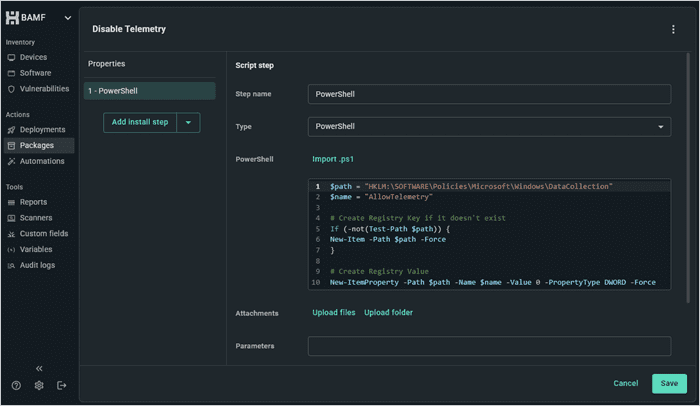
When you’re finished, click Save.

This script essentially checks to make sure the registry key exists. If it doesn’t, it creates it, then it creates the AllowTelemetry value and sets it to 0.
When you’re ready to deploy the package to your managed devices simply select the package, then click Deploy. Add your devices or groups that you want to target, then click Deploy.
Centralize your endpoint management
With PDQ Connect, gain real-time visibility, deploy software, remediate vulnerabilities, schedule reports, automate maintenance tasks, and access remote devices from one easy-to-use platform.
But wait, there’s more…
Windows has a bad habit of reenabling certain settings after Windows updates get applied. Usually this only occurs after a feature update, but it’s something to keep on your radar if you are determined to keep settings like telemetry disabled.


