

An in-place Windows upgrade lets you quickly move to a newer version of Windows without losing your files, apps, or settings. In fact, Windows in-place upgrades are so fast you’ll almost have time to catch up on your documentation … almost.
In this article, we’ll go over several different ways to perform an in-place Windows upgrade — from automatic methods to a few that require a touch of manual intervention.
Do in-place Windows upgrades happen automatically?
Windows 11 rolls out automatically to supported systems through Windows Update. If you're in no rush and your machine is compatible, this is your low-effort option. Just sit back, grab your favorite energy drink, and let Windows do its thing — eventually.
Windows 11 minimum hardware requirements
Here’s a quick overview of Windows 11 minimum hardware requirements.
Processor: 1GHz or faster with two or more cores on a compatible 64-bit processor
RAM: 4 GB or more
Storage: 64 GB or larger storage device
System firmware: UEFI, Secure Boot capable
TPM: Trusted Platform Module (TPM) version 2.0
Graphics card: DirectX 12 compatible graphics / WDDM 2.x
Display: >9” with HD resolution (720p)
To check your system's compatibility, you can run Microsoft's PC Health Check app.
How to force an in-place upgrade manually
If you don’t want to wait for Windows Update to roll out Windows 11 on its own schedule, you can force an in-place upgrade manually using official Microsoft tools. This lets you take full control over how and when the upgrade happens, leaving you plenty of time to continue to neglect your documentation and rewiring that network closet.
Navigate to Microsoft's Windows 11 download page.
Click Download Now under Windows 11 Installation Assistant.
Run the downloaded Installation Assistant executable.
Follow the on-screen prompts to begin the upgrade process.
Wait for the tool to validate your system’s compatibility.
If compatible, allow the upgrade to proceed automatically.
Let your PC reboot as needed during the upgrade process.
After installation completes, confirm your files, apps, and settings are intact.
If you'd rather use an ISO:
On the same download page, scroll to Download Windows 11 Disk Image (ISO).
Select your language and confirm to start the ISO download.
Once downloaded, right-click the ISO file and click Mount.
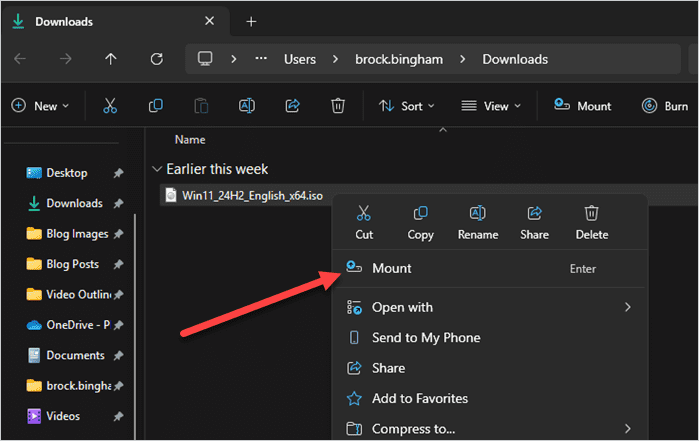
Open the mounted drive and run setup.exe.
Follow the upgrade wizard to complete the installation.

How to perform an in-place Windows upgrade with PDQ Connect
PDQ Connect makes it easy to roll out in-place Windows upgrades across your environment. It gives you full control over the process, lets you deploy upgrades to multiple targets at once, and supports both local and remote devices. If you’ve procrastinated the jump from Windows 10 to 11, PDQ Connect can help you get it done before Windows 10 goes to that big recycle bin in the sky.
Major props to our Discord community legends for working through the details and making this process smoother for everyone. Dive into the full community KB post for extra guidance, tips, and caveats.
And if you haven't already, join PDQ's Discord server which has thousands of active sysadmin community members. You'll find tons of general IT discussions, product focused help, an active PowerShell community, and the occasional Microsoft rant/ support group.
Identify Windows 11 compatible devices
Before upgrading to Windows 11 with PDQ Connect, you’ll first need to identify which computers are compatible. If you’ve already configured this process, you can skip to the next section where we create the Windows upgrade packages.
Start by creating and deploying a PowerShell package that runs the necessary hardware check and sets a registry key indicating whether each device is compatible or not.
Next, create a Registry Scanner in PDQ Connect to read the value of the registry key across your devices.
Finally, after you create and run the scanner against your devices, you can build dynamic groups to separate compatible and noncompatible devices.
Check out the KB article, which covers this entire process in detail, including the compatibility checker PowerShell script.
Create a custom Windows upgrade package in PDQ Connect
There are a couple of different ways we can create a Windows upgrade package in PDQ Connect. The main difference is whether we want to push the ISO file to the target using PDQ Connect or have the target download the upgrade files directly from Microsoft. There’s not really a right or wrong answer here, so the choice is totally up to you.

Centralize your endpoint management
With PDQ Connect, gain real-time visibility, deploy software, remediate vulnerabilities, schedule reports, automate maintenance tasks, and access remote devices from one easy-to-use platform.
Option 1: Push the ISO file with PDQ Connect
Download the Windows 11 ISO from the Windows 11 download page.
In PDQ Connect, click the Packages tab, then click Create package.
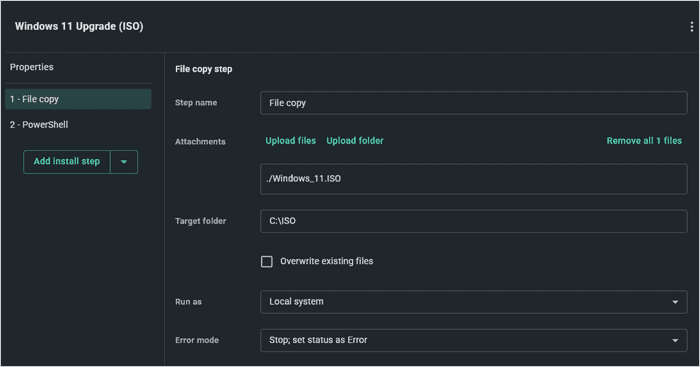
Name the package, then click the down arrow next to Add install step, and click Add file copy step.
Attach the Windows 11 ISO file, then set the target folder to C:\ISO.
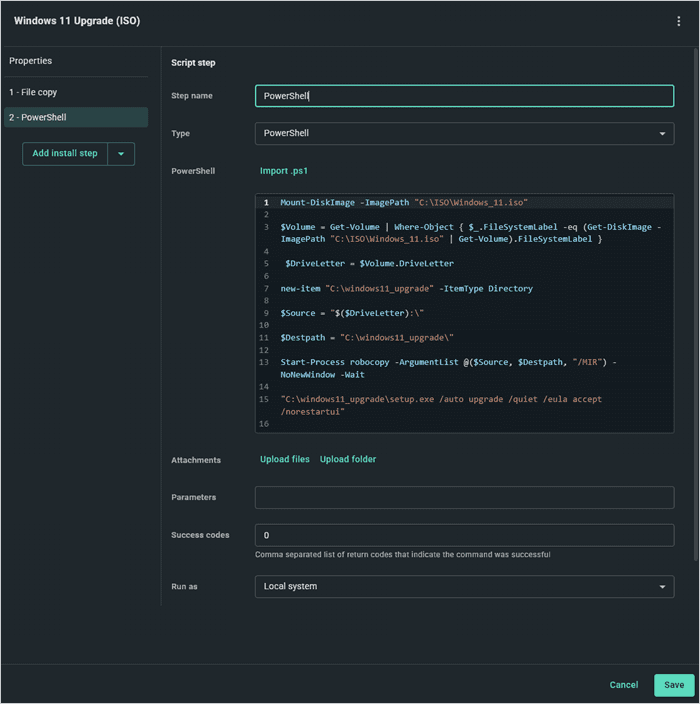
Add a script step to the package.
Set the script type to PowerShell.
Add this script:
Mount-DiskImage -ImagePath "C:\ISO\Windows_11.iso"

$Volume = Get-Volume | Where-Object { $_.FileSystemLabel -eq (Get-DiskImage -ImagePath "C:\ISO\Windows_11.iso" | Get-Volume).FileSystemLabel }

 $DriveLetter = $Volume.DriveLetter

new-item "C:\windows11_upgrade" -ItemType Directory

$Source = "$($DriveLetter):\"

$Destpath = "C:\windows11_upgrade\"

Start-Process robocopy -ArgumentList @($Source, $Destpath, "/MIR") -NoNewWindow -Wait

"C:\windows11_upgrade\setup.exe /auto upgrade /quiet /eula accept /norestartui"
Customize the setup.exe arguments to meet your needs. As is, this script runs the upgrade silently and restarts the machine with only a brief user prompt.
Click Save to finish creating the package.


At this point the package is ready to deploy to your Windows 11 compatible devices.
Option 2: Download the files directly from Microsoft
In PDQ Connect, click the Packages tab, then click Create package.
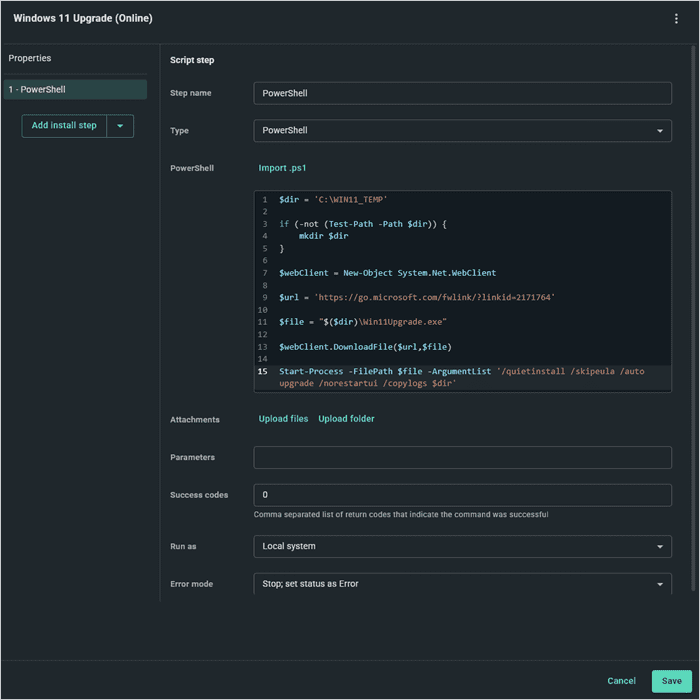
Click the down arrow next to Add install step, and click Add script step.
Set the script type to PowerShell.
Attach this PowerShell script:
$dir = 'C:\WIN11_TEMP'

if (-not (Test-Path -Path $dir)) {
    mkdir $dir
}

$webClient = New-Object System.Net.WebClient

$url = 'https://go.microsoft.com/fwlink/?linkid=2171764'

$file = "$($dir)\Win11Upgrade.exe"

$webClient.DownloadFile($url,$file)

Start-Process -FilePath $file -ArgumentList '/quietinstall /skipeula /auto upgrade /copylogs $dir /noreboot'
Customize the Start-Process arguments to meet your needs. As is, this script skips the EULA, runs the upgrade silently, and doesn’t reboot the device.
Click Save to finish creating the package.

Again, both packages get the job done. It’s just a matter of if you want to push over the ISO with PDQ Connect or download the files directly from Microsoft. It’s like choosing between a White Monster and a Mountain Dew. There is no wrong answer.
How to perform an in-place Windows upgrade with PDQ Deploy & Inventory
Upgrading Windows versions using PDQ Deploy & Inventory is a very similar process to PDQ Connect with a few minor differences. The biggest difference is that you don’t need to create a registry value to track Windows 11 compatibility. Instead, you can use a PowerShell Scanner to directly track compatible devices.
Check out our guide on tracking Windows 11 compatible devices with PDQ Inventory. It will walk you through the entire process from creating the PowerShell Scanner to configuring your dynamic groups.
Once you’ve got your tracking configured, here’s how to build the upgrade package in PDQ Deploy.
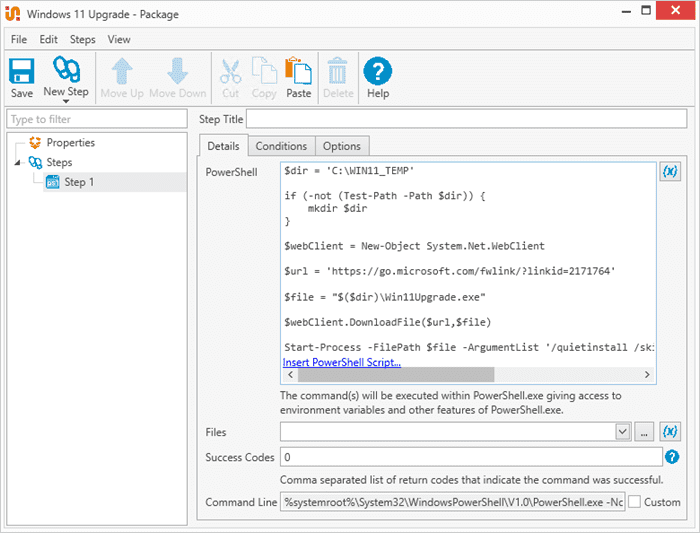
Click the New Package button.
Name the package, then click New Step > PowerShell.
Add this script to the PowerShell window:
$dir = 'C:\WIN11_TEMP'

if (-not (Test-Path -Path $dir)) {
    mkdir $dir
}

$webClient = New-Object System.Net.WebClient

$url = 'https://go.microsoft.com/fwlink/?linkid=2171764'

$file = "$($dir)\Win11Upgrade.exe"

$webClient.DownloadFile($url,$file)

Start-Process -FilePath $file -ArgumentList '/quietinstall /skipeula /auto upgrade /copylogs $dir /noreboot'
Customize the argument list to best meet your needs.
When you’re ready, save the package.

At this point you’re ready to target your Windows 11 compatible devices. Keep in mind that this package downloads the Windows 11 upgrade files directly from Microsoft, which can take up quite a bit of bandwidth. I recommend first testing this on a few devices at a time to ensure you don’t get a panicked phone call from your network admin.
Windows 11 in-place upgrade FAQ
Will files and apps be preserved in an in-place upgrade?
Yes, the in-place method keeps user data, settings, and installed applications unless you choose to do a clean install.
How long does the upgrade take?
How long an upgrade takes varies depending on your hardware and network bandwidth, but upgrades usually range from 15 to 30 minutes.
Can I downgrade after upgrading?
You can use the Go back setting to try rolling back to Windows 10 if the Windows 11 upgrade isn’t working out for you.
Do I need to back up before upgrading?
It’s always a good idea to back up before upgrading, even though in-place upgrades are designed to preserve your data.


