

If it feels like you have to upgrade Microsoft Office more frequently these days, you’re not wrong. Let’s talk about what changed and the best method I’ve found to upgrade Microsoft Office.
Microsoft’s shortened Office lifecycle
In 2018, Microsoft shortened the Office support lifecycle from 10 years (5 years mainstream + 5 years extended security) to just 5 years total support. Now, I’m not saying Microsoft made that change to “entice” users to move to Microsoft 365, but I’m not, NOT saying that either (removes tinfoil hat).
Regardless of the reason, users running Office 2016, 2019, and 2021 find themselves with an important decision and a major task: Do you upgrade to Office 2024, which loses support in 2029, or switch to Microsoft 365? While I can’t tell you which version is best for you, I can show you the best method I’ve found for upgrading Office.
All the following steps work with the assumption that we are installing a 64-bit version of Microsoft Office.
How to prep your Microsoft Office deployment
First, you’ll need the Office Deployment Tool from Microsoft.
Install the ODT into a folder of your choice (e.g., C:\TEMP\ODT). This will give you two files: setup.exe and a sample configuration-Office365-x64.xml file.
Now you need to decide how you want to proceed:
A) Let the package download all required files and install them. This is ideal if you need to push the installation to a remote computer that is not on your network. The setup will automatically download all it needs directly from Microsoft.
or
B) Download the installation files yourself, put them into a package or a network share, and create a package that installs it all. This is ideal for a local network to save internet bandwidth.
In both cases, you will need an uninstall.xml file that removes all previous Office versions.
To demonstrate the whole upgrade process, we are going to use PDQ Connect, though you can use a similar method with any deployment tool.
Configure your uninstall file
To remove all previous Microsoft Office versions, create an uninstall.xml with the following contents:
<Configuration>
    <Remove All="TRUE"/>
    <Display Level="None" AcceptEULA="TRUE"/>
    <Property Name="FORCEAPPSHUTDOWN" Value="TRUE"/>
</Configuration>
This will work even with Microsoft Office 2013 and 32-bit versions of Office. The uninstallation process removes only the Office applications. It does not touch the user configuration in the registry or the user profile.
Complete optional download prep
To download the specific Microsoft Office version and build, you have to modify the configuration file accordingly.
Important: Before you download anything, make sure that the target set in “SourcePath” exists.
To download the installation files, use the setup.exe with the /download switch and the download.xml configuration.
.\setup.exe /download download.xml
Here are two download.xml examples:
Microsoft Office 2024 Standard LTSC
<Configuration>
  <Add SourcePath="C:\TEMP\ODT" OfficeClientEdition="64" Channel="PerpetualVL2024">
    <Product ID="Standard2024Volume">
      <Language ID="en-us" />
      <ExcludeApp ID="Access" />
      <ExcludeApp ID="Groove" />
      <ExcludeApp ID="Lync" />
      <ExcludeApp ID="OneDrive" />
      <ExcludeApp ID="OneNote" />
      <ExcludeApp ID="Publisher" />
    </Product>
  </Add>
  <Updates Enabled="TRUE" Channel="PerpetualVL2024" />
  <Display Level="None" AcceptEULA="TRUE" />
  <Property Name="PinIconsToTaskbar" Value="TRUE"/>
</Configuration>
Microsoft 365
<Configuration>
  <Add SourcePath="C:\TEMP\ODT" OfficeClientEdition="64" Channel="Current">
    <Product ID="O365BusinessRetail">
      <Language ID="en-us" />
      <ExcludeApp ID="Access" />
      <ExcludeApp ID="Groove" />
      <ExcludeApp ID="Lync" />
      <ExcludeApp ID="OneDrive" />
      <ExcludeApp ID="OneNote" />
      <ExcludeApp ID="Publisher" />
    </Product>
  </Add>
  <Updates Enabled="TRUE" Channel="Current" />
  <Display Level="None" AcceptEULA="TRUE" />
  <Property Name="PinIconsToTaskbar" Value="TRUE"/>
</Configuration>
Note, as seen above, you can exclude features you don’t need or require. Choose the language version and channel that you want. You can even specify the build you want to download by adding Version="16.0.XXXXX.YYYYY" after Channel="Current". Make sure the Channel/Product ID pair matches. Products have individual release channels.
Assuming the SourcePath is set to "C:\TEMP\ODT", the download creates the following folder structure:
“C:\TEMP\ODT” – contains the setup.exe, download.xml,install.xml and “Office” folder
“C:\TEMP\ODT\Office\Data” – contains only the build subfolder
“C:\TEMP\ODT\Office\Data\<build>\” - contains the installation files for the specific office build (e.g., “C:\TEMP\ODT\Office\Data\ 16.0.17932.20602\”)
I’ve only covered the essentials here, but here are some tips and resources if you want to learn more:
To make the configuration task simpler, you can use the Office Customization Tool provided by Microsoft
To learn more about the individual parameters, visit Microsoft’s guide to configuration options for the Office Deployment Tool.
Check the list of product IDs supported by ODT.
Read PDQ’s previous article about Office deployment.
Microsoft Office upgrade process
The installation process depends on whether you want to let the setup download the files based on the provided configuration file or supply the downloaded files yourself.
Configure the download directly from Microsoft
If you want to let Microsoft automatically download the resources for you, you only need two files: setup.exe from the ODT and the install.xml.
Here is an example for Microsoft Office 2024 Standard LTSC
<Configuration>
  <Add OfficeClientEdition="64" Channel="PerpetualVL2024">
    <Product ID="Standard2024Volume">
      <Language ID="en-us" />
      <ExcludeApp ID="Access" />
      <ExcludeApp ID="Groove" />
      <ExcludeApp ID="Lync" />
      <ExcludeApp ID="OneDrive" />
      <ExcludeApp ID="OneNote" />
      <ExcludeApp ID="Publisher" />
    </Product>
  </Add>
  <Property Name="FORCEAPPSHUTDOWN" Value="TRUE" />
  <Property Name="AUTOACTIVATE" Value="1" />
  <Updates Enabled="TRUE" />
  <Display Level="None" AcceptEULA="TRUE" />
  <Property Name="PinIconsToTaskbar" Value="TRUE"/>
  <Property Name="PIDKEY" Value="XXXXX-XXXXX-XXXXX-XXXXX-XXXXX" />
</Configuration>
When the setup is run using the configuration above, all the required files are automatically downloaded from Microsoft over the internet and discarded after the installation. This is useful if you need to upgrade a system that is outside of the local network.
Download resources using a local drive or network share
This XML is mostly identical to the example above. It only needs the SourcePath parameter:
<Configuration SourcePath=”<path to files>”>
This can be either local “C:\TEMP\ODT” or a network resource like “\\server.local\share\ODT” where the “Office\Data” folder is located. The path cannot be relative. It must be absolute.
Microsoft Office upgrade package structure in PDQ Connect
Now it’s time to build the Microsoft Office upgrade package in PDQ Connect. It’s important to remember that PDQ Connect packages running as System can access a network share on domain-joined devices in the local network if you create a Windows file share and grant read permissions to "Domain Computers" in the share access settings. This enables the System context to retrieve files without issues.
Basic Office upgrade package in PDQ Connect:
Step 1 – Run “setup.exe /configure uninstall.xml”
Step 2 – Run “setup.exe /configure install.xml”
Office upgrade package with optional file transfer:
Step 1 – Copy uploaded files from the download location “i.e. C:\TEMP\ODT” to the location the install.xml points to.
Step 2 – Run “setup.exe /configure uninstall.xml”
Step 3 – Run “setup.exe /configure install.xml” Step 4 – Clean up C:\TEMP
Office upgrade using a network source for installers:
Step 1 – Run “setup.exe /configure uninstall.xml”
Step 2 – Run “setup.exe /configure install.xml” (make sure the install.xml is pointing to the network location and that the files are available there)
Here are a few other things to consider when building your Office deployment package:
In any of the steps above, make sure you set the package timeout to an appropriate value. 60 minutes should suffice.
In case you encounter “timing” issues between the steps, you can add a PowerShell step with “Start-Sleep -Seconds 15” to allow the previous step’s background tasks to finish before the next step is executed.
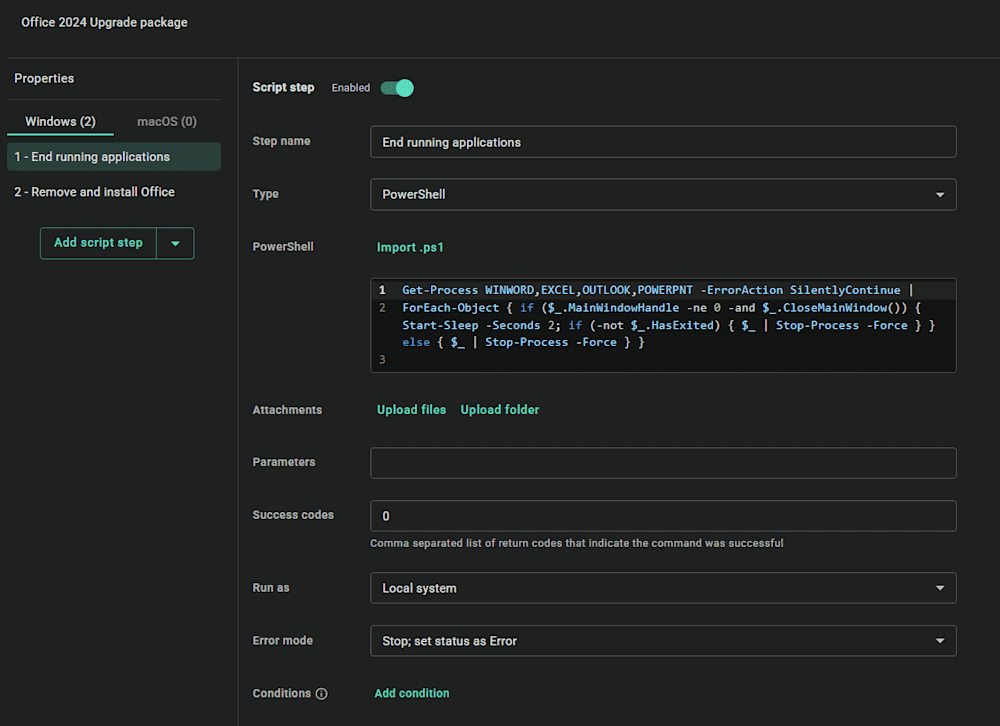
Before running the upgrade, check if there are any running applications. You don’t want a call from your users the next day that their documents are lost because they didn’t save. To do so, you can run this PowerShell script and continue depending on the result:
Get-Process WINWORD,EXCEL,OUTLOOK,POWERPNT -ErrorAction SilentlyContinuee.g. pipe the result to
| ForEach-Object { if ($_.MainWindowHandle -ne 0 -and $_.CloseMainWindow()) { Start-Sleep -Seconds 2; if (-not $_.HasExited) { $_ | Stop-Process -Force } } else { $_ | Stop-Process -Force } }Why? Because you informed the user about the upgrade process timeframe. Right? Unsaved documents can cause the upgrade process to fail, and we don’t want this to happen.
In PDQ Connect, you can now use the package conditions to check if a user is logged in or not.
How to build the Office upgrade package in PDQ Connect
In PDQ Connect, create a new package, give it a name and description, and don’t forget to change the package timeout.
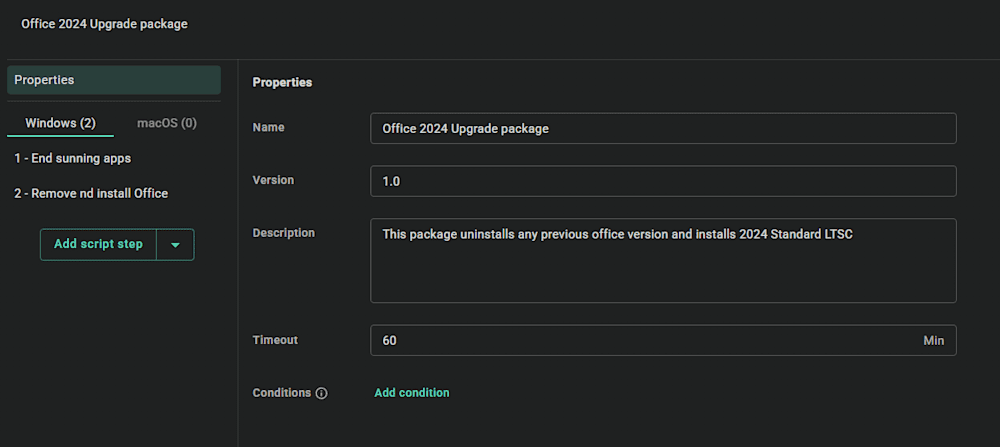
End any running Office application process using PowerShell. (No mercy, the user was warned.)
Create a CMD step with the setup.exe and /configure parameters as shown below. Don’t forget to upload the setup.exe from the Office Deployment Tool and the configuration XML files using “Upload files.”


Save the package, and you are ready to deploy. If you want, you can add the downloaded installation files as mentioned above. Remember to maintain the file folder structure. Don’t forget to create the appropriate groups so you know what was and what wasn’t upgraded. More info about using filters and creating groups can be found in the Help Center’s Introduction to Filters & Groups.
I have covered the process for PDQ Connect, but it can be done in PDQ Deploy essentially without any changes.
Important note: The first two starts of one of the Office applications, the new version performs a configuration update. You might see Office 2016/2019/2021 starting splash screen and the “old” UI. This resolves after the third start. You might need to tell this to your users. Also, the Outlook search is now located in the Window title.
For future updates, you can force the update by running the following command:
start /B "" "C:\Program Files\Common Files\microsoft shared\ClickToRun\OfficeC2RClient.exe" /update user displaylevel=false forceappshutdown=trueIt won’t show the updating dialog and will close any open applications.
To make your life easier, PDQ provides two packages in the Package Library:
Both are available in PDQ Connect and PDQ Deploy.
If you have any questions about this process, you can find me on PDQ's Discord server.


