

I have a love-hate relationship with imaging. I love that we no longer have to build every OS from the ground up manually. I hate building and updating images. For some, Windows 10 made capturing images even more complex than it used to be. Fortunately, FOG and PDQ.com are here to make our lives and our imaging easier.
What is FOG?

FOG is a powerful and free, open-source imaging solution that offers a ton of functionality, such as PXE booting, domain joining, snapins, and multi-casting, to simplify the imaging process. FOG supports all major operating systems, including Windows (from XP to 10), Linux, and Mac OS X. FOG is backed by thousands of active community members, and support is readily available on their forums page. Learn more about FOG and how to get started with it on their website, www.fogproject.org.
FOG and PDQ work hand in hand
There’s nothing worse than finishing up a brand new image with all the latest updates only to have Chrome come out with a new version the very next day. Keeping images up to date can be very time-consuming, especially with applications like Chrome and Firefox updating seemingly every other day. Solving this problem is where FOG and PDQ go hand in hand.
FOG includes the ability to run post steps after imaging called snapins. Snapins are the key to simplifying the imaging process with PDQ Deploy. Snapins give us the ability to do all sorts of things such as launch MSI’s, batch scripts, and PowerShell scripts. The ability to launch PowerShell scripts after imaging enables us to kick off deployments from PDQ Deploy automatically. Do you know what that means? It means you can keep your images as basic as possible, and FOGs snapins and PDQ Deploy will take care of deploying your baseline packages after you finish re-imaging a computer automatically. And since PDQ Deploy automatically updates hundreds of the most popular applications in the package library, you don’t even have to worry about keeping those up to date.
Deploying The FOG Agent
To take advantage of FOGs many valuable features, we need to ensure our devices have the FOG client installed. FOG provides two client installers, an MSI specifically for Windows devices and a Smart Installer that is usable on most major operating systems. After you have your FOG server up and running, you can find the client installs by clicking on the gear icon, and then under the FOG Client Download section, click Click Here.

Download whichever option you fancy, and then we’ll create a package in PDQ Deploy to distribute it.

Now that we have our installer, we’ll build a package in PDQ Deploy. We’ll first show how to build a package for the Smart Installer.
With Deploy open, click New Package
Name the package something creative like FOG Client
Click New Step > Install
Put in the path to the Smart Installer in the Install File field
In the Parameters field, enter --server=IPAddress or --server=FOGServerName (replace IPAddress with your FOG servers IP address or FOGServerName with the name of your FOG server)

Making a package for the MSI installer is similar, the only difference being the parameter name. Instead of --server=, we’ll use WEBADDRESS= for the parameter for the MSI package.

Now that I’ve deployed the client to one of my workstations and started the FOG service on that workstation, it automatically shows up as a host on my FOG Server.

Creating a baseline package in PDQ Deploy
If you haven’t already created a baseline package in PDQ Deploy, now’s as good as time as any. A baseline package is a package that contains the essential applications that you want all of your workstations to have after they’ve been imaged. Fortunately, PDQ Deploy makes it very easy to add multiple packages to one nested package.
With Deploy open, make sure you have all the necessary packages already created and in your packages list
Holding CTRL, click on each package you want to add to your baseline package. I’ve clicked on Google Chrome, Mozilla Firefox, and Notepad++
With your packages highlighted, click Create new package nesting these packages
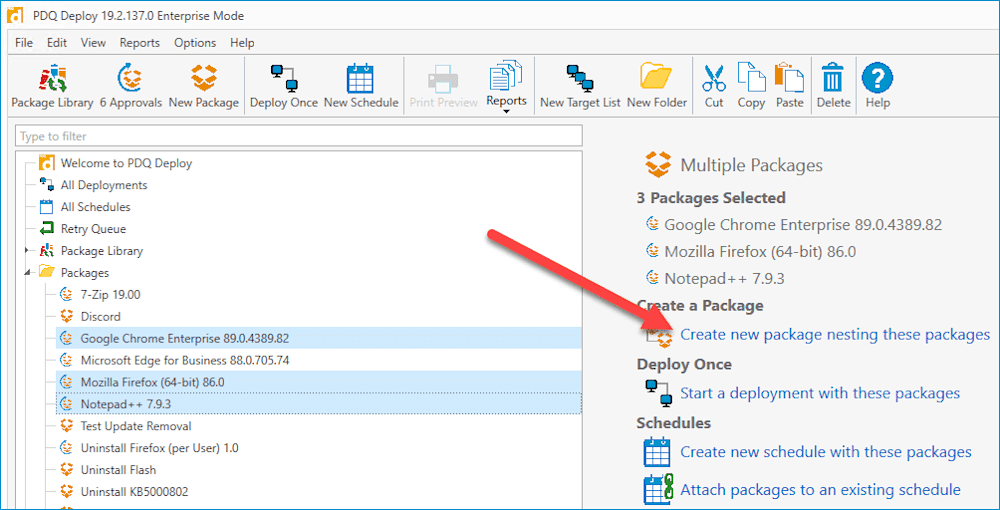
Name your package something super creative like Baseline
You can expand the Steps menu item to make sure each of your applications has been included
Click Save

Configuring FOG snapins
Configuring snapins in FOG is pretty straightforward. We’re going to build a snapin that will call a PowerShell script to kick off a deployment in PDQ Deploy. Before we make the snapin, we’ll need to create the PowerShell scripts that we want the snapin to run.
Creating Password and Key files script:
$KeyFile = "c:\temp\fog.k"
$Key = New-Object Byte[] 16   # You can use 16, 24, or 32 for AES
[Security.Cryptography.RNGCryptoServiceProvider]::Create().GetBytes($Key)
$Key | out-file $KeyFile


$PasswordFile = "C:\temp\fog.p"
$Key = Get-Content $KeyFile
$Password = read-host -AsSecureString
#$Password = "" | ConvertTo-SecureString -AsPlainText -Force
$Password | ConvertFrom-SecureString -key $Key | Out-File $PasswordFile


$User = "Username"
$key = Get-Content $KeyFile
$Credential = New-Object -TypeName System.Management.Automation.PSCredential -ArgumentList $User, (Get-Content $PasswordFile | ConvertTo-SecureString -Key $key)
Kicking off PDQ Deploy script:
Stop-Transcript | out-null
$ErrorActionPreference = "Continue"
Start-Transcript -path C:\powershelloutput.txt -Force

$KeyFile = ".\fog.k"
$PasswordFile = ".\fog.p"
$key = Get-Content $KeyFile
$Credential = New-Object -TypeName System.Management.Automation.PSCredential -ArgumentList "Username", (Get-Content $PasswordFile | ConvertTo-SecureString -Key $key)

$LocalComputerName = $env:COMPUTERNAME
Invoke-Command ConsoleName -Credential $Credential -ScriptBlock {pdqdeploy deploy -package "Baseline" -targets $using:LocalComputerName }

Stop-Transcript
The password and key files script creates the credential files that we will use in the deployment script. Make sure to run the password and key file script first, as it will output two necessary files for the deployment script.
The deployment script uses the credential files you created to deploy the Baseline package to whichever localhost the script is run from. Make sure to replace Username and ConsoleName in the scripts with your PDQ Deploy username, and the name of your PDQ Deploy console computer.
After running the password and key script, it will generate two files, fog.k and fog.p. Zip these two files and the Deploy script ps1 file together into one zipped folder. When we build our snapin in FOG, we will point to this zipped folder.


Now that we have our files zipped up, we can build our FOG snapin.
Click the Snapin icon on your FOG server

Click Create New Snapin
Add a name for the snapin in the Snapin Name field
If you’re lazy, skip the description section. If you’re not lazy, then put in an epic description for your snapin
For the Snapin Type, choose Snapin Pack from the dropdown menu
For the Snapin Pack File, choose PowerShell Script from the dropdown menu
Change the filename in the Snapin Pack Arguments to the name of your deploy PowerShell script. I’ve named my script Baseline, so this is my Snapin Pack Argument: -ExecutionPolicy Bypass -File "[FOG_SNAPIN_PATH]\Baseline.ps1"
Click Browse next to the Snapin File Max Size: 3000M option and browse out and select the zip file you created.
Click Add at the bottom of the New Snapin window


Running FOG snapins
With our snapin created, we’re ready to test it out.
1. In FOG, click the Hosts menu option
2. Click List All Hosts
3. Click on the host you want to test the deployment on

4. Click Basic Tasks (note: you may need to trust the host in FOG before you will see the Basic Tasks option)
5. Click Advanced
6. Click Single Snapin
7. From the dropdown menu, select the snapin you created
8. Select Schedule instant if it’s not already selected
9. Click Task
By default, FOG is set to run the tasks within a minute of launching it. You can view the running task by clicking the Tasks button at the top menu in FOG. You can also launch PDQ Deploy to view the deployment.

Now that you have your snapin and you’ve tested it, you can start assigning it to your hosts in FOG. After imaging a host with this snapin assigned to it, the snapin will launch and kick off a deployment from PDQ Deploy.
Wrapping up
FOG is an excellent imaging solution with a great community supporting it. It really takes some of the pain out of imaging. Combining FOG with PDQ Deploy is a winning combination. If you are tired of doing things manually and you need a little more automation in your life, FOG and PDQ Deploy is where it’s at. If you don’t yet have PDQ Deploy, then head over to our trial page to get a free 14-day trial. Be warned; trialing PDQ products often results in the sudden urge to purchase PDQ products.

