

Distributing new and recently imaged computers can be a resource-intensive process for IT departments. But with the right approach and a comprehensive baseline package, you can drastically speed up this process and limit your resource-intensive activity intake. Here’s everything you need to know about building and deploying baseline packages with PDQ.
What is a baseline package?
A baseline package is a deployable package containing organization-approved default applications for managed computers. Typically, default applications consist of the bare minimum software every user in an organization needs access to. Some examples of common baseline applications include:
Default browsers (*cough* Chrome *cough*)
Office suites
Email clients
Calendars
Security solutions
PDF readers
Media players
File archivers
FTP clients
Task management platforms
Time-tracking software
Desktop Goose (to mess with your users, of course)
Default or baseline applications are organization specific. You should review and develop the list you develop with your team members. Just remember, the goal is to incorporate applications that all users need access to while still following the principle of least privilege.
PDQ Deploy takes baseline packages to the next level
PDQ Deploy makes it easy to build baseline packages with a couple of key features: Auto Download packages and the Nested Package step.
Auto Download packages are prebuilt packages created and maintained by PDQ. The Package Library in PDQ Deploy contains hundreds of these prebuilt packages, which are automatically updated when new software versions are released.
In addition, the Nested Package step allows admins to embed several packages into one package, making it possible to deploy one package consisting of multiple packages.
With Auto Download packages and the Nested Package step, you can easily create a baseline package that is automatically kept up to date.
How to build a baseline package in PDQ Deploy
Here’s how easy it is to create a baseline package in PDQ Deploy.
In PDQ Deploy, click on Package Library.
Select the packages to add to your baseline package, then click Download Selected (As Auto Download). I’m using Google Chrome Enterprise, Adobe Reader DC (32-bit), and FileZilla for this example.
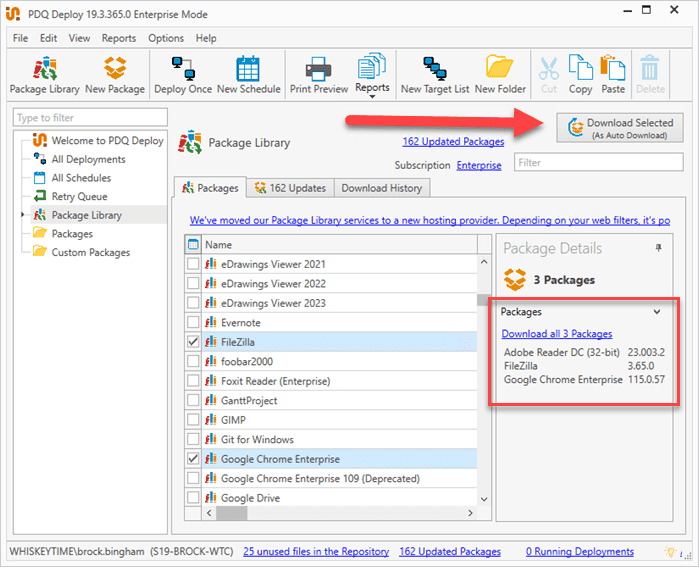
Once the packages have been downloaded to your console, click New Package.
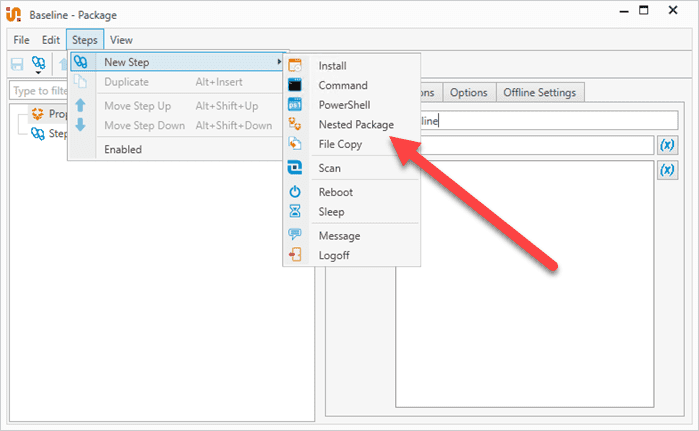
Name the package, then click Steps > New Step > Nested Package.
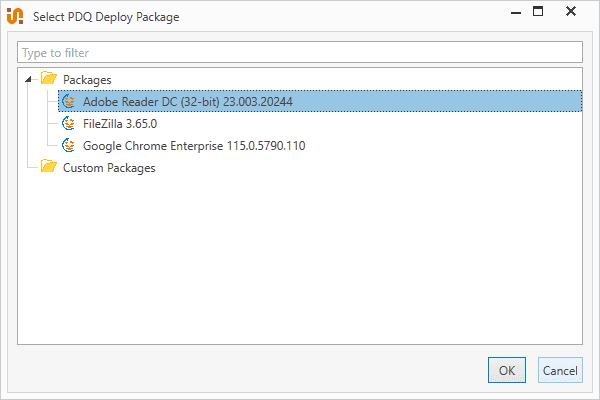
Click the ellipsis button next to the Package field, then select the package you want to add. Click OK.
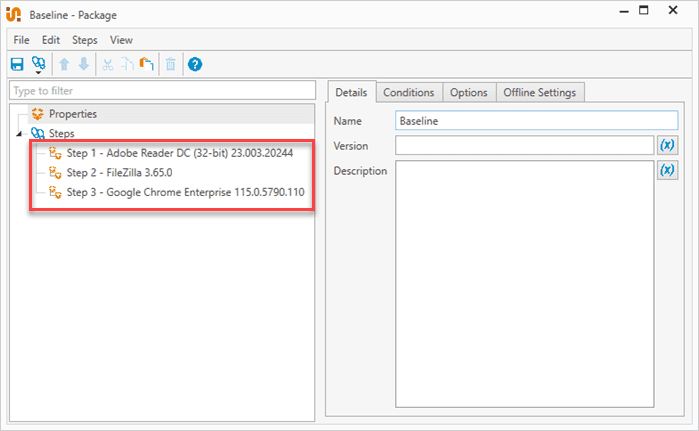
Repeat steps 4 and 5 for the remaining packages.
When finished, click the Save button, then close the package builder.


Because all the packages are Auto Download packages from the Package Library, they will stay current as new versions are released. Additionally, you can add custom packages to your baseline package, but you will need to keep custom packages updated manually.
To increase the functionality of your baseline package, consider adding additional steps, such as PowerShell, File Copy, or Reboot steps. These steps can add value to your baseline packages. For example, you can create a PowerShell script that moves computers to a new OU in Active Directory once they’ve received the baseline package.
How to build a baseline package with PDQ Connect
Much like Deploy, PDQ Connect can also build and deploy baseline packages. It features both prebuilt packages and nested packages. However, since Connect is an agent-based solution, it can distribute packages to both local and remote endpoints.
While PDQ Connect includes many of the same features as PDQ Deploy, its streamlined interface makes the process a bit different. Here’s how to build a baseline package in Connect.
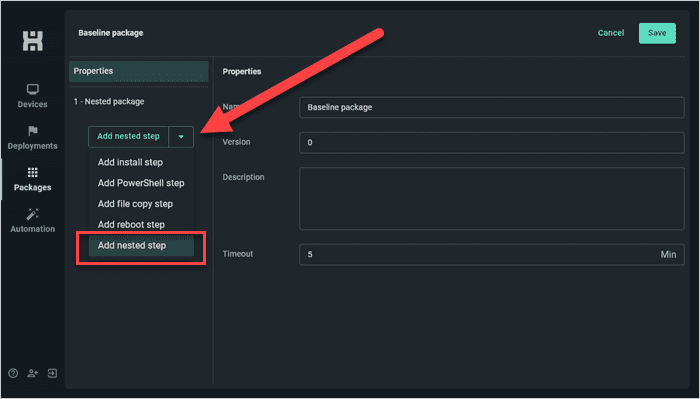
In PDQ Deploy, click the Packages tab.
Click Create package.
Name the package, then click the drop-down menu option next to the Add install step button. Click Add nested step.
In the Package field, search for and select the package you want to add.
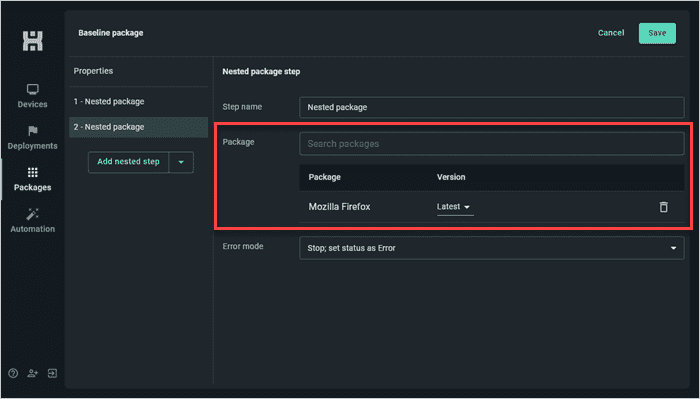
Add a new nested package step for each application you want to add to the baseline package. When you are finished, click Save.


With the package saved, it’s ready to be deployed to your recently imaged devices. As with PDQ Deploy, you can incorporate additional functionality to your baseline package by adding steps, such as the PowerShell step. Keep in mind that to make this process as easy as possible, you’ll want to add the Connect agent as part of your Windows image so your recently imaged computers are automatically assigned to your Connect instance.
Ready to level up? Learn how to automate package baselines in PDQ Deploy & Inventory.
How to target recently imaged computers
Once you’ve got your baseline package ready to go, deciding how to identify and target recently imaged computers is the next piece of the puzzle to solve. Sure, you could manually target devices, but you don’t want to be stuck manually deploying baseline packages for the rest of your life. Instead, you’ll want to identify a process that is repeatable and automatable. Thankfully, there are dozens of ways to accomplish this. Here are a few suggestions, but you’ll want to determine a method that works best for your organization.
How to identify recently imaged computers using Active Directory
Active Directory (AD) is the source of truth for many organizations, making it a great way to identify new computers. AD indexes tons of information about computer objects, providing several ways to distinguish recently imaged computers. Some examples include identifying computers by their organizational unit (OU), group membership, or an AD attribute.
While AD is a great option, there are several factors to consider. In many cases, you need a way to modify the AD object so it no longer carries the recently imaged computer marker. This can often be accomplished with a dedicated PowerShell script added to the end of your baseline package that moves the PC to a new OU, changes group membership, or modifies an AD attribute. It’s important to consider how moving computers between OUs may affect group policies.
If you’re interested in watching our experts walk through this process, check out our PDQ & SmartDeploy webcast, where they utilize the OU to identify and target recently imaged computers.
How to identify recently imaged computers using a file
An easy way to identify recently imaged computers is by adding a file to the image to distinguish recently imaged computers. This may sound simple, but that’s only because it is. Here’s how the process would work.
Add a file to the system drive as part of your image, preferably somewhere that doesn’t require special rights to read. Then, in PDQ Inventory, create a Files & Directories Scanner that scans for the file. Add this scanner to the Standard scan profile so it runs whenever new computers are synced into Inventory. Lastly, build a dynamic collection to filter for computers containing the marker file.

There are a couple of things to note about this process. First, unlike the previous example, this process won’t currently work with PDQ Connect. Second, you’ll need a way to remove the designated file once the baseline package has been deployed. This can be accomplished with a simple PowerShell step added to the end of your baseline package.
How to identify recently imaged computers using a registry entry
Using a registry entry to distinguish recently imaged computers is another easy way to identify them. This process is similar to the previous example, but instead of a file, we’re using a registry key that is built into your image.
The same requirements from the previous example also apply when using a registry key to distinguish recently imaged computers. You need to add a registry scanner to the Standard scan profile in PDQ Inventory to search for that specific registry, and you need a dynamic collection that filters against the registry scan result.
Automate more, work less
If you’re understaffed and overworked, the last thing you need on your plate is another resource-intensive task. PDQ Deploy & Inventory and PDQ Connect make it simple to automate more and work less. Discover how easy it is to be l̶a̶z̶y̶ efficient when you’ve got the right tools for the job.


