

TL;DR: WinRM lets admins run PowerShell commands on remote Windows devices, but it must be enabled before remote scripting works. You can check WinRM status with Test-WSMan, enable it quickly with WinRM quickconfig, configure it at scale with Group Policy, or deploy the configuration command through PDQ Connect or PDQ Deploy depending on whether devices are remote or local.
Need to run PowerShell commands against remote Windows devices? WinRM is usually the piece that makes that possible. In this guide, we’ll walk through how to check whether WinRM is enabled, turn it on for one device, and configure it across multiple machines without making it a whole thing.

Run PowerShell scripts on remote devices
Execute PowerShell scripts on managed devices from anywhere with PDQ Connect.
How do you check if WinRM is enabled?
To check if WinRM is enabled, run Test-WSMan from PowerShell against the target computer. If the command returns WS-Management details, WinRM is running and responding on that device.
In this guide, I’m using PowerShell 7.x from an elevated command prompt. These commands should also work in Windows PowerShell, but results may vary if your environment mixes PowerShell 7.x and Windows PowerShell across devices.
Test-WSMan -ComputerName “computer_name”

I ran this command on a few different computers, two with WinRM enabled and one with it disabled so you can see the different results. This command is great if you’re like me and your biggest pet peeve is doing extra work for no reason.
How do you enable WinRM using quickconfig?
The fastest way to enable WinRM on a single Windows device is to run WinRM quickconfig from an elevated command prompt. This command starts the WinRM service, sets it to start automatically, configures a listener, and creates the required firewall exception.

In this screenshot, you see that the command walked me through several prompts, enabling the various settings to ensure WinRM is properly configured. Now if we rerun the test from the previous section, this device should pass it.

WinRM quickconfig works best for one device or a small batch of devices. Because WinRM is not already enabled, you need local access, another remote execution method such as PsExec, or a deployment tool to run the command on target machines. For dozens of devices or an entire domain, use Group Policy or a deployment tool instead.
How do you enable WinRM using Group Policy?
Group Policy is the best option for enabling WinRM across domain-joined Windows devices. You can use one GPO to allow remote server management through WinRM, start the WinRM service automatically, and configure the required inbound firewall rules. Group Policy also has several other features you can configure to customize your WinRM implementation.
Configure the WinRM service policy
Here’s how to enable WinRM with Group Policy and set the IP filters.
Open your Group Policy Management Console.
Right-click on an OU you want to apply the policy to, then click Create a GPO in this Domain, and Link it here.
Name the policy Enable WinRM, then click OK.
Right-click on the new GPO and click Edit.
Expand Computer Configuration > Policies > Administrative Templates > Windows Components > Windows Remote Management (WinRM) > WinRM Service.
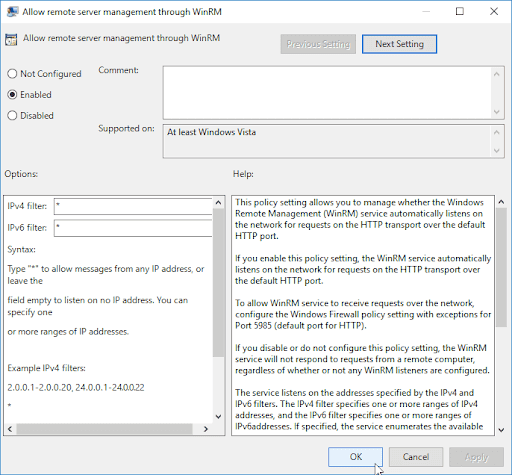
Locate Allow remote server management through WinRM, and double-click it to edit the setting.
Select Enabled.
Enter a range of IP addresses in the IPv4 and IPv6 filter boxes or add an asterisk to allow all IP addresses.

Set the WinRM service to start automatically
Next, let’s configure the WinRM service to start automatically.
Navigate to Computer > Configurations > Preferences > Control Panel Settings > Services.
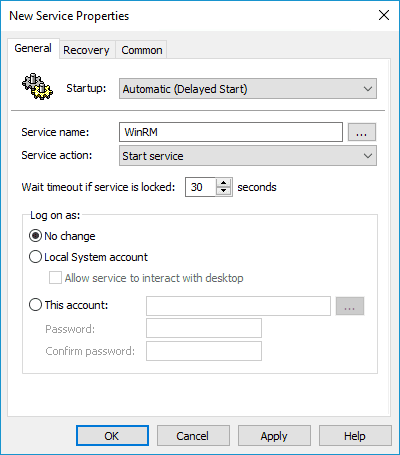
Right-click in the Services window, then click New > Service.
Change the Startup to Automatic (Delayed Start).
Click the ellipsis button next to the Service name field.
Find and select the service name WinRM.
Select Start Service from the service action menu, then click Apply and OK.

Configure the WinRM firewall rules
Finally, we need to configure the firewall rules.
Expand Computer Configuration > Policies > Windows Settings > Security Settings > Windows Defender Firewall with Advanced Security > Windows Defender Firewall with Advanced Security.
Right-click on Inbound Rules, then click New Rule.
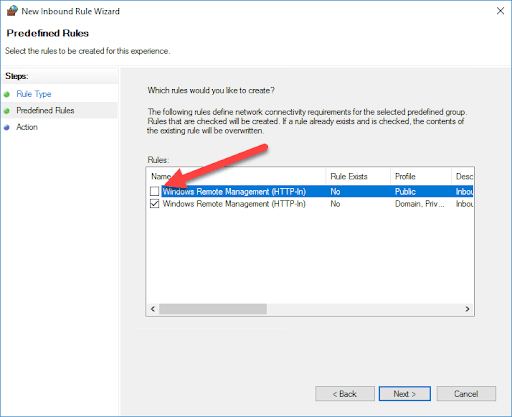
Select Predefined, then select Windows Remote Management from the drop-down menu.
Click Next.
Uncheck the public profile rule.
Click Next.
Select Allow the connection, then click Finish.

With the Group Policy Object in place, any devices assigned that GPO will automatically have the necessary Windows Remote Management settings configured.
Can you use PDQ Connect to enable WinRM?
You can use PDQ Connect to enable WinRM. Doing so gives you the ability to deploy the package to remote devices. To create a WinRM enablement package in Connect:
Click the Packages tab.
Click Create package.
Add a package name.
Click the down arrow next to Add install step, then click Add script step.
In the PowerShell window, enter the command
WinRM quickconfig -quiet.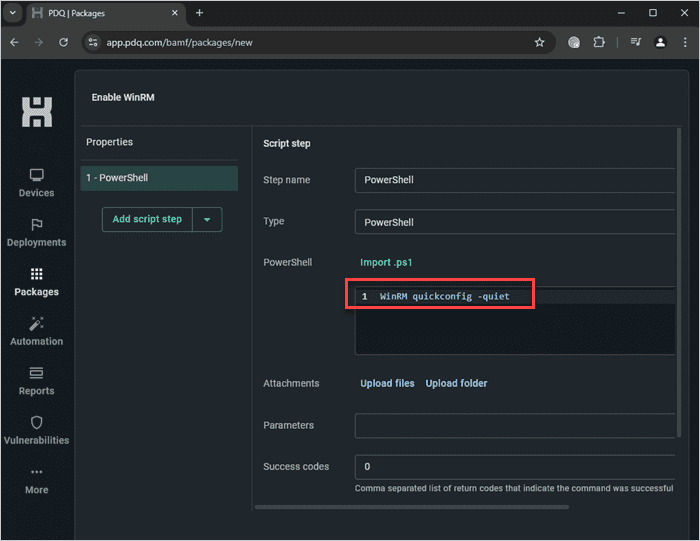
When you’re ready, click Save to save the package.

To deploy the package:
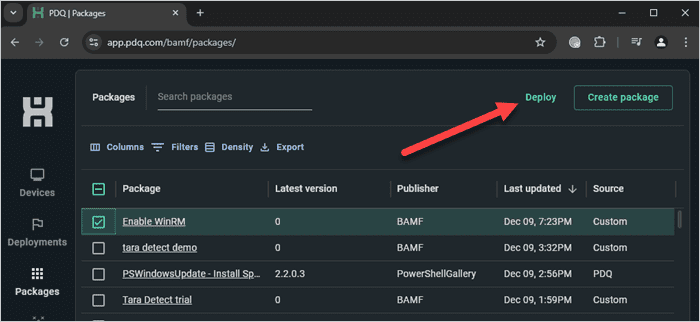
In the Packages tab, locate and select the package you just created, then click Deploy.
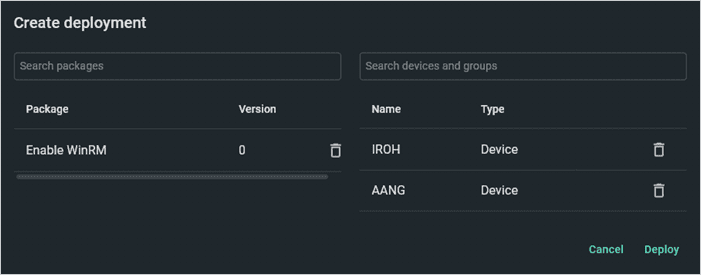
Add your target devices or groups by searching for them in the Search devices and groups field.
When you’re ready, click Deploy.


PDQ Connect can deploy the package to remote devices over the internet, but WinRM connections still require network reachability between the devices using WinRM. Enabling WinRM does not make remote WinRM sessions work across the internet by itself.
WinRM is pretty cool, but not quite that cool.
Can you use PDQ Deploy to enable WinRM?
PDQ Deploy lets you push the WinRM quickconfig command to any device on your local network, making it ideal for on-prem deployments. To ensure we don’t interrupt any users, we’ll use the -quiet parameter to run the command silently.
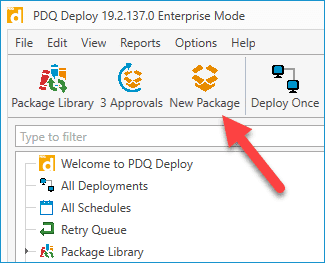
In PDQ Deploy, click New Package.
Add a name like Enable WinRM to your package.
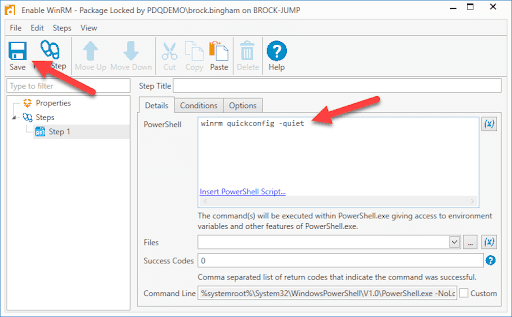
Click New Step > PowerShell.
Add the command
WinRM quickconfig -quietto the PowerShell window.Click Save.


Your WinRM package is ready to deploy to as many or as few devices as you need. This is a great way to limit the number of devices you enable WinRM on.
Whether you’re enabling WinRM on one machine or wrangling an entire domain, the right tool can save you a heap of time and coffee. PDQ Connect makes it easy to deploy scripts like WinRM quickconfig across remote devices — no VPN required. Try PDQ Connect for free and see how simple remote device management can be when the software actually works with you, not against you.
How to enable WinRM FAQs
What is WinRM used for?
WinRM (Windows Remote Management) lets you run PowerShell commands on remote Windows devices. It’s commonly used for remote scripting, automation, and configuration tasks.
Is WinRM secure?
WinRM can be secure when it is limited to trusted networks, protected with proper authentication, and controlled with firewall rules or IP filters. For additional transport protection, configure WinRM over HTTPS with a valid certificate.
What are the default ports for WinRM?
By default, WinRM listens on port 5985 for HTTP and 5986 for HTTPS.


