

TL;DR: To remove bloatware from Windows 11, start by auditing a fresh install and creating your own keep and remove list. Then remove unwanted apps via Start menu uninstall (current user), Group Policy to block cloud consumer content and clear pinned “installer” links, or PowerShell to uninstall APPX packages with an allowlist. Recheck after major updates.
Windows 11 includes a mix of preinstalled apps that many admins consider bloatware. You can remove these apps using manual uninstall options, Group Policy, or PowerShell. Below is a breakdown of how to identify unwanted apps and remove them safely from Windows 11.
What is bloatware?
Bloatware is any preinstalled app in Windows 11 that you don’t want or need. These apps take up storage space and can slow performance, especially when they run in the background.
A new operating system used to offer a blank slate. But nowadays, most OSes come loaded with preinstalled apps — from TikTok to WhatsApp — that you may never use. They take up valuable space and bog down your processing power. And dare I say, they've earned their name: bloatware.
How to identify a bloatware app
You can identify bloatware in Windows 11 by reviewing the apps included in a fresh image and marking any preinstalled software that users don’t need.
I can’t list all the bloatware included with Windows 11 because bloatware is subjective. What’s bloatware to me may not be bloatware to you. For example, just because I don't want certain Google apps on my workstations doesn't mean you agree.
For that reason, I recommend thoroughly inspecting a fresh installation of your version of Windows 11 and making a list of applications you don't want included with your OS. Remember that preinstalled software may vary between Windows 11 Home, Pro, and Enterprise editions.
The Windows 11 bloatware problem
Windows 11 includes both OEM and Microsoft-added apps that many admins don’t want, but the larger issue is the lack of clear documentation about these packages.
Most of the relevant information on the web is from sysadmins documenting their processes through trial and error, which shouldn’t be the case. Hopefully, Microsoft will step up and provide better insights for the community since it should be the ultimate authority on the topic.
How to manually uninstall bloatware from Windows 11
You can manually uninstall bloatware in Windows 11 by removing apps directly from the Start menu for the current user.
Click the Start button to open the Start menu.
Right-click on the offending bloatware, then click Uninstall.


This surefire method gets those annoying Windows apps off your computer super quickly. However, there are a few things I should point out.
First, this method removes the bloatware only from the current user profile. Anyone else using that device will have to remove their own bloatware.
Another helpful bit of information I should point out is that many — but not all — “bloatware” apps aren’t actually installed. Many apps on the Start menu — including ESPN, Instagram, and TikTok — are just links to installers. I’ve heard them referred to as “quick installers” and “ghost apps.” You can test this for yourself by just clicking on the app icon. You’ll notice an installer progress bar appears under the icon. Once the installation finishes, you’ll receive a notification that the app has been installed. (So that’s not deceptive at all ...)
The last thing I want to mention is that since many of these apps aren’t installed, you won’t find them in the All apps menu. Also, they won’t appear as an installed app when you search for them. They reside solely as a link pinned to the Start menu. However, if you click on them and go through the installation process, they appear in the All apps menu and search results.

Automate your patching
Keep devices patched and secure from the cloud.
How to uninstall bloatware using Local Group Policy
You can remove many Start menu bloatware links in Windows 11 by enabling the Turn off cloud optimized content policy and resetting the Start menu cache.
If uninstalling each app one by one doesn’t impress you, I don’t blame you. It’s not the most efficient method, nor does it divulge where each app or link comes from in the first place. To get to the root of our bloatware problem, we’ll use Local Group Policy along with some other IT foolery.
Enter group policy into the Windows 11 search field, then click on the Edit group policy app.

Navigate to Computer Configuration > Administrative Templates > Windows Components > Cloud Content.
Double-click the Turn off cloud optimized content policy.
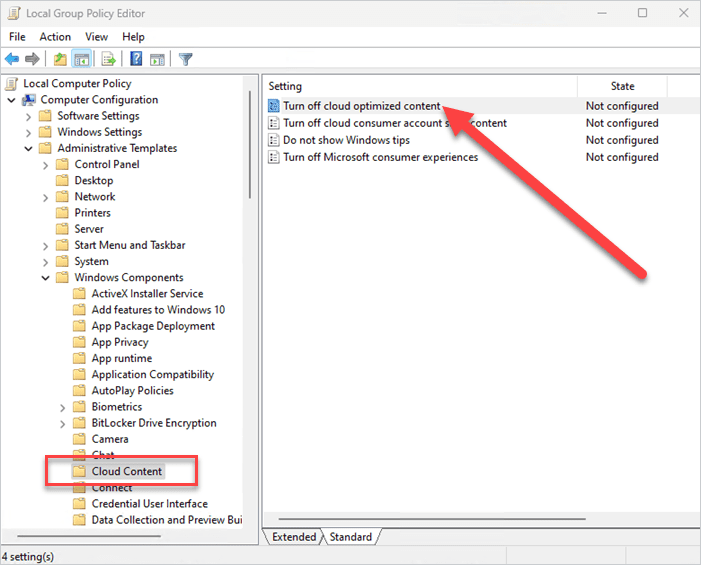
Select Enabled, then click OK to save and close the policy.

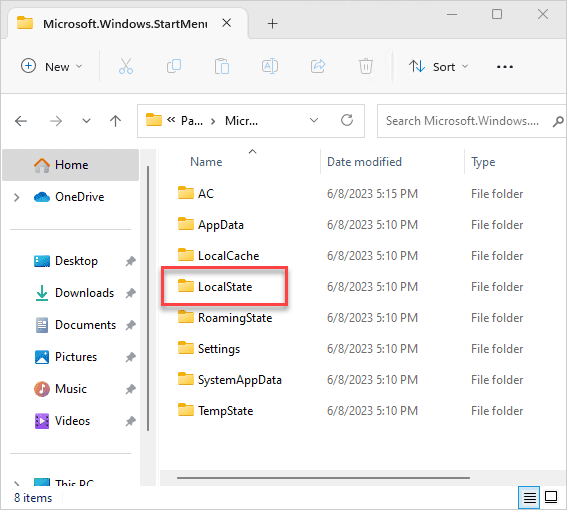
Open File Explorer and navigate to C:\Users\<current_user>\AppData\Local\Packages\Microsoft.Windows.StartMenuExperienceHost_cw5n1h2txyewy. You will need to show hidden items to navigate to this directory.
Delete the LocalState folder. You can move this folder to a different directory if you’d rather save it, just in case.
Restart the PC.


Once the computer reboots and you log back in, your Start menu should be bloatware free. Remember that this removes only the bloatware links, such as ESPN, Spotify, and Messenger. This process won’t remove other APPX packages you may or may not want installed on your system. Also, this process only works for the current user and new user account. Microsoft’s approved bloatware will still appear for other existing users.
One last caveat I should mention before moving on: These changes may or may not last forever. Windows updates have a way of restoring things we’d rather not restore. While this is usually the case only with Windows feature updates, I’ve heard rumors that regular cumulative updates can also revert some of these changes, so keep an eye on your config settings after installing updates.
Windows 11 widgets annoying you too?
Read our step-by-step guide on how to remove widgets in Windows 11.
How to uninstall bloatware using Windows PowerShell
You can remove Windows 11 bloatware with PowerShell by running scripts that uninstall APPX packages, delete quick installer links, and disable related consumer features. PowerShell also lets you fix other default Windows 11 settings that many admins find just as disruptive.
Here are some of the changes these PowerShell scripts can make.
Remove bloatware (both quick installers and APPX packages)
Disable Microsoft Teams
Disable Cortana
Disable news and interests
Disable cloud content
Disable consumer experiences
Disable Windows Spotlight
Make sure you review and test these scripts to understand all the changes they make. If there are changes you’d rather not implement, feel free to modify these scripts to meet your users’ needs.
This first script removes APPX packages that many users consider bloatware. It uses an allowlist to ensure necessary apps, like Notepad and Calculator, are not removed. Add any other APPX packages you want to keep to the allowlist.
##Get appx Packages
$Packages = Get-AppxPackage

##Create Your allowlist
$AllowList = @(
    '*WindowsCalculator*',
    '*Office.OneNote*',
    '*Microsoft.net*',
    '*MicrosoftEdge*',
    '*WindowsStore*',
    '*WindowsTerminal*',
    '*WindowsNotepad*',
    '*Paint*'
)

###Get All Dependencies
ForEach($Dependency in $AllowList){
    (Get-AppxPackage  -Name “$Dependency”).dependencies | ForEach-Object{
        $NewAdd = "*" + $_.Name + "*"
        if($_.name -ne $null -and $AllowList -notcontains $NewAdd){
            $AllowList += $NewAdd
       }
    }
}

##View all applications not in your allowlist
ForEach($App in $Packages){
    $Matched = $false
    Foreach($Item in $AllowList){
        If($App -like $Item){
            $Matched = $true
            break
        }
    }
    ###Nonremovable attribute does not exist before 1809, so if you are running this on an earlier build, remove “-and $app.NonRemovable -eq $false” rt; it attempts to remove everything
    if($matched -eq $false -and $app.NonRemovable -eq $false){
        Get-AppxPackage -AllUsers -Name $App.Name -PackageTypeFilter Bundle  | Remove-AppxPackage -AllUsers
    }
}
This second script removes the quick installer bloatware and configures several Windows 11 settings that are more appropriate for business use.
# modified from https://gist.github.com/redlttr/8b95df51fd472d459b5c3a3ae6c8f5ad

#region install the PolicyFileEditor module to update local group policy
Try {

    $null = Get-InstalledModule PolicyFileEditor -ErrorAction Stop

}
Catch {

    if ( -not ( Get-PackageProvider -ListAvailable | Where-Object Name -eq "Nuget" ) ) {

        $null = Install-PackageProvider “Nuget” -Force

    }

    $null = Install-Module PolicyFileEditor -Force

}

$null = Import-Module PolicyFileEditor -Force

# help about_registryvaluesforadmintemplates
#

#endregion

# Variables
$ComputerPolicyFile = Join-Path $env:SystemRoot '\System32\GroupPolicy\Machine\registry.pol'
$UserPolicyFile = Join-Path $env:SystemRoot '\System32\GroupPolicy\User\registry.pol'

$WinVer = Get-CimInstance win32_operatingsystem

# Define policies
$ComputerPolicies = @(
    [PSCustomObject]@{Key = 'Software\Microsoft\Windows\CurrentVersion\Communications'; ValueName = 'ConfigureChatAutoInstall'; Data = '0'; Type = 'Dword' } # Disable Teams (personal) auto install (W11)
    [PSCustomObject]@{Key = 'Software\Policies\Microsoft\Windows\Windows Chat'; ValueName = 'ChatIcon'; Data = '2'; Type = 'Dword' } # Hide Chat icon by default (W11)
    [PSCustomObject]@{Key = 'Software\Policies\Microsoft\Windows\Windows Search'; ValueName = 'AllowCortana'; Data = '0'; Type = 'Dword' } # Disable Cortana
    [PSCustomObject]@{Key = 'Software\Policies\Microsoft\Windows\Windows Feeds'; ValueName = 'EnableFeeds'; Data = '0'; Type = 'Dword' } # Disable news/interests on taskbar
    [PSCustomObject]@{Key = 'Software\Policies\Microsoft\Windows\Windows Search'; ValueName = 'DisableWebSearch'; Data = '1'; Type = 'Dword' } # Disable web search in Start
    [PSCustomObject]@{Key = 'Software\Policies\Microsoft\Windows\Windows Search'; ValueName = 'AllowCloudSearch'; Data = '0'; Type = 'Dword' } # Disable web search in Start
    [PSCustomObject]@{Key = 'Software\Policies\Microsoft\Windows\CloudContent'; ValueName = 'DisableCloudOptimizedContent'; Data = '1'; Type = 'Dword' } # Disable cloud consumer content
    [PSCustomObject]@{Key = 'Software\Policies\Microsoft\Windows\CloudContent'; ValueName = 'DisableConsumerAccountStateContent'; Data = '1'; Type = 'Dword' } # Disable cloud consumer content
    [PSCustomObject]@{Key = 'Software\Policies\Microsoft\Windows\CloudContent'; ValueName = 'DisableWindowsConsumerFeatures'; Data = '1'; Type = 'Dword' } # Disable Consumer Experiences
)

$UserPolicies = @(
    [PSCustomObject]@{Key = 'Software\Microsoft\Windows\CurrentVersion\Explorer\Advanced'; ValueName = 'TaskbarMn'; Data = '0'; Type = 'Dword' } # Disable Chat Icon
    [PSCustomObject]@{Key = 'Software\Microsoft\Windows\CurrentVersion\Policies\Explorer'; ValueName = 'HideSCAMeetNow'; Data = '1'; Type = 'Dword' } # Disable Meet Now icon (W10)
    [PSCustomObject]@{Key = 'Software\Microsoft\Windows\CurrentVersion\Search'; ValueName = 'SearchboxTaskbarMode'; Data = '1'; Type = 'Dword' } # Set Search in taskbar to show icon only
    [PSCustomObject]@{Key = 'Software\Policies\Microsoft\Windows\CloudContent'; ValueName = 'DisableWindowsSpotlightFeatures'; Data = '1'; Type = 'Dword' } # Disable Windows Spotlight
)

# Set group policies
try {
    Write-Output 'Setting local group policies...'
    $ComputerPolicies | Set-PolicyFileEntry -Path $ComputerPolicyFile -ErrorAction Stop
    $UserPolicies | Set-PolicyFileEntry -Path $UserPolicyFile -ErrorAction Stop
    gpupdate /force /wait:0 | Out-Null
    Write-Output 'Group policies set.'
}
catch {
    Write-Warning 'Unable to apply group policies.'
    Write-Output $_
}

# Cleanup start menu & taskbar
try {
    if ($WinVer.Caption -like '*Windows 11*') {


        # Reset existing start menu layouts
        $Layout = 'AppData\Local\Packages\Microsoft.Windows.StartMenuExperienceHost_cw5n1h2txyewy\LocalState'
        Get-ChildItem 'C:\Users' | ForEach-Object { Remove-Item "C:\Users\$($_.Name)\$Layout" -Recurse -Force -ErrorAction Ignore }


    }

    # Restart Explorer
    if ($env:USERNAME -ne 'defaultuser0') { Get-Process -Name Explorer -ErrorAction SilentlyContinue | Stop-Process -Force }
}
catch {
    Write-Warning 'Unable to complete start menu & taskbar cleanup tasks.'
    Write-Output $_
}


<#
Report on configured policies
Get-PolicyFileEntry -Path $ComputerPolicyFile -All
Get-PolicyFileEntry -Path $UserPolicyFile -All
remove the policies
Get-PolicyFileEntry -Path $ComputerPolicyFile -All | Remove-PolicyFileEntry -Path $ComputerPolicyFile
Get-PolicyFileEntry -Path $UserPolicyFile -All | Remove-PolicyFileEntry -Path $UserPolicyFile
#>
As I mentioned in the previous section, Windows updates have a way of reverting changes made to the OS. To ensure these changes endure, you may consider configuring these scripts to run every time users log on. Keep in mind that it may take a few minutes for these scripts to run the first time you execute them. However, each subsequent run should execute almost immediately.
Want to increase your PowerShell knowledge?
Tune into The PowerShell Podcast, where PowerShell experts share their tips, tricks, and best practices.
Other resources to help manage bloatware
While the methods we’ve covered effectively remove bloatware in Windows 11, the best strategy is to start with an image that already has bloatware removed and the correct settings configured. A properly configured OS image ensures all user profiles get the necessary settings and apps. Check out our guide on configuring default profiles in Windows 11 to build the best image for your users.
If you’re more of a visual learner, our Windows 11 bloatware webcast walks you through removing Windows 11 bloatware and answers many common questions about the process.
Finally, if you’re looking for a way to deploy the scripts used in this article, check out PDQ Deploy. If most of your devices are remote, PDQ Connect, our agent-based solution, can deploy PowerShell scripts to devices anywhere in the world with an internet connection. You can try both products free for 14 days.
How to remove bloatware FAQs
What’s the easiest way to remove bloatware?
It’s subjective, but I recommend using PowerShell to remove bloatware from your devices. Not only can you use scripts to remove unwanted programs, but you can take it a step further and change other default Windows settings that are (arguably) just as annoying as bloatware.
Is it safe to remove bloatware?
Yes, it’s totally safe to remove bloatware from your devices — as long as you define bloatware as unwanted applications that serve no real purpose on your operating system. Now, if you consider the registry to be bloatware ... we may need to talk before you run scripts or crack open Local Group Policy.
Is there an app or tool for automatic bloatware removal?
Yes, there are apps and tools for automatic bloatware removal — but we don’t recommend using them. Bloatware is a highly subjective concept, and the last thing you want to do is use a "bloatware remover” only to see it delete programs you actually need or want to keep. By using one of the methods described in this blog, you can get rid of bloatware just as fast — all without relying on a third-party tool.
Does Windows 11 still have bloatware?
Unfortunately, yes, the most current version of Windows 11 still contains bloatware. But by using one of the removal methods described in this blog, you can get rid of bloatware in a flash. Or ... you can block the Windows 11 upgrade altogether. (Shhh.)

