

I was recently cleaning up my office when I stumbled upon a couple of Raspberry Pi’s. You know, those computers that are tiny, and run Linux? Yeah, I have accumulated a few over the years. Before boxing them up to collect dust for a couple of years, I had a thought (I have lots of thoughts, but not many of them are good). All of a sudden, it felt like everything in the universe was in harmony, and I realized that PowerShell - my favorite language - can run on Linux! Even a teeny tiny device, like a Raspberry Pi, can run PowerShell. Heck yes!
Running PowerShell is cool, but you need more than a simple “Hello, World” to be satisfied with a project. You don't want to connect a keyboard and monitor every time we write some code. Let’s use VS Code to write PowerShell. What kind of project could possibly satisfy the requirements of impressing your boss, co-workers, friends, or even your significant other, as well as help you learn more about PowerShell?
Introducing PoshBot: a PowerShell-based Chatbot. PoshBot allows you to turn PowerShell code into bot commands. You can send these commands to your bot in a chat service, like Discord. This allows you to interact with your friends and execute code on the Pi from anywhere in the world, assuming that you have access to Discord. This will even allow you to share your code with people who know nothing about power, shells, or anything else that’s been mentioned thus far.

Before you jump to the end product, you need to get your Raspberry Pi up and running PowerShell, followed by some VS Code configuration, which will allow you to develop remotely on the Pi from your desktop. That’s what I will cover in part 2: Configuring PoshBot and writing your first module.

Advantages of PowerShell on a Pi
Raspberry Pi’s run Linux, which means they have a bunch of awesome tools that you can use. The beauty of PowerShell is that it plays nicely with built-in tools. Running PowerShell on a dedicated device allows you to have a personal server to do things for you without increasing your electricity bill, like a traditional server.
I will be using PowerShell 7 for this, which you can download from the Package Library. It will run PoshBot and anything else that I want in PowerShell. You can interact with it by SSHing into it, using VS Code remote development, or even sending it commands through a chatbot. This will give me the power of PowerShell on my phone.
Raspberry Pi setup
This article was written using a Raspberry Pi 3 Model B. Note: A Raspberry Pi Zero will not work. If you already have a Pi that is running, skip ahead to the PowerShell 7 installation.
The first thing that you need to do is put an operating system on your Raspberry Pi.
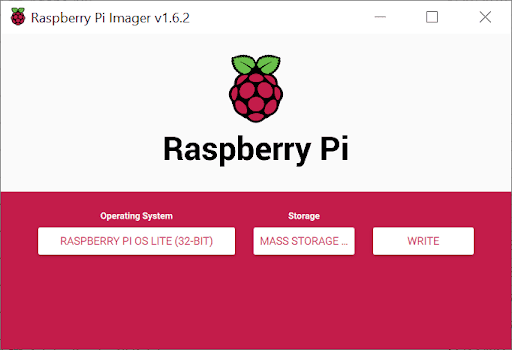
To image your Pi, you will use the Raspberry Pi Imager to put Raspberry Pi OS on your device.
Download: https://downloads.raspberrypi.org/imager/imager_latest.exe
Insert your SD Card into your computer to be imaged and run the Raspberry Pi Imager.
Click OS > Raspberry Pi OS (other) > Raspberry Pi OS Lite (32-bit). You don’t need a GUI for this because we will be connecting to it via SSH, once we have it up and running.
Select the storage device containing your SD card and press “write” to begin the process.
If Windows asks you to format a disk, don't do it. Just click “cancel”, and your Raspberry PI SD card should be imaged.


Boot up the Raspberry Pi
Next, you need to put the SD card in the Raspberry Pi and give it an initial configuration. Connect power, HDMI, add a keyboard to your Pi and you are ready to do the initial configuration. To login with the default credentials, type in pi for the username and raspberry for the password.
Once logged in you should be greeted with the following prompt:
pi@raspberrypi:~$
Configure the Raspberry Pi with raspi-config
Run sudo raspi-config to configure the Pi. Yes, I did take a picture of my screen with my phone, and no, I’m not ashamed. I’m lazy and efficient.

These are the configuration changes to make:
Localization Options > WLAN Country > Select Country
System Options > S1 Wireless LAN > Enter SSID > Enter Passphrase
System Options > S3 Password > Update Pi password. Choose something complex, because we will be enabling SSH.
System Options > S4 Hostname > Enter Hostname. I’m going to go with pdqtpi for giggles.
Interface Options > P2 SSH > Enable. We are going to be using SSH to connect to and run commands.
Press “Escape” to exit raspi-config. Run ifconfig to see your network details.
Visual Studio Code setup
One of the worst parts of using a tiny computer is having a big screen and keyboard dedicated to it. The only thing worse is unplugging and plugging in the video and keyboard cables to make changes to our device. Instead, you can use VS Code to write code and manage files on the Pi. VS Code will connect over SSH and let you interact with files and folders on the Pi.
To follow along, you will need VS Code. If you don’t have VS Code, you are missing out. If your coworkers aren’t using VS Code, they are missing out. If you have PDQ Deploy, there is a pre-built package in the package library for Visual Studio Code that you can deploy to yourself and your coworkers. If you don't have PDQ Deploy, you can try it out for free with a 14-day free trial.
Once VS Code is installed we need to install couple extensions to get started:
Now that you have the appropriate extensions, you can configure your Raspberry Pi as an SSH Target to be used by VS Code.
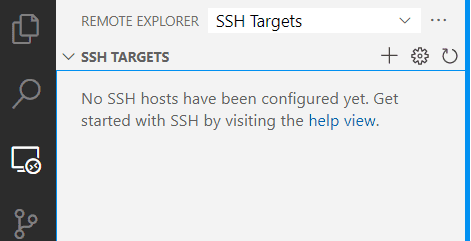
If this is your first time connecting to the device, you will need to select “Remote Explorer” in the sidebar, and click the “+” button to add a new SSH target.
Fill out the SSH connection command in the format of ssh: <username>@<hostname/ip address>

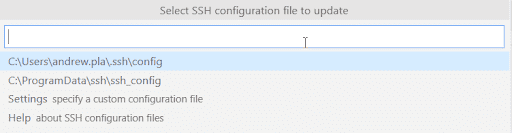
Select the first SSH configuration file (If successful, you should see a toast in the bottom right.):
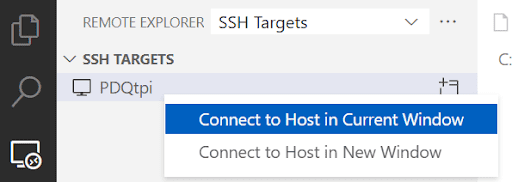
Right-click on the host and choose "Connect to host in Current Window"
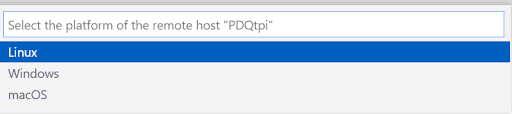
Select the platform of the target host, which is Linux.
Confirm the host fingerprint before proceeding
Finally, enter your password.


The first time we connect it will take a bit longer because it needs some initial setup.
If everything went as planned, you should be connected by now. Select the “Terminal” tab on the bottom panel, and note the bash terminal for the Raspberry Pi. If you don't see a bottom panel, press Ctrl + ` <backtick> to show the terminal.

Installing PowerShell on your Raspberry Pi
Setup PowerShell folder
Next, you are going to create and open the folder where you will be installing PowerShell.
To be extra fancy Linux Lords and Ladies, you’ll use the oft-fabled “squiggly”, which is really just $Home.
mkdir ~/powershellOpen the Explorer > select Open Folder> Select the PowerShell folder > Reenter password if prompted.


Create shell script to install PowerShell
It’s time to run the code to install PowerShell. You are going to put it into a shell script so that all of the commands run in succession. This also sets you up for easier reinstallation.
Create a file in the newly created PowerShell folder by pressing the + button and adding a file called installpwsh.sh

Copy the code below into the file and save it.
#!/bin/bash
# Update package lists
sudo apt-get update
# Install libunwind8 and libssl1.0
# Regex is used to ensure that we do not install libssl1.0-dev, as it is a variant that is not required
sudo apt-get install '^libssl1.0.[0-9]$' libunwind8 -y
###################################
# Download and extract PowerShell
# Grab the latest tar.gz
wget https://github.com/PowerShell/PowerShell/releases/download/v7.1.4/powershell-7.1.4-linux-arm32.tar.gz
# Make folder to put powershell

# Unpack the tar.gz file
tar -xvf ./powershell-7.1.4-linux-arm32.tar.gz -C ~/powershell

# Start PowerShell
~/powershell/pws
# To Uninstall, run "rm -rf ~/powershell"
Execute the shell script by running sh ~/powershell/installpwsh.sh


You should have PowerShell on your target. If all went well, you should be in an active PowerShell Prompt!

Now that you’ve gotten into PowerShell, run exit to return to bash. Try running pwsh to get into PowerShell. Oh no! It doesn’t work. You need a symbolic link to make that work. The symbolic link is what allows you to run `pwsh` to open up PowerShell. We link ~/powershell/pwsh, which we just created, with /usr/bin/pwsh (/usr/bin is the location for system-wide binaries).
sudo ln -s ~/powershell/pwsh /usr/bin/pwsh
pwsh
You can now get into PowerShell whenever you want, simply by running pwsh.
Install the PowerShell extension in the SSH workspace
In order for the code that you write in your SSH session to have telesense and formatting, you will need to install the PowerShell Preview extension inside that session.

Select Extensions > PowerShell Preview > Install in SSH: <hostname>
You can create a folder to insert scripts: New-Item -ItemType Directory -Path ~/scripts
You now have PowerShell running on a Raspberry Pi. That, in and of itself, is pretty cool, but you are just getting started. You need to take this to the next level and create something that you can keep coming back to. You also have a development environment, where you can develop scripts on the Pi.
This chatbot can be used to control home automation, check for the latest blogs from PDQ.com, run commands from your phone, and even monitor your network remotely! You can now put your Raspberry Pi to work for you.


