

TL;DR: Robocopy (Robust File Copy) is Windows’ built-in powerhouse for copying, moving, and syncing large file sets with far more control than Xcopy or File Explorer. It’s ideal for network transfers and complex jobs, letting you mirror directories (/MIR), include all subfolders (/E), run in restartable mode (/Z), filter files, and log activity — with dry-run support (/L) to test safely before committing. The guide also covers return codes, automation tips, and how Robocopy pairs well with PDQ for reliable file distribution at scale.
Robocopy is a Windows command-line tool for copying, syncing, moving, and mirroring files or folders, especially across large directories and network paths. This guide explains how Robocopy works, which switches matter most, and how to test commands safely before changing production data.
What is Robocopy?
Robocopy, which stands for robust file copy (not robot copy, unfortunately), is a command-line utility that copies, replicates, or moves files and directories. It’s a far more robust alternative to Xcopy and essentially replaces Xcopy. Robocopy was initially released as part of the Windows NT 4.0 Resource Kit and has been integrated as a standard feature of Windows since Windows Vista and Windows Server 2008.
Why should you use Robocopy?
Robocopy helps Windows admins reliably transfer large sets of files across directories or networks. Use Robocopy when File Explorer or basic copy commands are too limited for large, repeatable, or network-based file transfers. It gives admins control over retries, logging, permissions, mirroring, file filters, and interrupted transfers.
While copying a few files here and there can be a simple undertaking, transferring mind-bogglingly large numbers of files or multiple folders across a network can get very complex very quickly. But to quote Douglas Adams, “Don't Panic,” because this exact scenario is what Robocopy was built to handle.
Robocopy has more options than you can shake a stick at. If you’re the type of person who buys a fully loaded car simply because it comes with all the options (even though you’ll never use half of them), then Robocopy is for you. You’ve got options for logging, scheduling, attributes, file name lengths, file types, excluding, including, file sizes, purging, and much, much more. You'll probably never use most of the options, but it’s comforting to know they’re there.

Automate patching with PDQ Connect
Keep Windows & macOS devices patched and secure from anywhere.
Robocopy vs. Xcopy
Use Robocopy for almost any modern Windows file copy job. It offers multithreading, robust ACL handling, mirroring, better logging, and resilient network behavior. Xcopy is still available, but it is best reserved for simple one-off copies or compatibility with old scripts. For modern admin workflows, Robocopy offers better retry handling, logging, mirroring, and permission controls.
Quick comparison
Capability | Robocopy | Xcopy |
|---|---|---|
Reliability on flaky networks |
restartable plus
fallback |
restartable only |
Multithreaded performance |
| Not supported |
Sync and tidy backups |
and
| No true mirror |
NTFS ACLs, owner, audit |
flags like
|
and
exist but are limited compared to Robocopy’s controls |
Long paths | Supported by default (avoid
if you need >260) | Often limited by MAX_PATH |
Logging to file and console |
,
,
,
| No built‑in log switch; redirect output manually |
Fine‑grained retries |
and
| No retry tuning |
What are the main Robocopy switches?
Robocopy switches control how files are copied, filtered, retried, logged, and saved as reusable jobs. Admins commonly use switches like /E, /MIR, /Z, /COPYALL, /R, /W, /LOG, and /MT to make file transfers safer and more predictable.
If you ever want to view what additional switches can be set for a given command, simply enter the command followed by /?. For example, to return all the available options for Robocopy, run this in the Command Prompt.
robocopy /?
As you’ll see, this command returns a long list of available Robocopy switches, letting you copy files where, when, and how you want. To make this information a little easier to digest, I’ve listed commonly used parameters in this handy-dandy table. I’ve also included my own notes on each switch, detailing what they do since the included explanation from Microsoft could be considered lackluster at best.
Copy options
Switch | Explanation | Notes |
|---|---|---|
| copy Subdirectories, but not empty ones. | Robocopy does not copy subdirectories by default. |
| copy subdirectories, including Empty ones. | Same as |
| only copy the top n LEVels of the source directory tree. |
|
| copy files in restartable mode. | Allows Robocopy to pick back up where it left off if an error or connection drop is encountered. |
| copy files in Backup mode. | Useful for overcoming ACL restrictions. Make sure to run this with elevated privileges. |
| copy using unbuffered I/O (recommended for large files). | As said in the explanation, recommended for large files. If you are copying small files, then an unbuffered I/O isn’t worth it. |
| copy all encrypted files in EFS RAW mode. | Allows copying encrypted files without having to decrypt the data. |
| what to COPY for files (default is | These are the flags to determine what you want to copy. Default is |
| Copy files with SECurity (equivalent to | Useful if you just want to copy over security changes. |
| COPY ALL file info (equivalent to | Easier to type in compared to adding all the flags. |
| COPY NO file info (useful with | Copies only the file; no additional data is copied. |
| FIX file SECurity on all files, even skipped files. | Copies security permissions even when the file data hasn’t changed. |
| FIX file TIMes on all files, even skipped files. | Copies timestamps even when the file data hasn’t changed. |
| delete dest files/dirs that no longer exist in source. | Use this only if you are sure you won’t need to restore a file in the future. |
| MIRror a directory tree (equivalent to |
|
| MOVe files (delete from source after copying). | Same as if you cut & paste a file from one folder to another. Does not delete the source folder. |
| MOVE files AND dirs (delete from source after copying). | The Microsoft provided explanation is misleading. |
| add the given Attributes to copied files. | Add Read only, Archive, System, Hidden, Compressed, Not content indexed, Encrypted, Temporary, Offline. |
| Remove the given Attributes from copied files. | Remove Read only, Archive, System, Hidden, Compressed, Not content indexed, Encrypted, Temporary, Offline. |
| CREATE directory tree and zero-length files only. | This mimics the structure of the source, though the files contain no data. Use |
| create destination files using 8.3 FAT file names only. | Truncates file and directory names to meet FAT 8.3 standards of 8 characters only. |
| turn off very long path (> 256 characters) support. | By default, Robocopy supports paths longer than 256 characters; only use this switch if you want to disable that support. |
| MONitor source; run again when more than n changes seen. | Continually monitors the source every minute for saved changes. Once n changes have been met, the copy runs. CTRL + C to escape the monitor. |
| MOnitor source; run again in m minutes Time, if changed. | Continually monitors the source every m minutes. Once a change is detected, the copy runs. Can run in combination with |
| Run Hours - times when new copies may be started. | Robocopy only runs the copy during the times specified. |
| check run hours on a Per File (not per pass) basis. | Checks the scheduled |
| Inter-Packet Gap (ms), to free bandwidth on slow lines. | Instructs Robocopy to pause n milliseconds between transferring blocks of data. |
| copy symbolic links versus the target. | Copies the symlink versus the actual file the symlink points to. |
| Do multi-threaded copies with n threads (default 8). n must be at least 1 and not greater than 128. This option is incompatible with the | By default, Robocopy uses 8 CPU threads when copying files. You can use the |
| what to COPY for directories (default is | Specifies what directory data to copy. |
| COPY NO directory info (by default | Won’t copy directory info such as attributes, data, and timestamps. |
| copy files without using the Windows Copy Offload mechanism. | Bypasses Windows offload mechanism. I’m hard-pressed to find a reason to actually use this parameter besides maybe stress testing. |
File selection options
Switch | Explanation | Notes |
|---|---|---|
| copy only files with the Archive attribute set. | Ignores files that do not have the archive attribute set. |
| copy only files with the Archive attribute and reset it. | Copies files that have the archive attribute and then removes the archive attribute from the source file. |
| Include only files with any of the given Attributes set. | Only copies files that have any of the specified attributes set. |
| eXclude files with any of the given Attributes set. | Exclude files that have any of the specified attributes set. |
| eXclude Files matching given names/paths/wildcards. | Use this parameter to exclude files based on names and paths. Use wildcards to expand the results. |
| eXclude Directories matching given names/paths. | Similar to XF, it excludes any given directories. Remember, directories are not returned by default, so this needs to be used with |
| eXclude Changed files. | Excludes files with the same timestamp but different file sizes. |
| eXclude Newer files. | Excludes files newer than the copy in the destination. |
| eXclude Older files. | Excludes files older than the copy in the destination |
| eXclude eXtra files and directories. | Does not delete extra files located in the destination not found in the source, even when |
| eXclude Lonely files and directories. | Exclude files located in the source directory but not found in the destination directory. New files are not added to the destination directory. |
| Include Same files. | Copy files even if there are no differences between the source and destination. |
| Include Tweaked files. | Include files that are the same size and have the same timestamp but have different attributes. |
| MAXimum file size - exclude files bigger than n bytes. | Exclude files bigger than a given size. |
| MINimum file size - exclude files smaller than n bytes. | Exclude files smaller than a given size. |
| MAXimum file AGE - exclude files older than n days/date. | Exclude files older than a given age. |
| MINimum file AGE - exclude file newer than n days/date. | Exclude files newer than a given age. |
| MAXimum Last Access Date - exclude files used since n. | Exclude files not accessed since a given date. |
| MINimum Last Access Date - exclude files used since n. (If n < 1900 then n = n days, else n = YYYYMMDD date). | Exclude files with a last access date newer than a given period. |
| eXclude Junction points and symbolic links. (normally included by default). | If you do not need to include junction points and symbolic links, use |
| assume FAT File Times (2-second granularity). | Use this to copy system times more reliably, especially when copying between systems such as Windows’ NTFS and Linux’s EXT4. |
| compensate for one-hour DST time differences. | Use |
| eXclude Junction points and symbolic links for Directories. | If you do not need to include junction points and symbolic links for directories, use |
| eXclude symbolic links for Files. | Exclude junction points for files. |
| Include Modified files (differing change times). | Includes same files with different timestamps. Use in conjunction with |
Retry options
Switch | Explanation | Notes |
|---|---|---|
| number of Retries on failed copies: default 1 million. | Number of times that Robocopy retries a failed copy. Not sure why the default is set to 1 million, which seems excessive. |
| Wait time between retries: default is 30 seconds. | The amount of time Robocopy waits before attempting a retry. |
| Save | Saves the number of retries and the wait time as the default in the registry. |
| Wait for sharenames To Be Defined (retry error 67). | Waits for a share name to be defined on a “Network Name Not Found” error. |
| Operate in low free space mode, enabling copy pause and resume (see remarks). | Helpful when you can’t move or delete files because of insufficient disk space. See remarks for further details. |
|
| Helpful when you can’t move or delete files because of insufficient disk space. This switch lets you set the floor size. See remarks for further details. |
Specialized and newer copy options
Robocopy also includes specialized switches that are useful in newer Windows environments or more advanced copy scenarios. Most admins won’t need these every day, but they’re worth knowing about for network performance, sparse files, and copy throttling.
Switch | Explanation | Notes |
|---|---|---|
| Request network compression during file transfer, if applicable. | Useful for large network copies when SMB compression is supported. Compression can reduce network traffic, though actual performance depends on file type, CPU resources, and network conditions. |
| Enable preserving sparse file state during copy. | Useful when copying sparse files, such as certain virtual disk, database, or specialized storage files. |
| Disable block cloning. | Useful for troubleshooting or when you want to avoid clone/offload behavior on supported file systems. |
| Request the maximum I/O size per read/write cycle. | Used for copy file throttling. Helps limit Robocopy’s impact on busy systems. |
| Request the I/O rate. | Used for copy file throttling. Helps reduce transfer speed so Robocopy doesn’t consume too many disk or network resources. |
| Set the file size threshold for throttling. | Use with
or
to apply throttling only to files above the specified size. |
Logging options
Switch | Explanation | Notes |
|---|---|---|
| List only - don’t copy, timestamp or delete any files. | Delete any files. No actual copying is performed. |
| report all eXtra files, not just those selected. | Reports extra files located in the destination folder that were not part of the copy. |
| produce Verbose output, showing skipped files. | Provides more detailed information about the robocopy job. |
| include source file Time Stamps in the output. | Time stamps are not shown in the output by default. |
| include Full Pathname of files in the output. | Outputs the actual full path to each file copied. |
| Print sizes as bytes. | Forces larger files to output their size in bytes instead of displaying larger size increments like MB or GB. |
| No Size - don’t log file sizes. | Stops displaying file sizes for each file copied. |
| No Class - don’t log file classes. | Does not return copied item classes such as “New File” and “Newer.” |
| No File List - don’t log file names. | Does not output individual files as they are copied. |
| No Directory List - don’t log directory names. | Does not output directory names as they are copied. |
| No Progress - don’t display percentage copied. | Robocopy displays the progress of a file copy in percentage format. |
| show Estimated Time of Arrival of copied files. | Displays the estimated time of arrival for copied files based on the copy speed of the first file. Must copy more than one file to see the ETA output. |
| output status to LOG file (overwrite existing log). | Creates a log file containing the output of the robocopy job. |
| output status to LOG file (append to existing log). | Instead of overwriting the preview log, the output is added to an already existing log. |
| output status to LOG file as UNICODE (overwrite existing log). | A log file is saved in unicode format. |
| output status to LOG file as UNICODE (append to existing log). | A copy job output is added to an existing unicode log file. |
| output to console window, as well as the log file. | When you use |
| No Job Header. | Removes the ROBOCOPY job header, which is displayed by default. |
| No Job Summary. | The summary of the job will not be output which is displayed by default. |
| output status as UNICODE. | Outputs the status in UNICODE format. |
Job options
Switch | Explanation | Notes |
|---|---|---|
| take parameters from the named JOB file. | This switch calls the parameters of an already existing Robocopy job file. |
| SAVE parameters to the named job file. | Saves the current Robocopy parameters to a Robocopy job file, which can be called again in the future. |
| QUIT after processing command line (to view parameters). | Doesn’t actually run the Robocopy command. Combine this with the |
| NO Source Directory is specified. | Does not specify a source in a job file. |
| NO Destination Directory is specified. | Does not specify a destination in a job file. |
| Include the following Files. | Any file names or filters added to the Robocopy command are added to the job file with the |
Back in the day, using /PURGE or /MIR on the root directory of the volume caused Robocopy to apply the requested operation on files inside the System Volume Information directory as well. This is no longer the case. If either is specified, Robocopy skips any files or directories with that name in the top-level source and destination directories of the copy operation.
The modified files classification applies only when both source and destination filesystems support change timestamps (e.g., NTFS) and the source and destination files have different change times but are otherwise the same. These files are not copied by default; specify /IM to include them.
Using /LFSM requests Robocopy to operate in low free space mode. In that mode, Robocopy pauses whenever a file copy causes the destination volume's free space to go below a 'floor' value, which can be explicitly specified by the LFSM:n[KMG] form of the flag. If /LFSM is specified with no explicit floor value, the floor is set to ten percent of the destination volume's size. Low free space mode is incompatible with /MT, /EFSRAW, /B, and /ZB.
Common Robocopy examples
Task | Command | What it does |
|---|---|---|
Copy all files and folders |
| Copies all files and subfolders, including empty folders, with reasonable retry settings. |
Preview a copy job |
| Lists what would be copied without actually copying anything. |
Mirror a folder | r | Makes the destination match the source, including deleting extra destination files. |
Copy with logging |
| Copies files and writes output to both the console and a log file. |
Copy over a flaky network |
| Uses restartable mode with backup-mode fallback and controlled retries. |
Copy files with permissions |
| Copies file data, attributes, timestamps, NTFS ACLs, owner info, and auditing info. |
Exclude a folder |
| Copies everything except the specified folder. |
Exclude file types |
| Copies files and folders while excluding .tmp and .bak files. |
Avoid overwriting newer files |
| Skips files when the destination already has a newer version. |
Run during off-hours |
| Starts new copy operations only between 7 p.m. and 5 a.m. |
Always test destructive commands, especially anything using /MIR or /PURGE, with /L first. The article already emphasizes that /MIR and /PURGE can delete destination files if they no longer exist in the source.
How do you use Robocopy?
Okay, now that my fingers are nice and numb, how about we look at some Robocopy examples? The goal here isn’t to give you an example for every possible scenario. Instead, I want to provide you with a general idea of what the various parameters do and how they work. Understanding the parameters helps you envision how best to use them in your environment.
Default parameters
Let me just knock this one out of the park real quick. Even when you provide the bare minimum with your command, Robocopy still includes several parameters by default. Most of these parameters are listed as default options in the table above.
If you ever want to see what options are set by default, run the following command.
robocopy "source" "destination" /QUITThis returns the following information.

As you can see, if you don’t specify any additional parameters, the defaults are:
Default Parameter | Description |
|---|---|
*.* | returns all files. |
| returns directory data and attributes. |
| returns data, attributes, and timestamps for files. |
| retries one million times. |
| waits 30 seconds between retries. |
This is what you can expect from Robocopy if you don’t specify any other options. I added the /QUIT parameter just to make sure the job didn’t actually run since I only wanted to see what the default parameters were.
Basic copy job
While the default options are okay (albeit a bit excessive with the retry settings), usually when I copy something, my intention is to copy everything, including subdirectories. Let’s look at the Robocopy syntax that accomplishes this.
robocopy "source" "destination" /E /DCOPY:DAT /COPY:DAT /R:5 /W:10
As you can see from the screenshot above, the command copied three files and one directory from C:\Gov_Secrets to C:\Public_Knowledge. Notice that the switch /S was added automatically. This is the expected result. Any time you add /E to a Robocopy command, /S is automatically added. We’ve also instructed Robocopy to retry five times and wait 10 seconds before each retry.
How does Robocopy mirror and purge files?
/MIR is simultaneously one of the best and scariest options with Robocopy. If you know what you’re doing, /MIR is great. If you don’t know what you’re doing, you can be left with missing files and no backup.
/MIR syncs two directories. Many users see this as a great backup option, which it can be. However, keep in mind that if a file gets deleted from the source accidentally, it also gets deleted from the destination copy when the Robocopy command runs. If you think you will ever need to restore a file that may have accidentally been deleted from the source, then I would not recommend using /MIR or /PURGE.
On the flip side, /MIR and /PURGE are great at keeping your backup tidy as you clean up your source directory. If you don’t use /MIR or /PURGE, then your destination copy may balloon in size since it will never delete any files, even if you delete them from the source directory.
robocopy "source" "destination" /MIR /DCOPY:T /COPY:DAT /R:3 /W:5
I’ve got a couple of interesting things to point out after running this command. Notice that the switch /PURGE was automatically added even though it wasn’t in the original command. Also notice that an extra file called “How The Universe Actually Started.txt” appeared in the destination folder. Because we ran the /MIR parameter, which automatically adds the /PURGE switch, this file was removed from the destination folder.
Remember, /MIR can be your friend, but it can also be your unreliable friend who betrays you when you least expect it. Or perhaps exactly when you expect it.
How do you move files with Robocopy?
If you just need to move multiple files and directories from one location to another, you can use the /MOV or /MOVE parameters. This is similar to cutting and pasting data from one directory to another.
I prefer copying files from one location to another rather than manually deleting the source data just in case the move job encounters an error, but to each their own. If you like to live dangerously, then /MOV and /MOVE may be the adrenaline fix you’re looking for. Consider adding the /ZB switch to help resolve any issues encountered during the move job.
robocopy "source" "destination" /MOVE /E /COPYALL /DCOPY:DAT /ZB /R:4 /W:7
Let’s break this down because this command is interesting. The description provided with the /MOVE command is a bit deceiving. /MOVE moves the files inside the source folder to a new folder and then deletes the source folder. It won’t touch subdirectories.
Imagine this. You have Folder1 and Folder2. Folder1 only has files in it, no subdirectories. /MOVE moves all the files from Folder1 into Folder2, then deletes Folder1.
Now, if you have subdirectories in Folder1, you need to include /E in order to move both files and subdirectories. This is probably what most people are trying to do with this command. The /COPYALL and /DCOPY:DAT is just to ensure everything comes over unless you don’t want to bring over permissions and such. I’ve included /ZB just in case it’s a large transfer that may get interrupted and in case permissions cause a file transfer issue. And finally, I’ve included the /R and /W parameters. I like to add these with all of my Robocopy commands to ensure something doesn’t hang forever.
How do you monitor file changes with Robocopy?
Robocopy can monitor folders for changes and run incremental passes using the /MON and /MOT switches.
/MON and /MOT allow Robocopy to continually run on a system, monitoring for file changes. This allows Robocopy to serve as a kind of pseudo-backup service. /MON:n checks for a specified number of changes before making another copy pass. /MOT:n waits for a specified period of time before performing another copy pass. These switches can be combined, so both conditions must be met before Robocopy completes another pass.
robocopy "source" "destination" /E /MON:5 /MOT:10
As you can see in this screenshot, Robocopy still runs as it waits for the conditions to be met. /MON:5 instructs Robocopy to wait for five changes to be detected before running another pass. /MOT:10 instructs Robocopy not to make another pass for at least 10 minutes. With this combination of /MON:5 and /MOT:10, Robocopy does not run for at least 10 minutes. After 10 minutes, if five changes have been made, then a copy pass runs. If, after 10 minutes, five changes haven’t been made, Robocopy continues to wait for those five changes before running. To end the process, simply use the CMD abort command, which is CTRL+C.
How do you filter files and folders in Robocopy?
Robocopy filters files and folders with file names, wildcards, file extensions, attributes, size, age, and include or exclude switches. Use /XF to exclude files, /XD to exclude folders, and wildcards like *.log or *.tmp to target specific file types.
From the “File Selection Options” section in the parameters table, there are 24 different parameters to filter with. Not 42, but 24. Let that sink in. That’s a lot of options, which is the whole point. Robocopy was designed to ensure users could have complete control over their copy jobs. This one’s for you, fellow control freaks.
Before we dive into the actual switches, it’s important to note that you can filter files without actually adding any switches. Here’s a basic example:
robocopy "source" "destination" filename


Notice that since I included the actual file name that I wanted to copy (“My Name Is Inigo Montoya.txt”) only that one file was copied, even though there are other files in the source folder.
You can extend this functionality even further by using wildcard symbols. Wildcards are symbols that take the place of unspecified characters. There are two well-known wildcards, and there are a couple of lesser-known, or “undocumented,” wildcards.
Let’s take a look at a few wildcard examples.
robocopy "source" "destination" b*

With the b* parameter included, you’re telling Robocopy that you only want to copy any files that start with the letter b. In the screenshot above, you can see that “Bare Necessities.txt” and “Bear Grylls.txt” were the only files to get copied over because they both start with the letter b.
You can include the wildcard symbol anywhere in a file name. In fact, when you run the most basic Robocopy command, you can see that by default, the *.* file filter is included, which means all files will be included.
Here’s an example of using the ? wildcard.
robocopy "source" "destination" "file_n?me.txt"
If you need to copy only files that do not have file extensions, you could use the < wildcard. Here is an example:
robocopy "source" "destination" "<"

Notice that only the files without file extensions were copied over. Take note that we used quotation marks surrounding the < wildcard. If you don’t enclose the < wildcard in quotes, you’ll receive an error that says, “The syntax of the command is incorrect.”
You can also extend the functionality of wildcards to include directories by adding the /S or /E switch.
robocopy "source" "destination" a* /S


What’s important to note is that when you add a file filter and include subdirectories, the filter applies to both files and folders recursively. In other words, the filter also applies to the files contained in the subdirectories that meet the filter criteria. As you can see from the example above, since I filter anything that started with the letter “a”, the folder “Area 51 Alien Communication Files” was copied, but only one of the files inside of that folder was copied.
If you’d rather specify what you want to exclude, use /XF to specify files you wish to exclude and /XD to specify directories you want to exclude.
You can also use the wildcard symbol to filter by file type. *.docx only includes files of the .docx type. *.txt only includes files of the .txt type.
If you want to include more than one filter, simply include a space between each filter.
robocopy "source" "destination" a* b* *.txt *.docx *.jpgThis example copies .txt, .docx, and .jpg files that start with the letter a and b.
If you want to filter based on attributes, you can use the /IA:[RASHCNETO] to include certain attributes or /XA:[RASHCNETO] to exclude specific attributes. The switch options are as follows:
Switch option | Description |
|---|---|
| Read only |
| Archive |
| System |
| Hidden |
| Compressed |
| Not content indexed |
| Encrypted |
| Temporary |
| Offline |
/MAXAGE, /MINAGE, /MAXLAD, /MINLAD are all useful for filtering based on the age or the access date of the file. /MINAGE is especially useful for filtering out files that haven’t been touched in years.
robocopy "source" "destination" /MAXAGE:365This command copies only files that have been modified within the last year. As you can imagine, this is great when you have those users or departments that struggle to clean up their older files.
With so many filter options, it’s difficult to cover them all, but there is one more that I would like to highlight, and that’s the /XO switch. This switch excludes files that have newer versions in the destination directory. This is useful if you have users working out of both the source and destination folders. You don’t want to accidentally overwrite a file that a user has been working on in the destination folder, and this switch stops that from happening.

How do you use Robocopy over a network?
Transferring files across the network can be stressful for any sysadmin, depending on the situation. You may need to migrate your files to a new file server, or maybe you need to capture a backup of some network files. Regardless, there are a few Robocopy switches that can help you ensure a smooth transfer process.
Parameter | Description |
|---|---|
| As I mentioned earlier, this parameter helps overcome unexpected issues, especially when you are transferring files across an unreliable network. It also helps mitigate permission restrictions. |
| If you are copying files to a new file server, you’ll want to make sure you copy all file settings, especially ACL permissions, so users are still able to access their files on the new server. |
| To ensure you don’t bog down the network during work hours, use the run hours switch. You can specify exactly when Robocopy is allowed to run. This is also useful to make sure you aren’t copying files that users are currently modifying. |
| The multi-threaded parameter helps speed up your file transfers by increasing the number of CPU threads used to transfer files. |
Note that when transferring network files, users have reported issues when targeting mapped drives, so it’s recommended that you use full UNC paths in your Robocopy commands.
robocopy "source UNC path" "destination UNC path" /COPYALL /E /ZB /RH:1900-0500 /MT:64 /R:10 /W:10 /V /TEE /LOG:"C:\Logs\Robocopy_Log.txt"These are some pretty standard options you’ll want to consider when doing a big network transfer job. We're using full UNC paths for our source and our destination. The /RH:1900-0500 option specifies that we only want Robocopy to run from 7 p.m. to 5 a.m. Once 5 a.m. hits, the Robocopy job pauses, which should prevent Robocopy from bogging down the network during work hours. We’ve included some logging options as well with /V, /TEE, and /LOG, which we will cover more in-depth in a moment.
I want to emphasize that no two network environments are the same. You'll need to evaluate your network to determine which switches and options you need to complete your file transfers. I strongly suggest you use /PURGE and /MIR cautiously when transferring critical network files, or really any vital data. Robocopy is terrific at deleting files if you're careless with your commands.
How do you enable Robocopy logging?
By default, Robocopy outputs quite a bit of information to the console window. I find this pretty sufficient for most small Robocopy jobs. However, when you're dealing with critical files or transfers of hundreds of GB or even TB of data, it’s good practice to have an actual log file to review, especially if an issue occurs.
Much like its options for everything else, Robocopy offers an abundance of logging options. While most options are user-preference settings to either minimize or maximize what data is logged, there are a few standouts.

Parameter | Description |
|---|---|
| This one is pretty straightforward as it simply saves the log information to a log file rather than just outputting it to the console window. |
| Use this option if you want to append log information to an already existing log file. Be aware that if you transfer large numbers of files, especially on a scheduled task, this can make your log file balloon into a file that is several gigabytes in size. |
| This sends the log information to a log file as well as the console window. |
| This switch provides the full path address to the file, making it easier to find files that may have encountered an issue during the copy job. |
| This enables verbose logging, which returns more detailed information about the Robocopy job. Specifically, it includes information about skipped files, not just files that were actually transferred. |

You can see the difference between these two logs, one with the verbose switch, and one without it.
Here is an example of a command that generates a verbose log file with the date included in the file name. I use the /TEE switch to also send the output to the console window.
robocopy "source" "destination" /TEE /FP /V /LOG:"C:\Logs\Robocopy_V_Log_%date:~-10,2%"-"%date:~7,2%"-"%date:~-4,4%.txtHow do Robocopy job files work?
Robocopy job files save source paths, destination paths, file filters, and switches in a reusable .rcj file. Use /SAVE to create a job file and /JOB to run that saved configuration again. This could be very helpful if you find yourself running the same long list of Robocopy commands over and over again. Robocopy commands can grow exceedingly long, especially if you have to include a lot of filter options.
Here’s how to save and call upon job files via Robocopy:
/SAVE:job_name → Saving a Robocopy job is as simple as adding the
/SAVEcommand to the end of your Robocopy command. Make sure it is the last switch added to the command, as any other options added after the /SAVE switch will not be saved. The file will be saved with a .rcj extension./JOB:job_name → Calling a Robocopy job file is just as simple as saving it. Simply enter the
/JOBswitch with the name of the job file you want to run.
Here is a simple example to create a Robocopy job file.
robocopy "source" "destination" /COPYALL /SAVE:"C:\Robocopy Job Files\job1" /MIRAs you can see, I’ve purposefully included the /MIR option after the /SAVE option. If I view my job file, /MIR is not there.

Now, if I add the /MIR parameter before the /SAVE parameter, my copy options look like this.

To run a job, execute Robocopy with the /JOB:file_name option. When the job file runs, you’ll see all of the parameters passed by it.
robocopy /JOB:"C:\Robocopy Job Files\job1.RCJ"

If you want to edit a job file, but you don’t want to run a command to do it, you can modify job files with any text editor. By default, the job files are filled with comments, though they can be trimmed down to the bare minimum parameters if that’s more your style.
Here’s a job file I edited to contain the bare minimum information.

And here is the result from running the job file.

As you can see, without the comments, the job file is much smaller, and all that’s really needed is the source, destination, and switches.
Two other options I’d like to briefly discuss related to Robocopy jobs are the /NOSD and /NODD parameters. These options let you leave the source and destination locations out of your job files. When you run the job file, you need to include the information. This is useful if you need to run the same job in multiple locations.
/NOSD → No source specified. This will automatically be added to the job file when you leave the source directory out of the command.
/NODD → No destination specified. This will automatically be added to the job file when you leave the destination directory out of the command.
robocopy *.txt /SAVE:"C:\Robocopy Job Files\job2"When you call this job, you want to include the source and destination information. The job contains the options you previously saved, but you can append more options that aren’t in the job file if you wish.
robocopy /JOB:"C:\job_file_location\job_name.rcj" "C:\source" "C:\destination" /COPYALLYou can see in this example that I’ve called the job file, though I’ve also included the /COPYALL switch, which wasn’t included in the job file.

The filter m* from the job file remained intact, and the /COPYALL option was also included.
How do you safely test a Robocopy command?
Since we like to play it safe with utilities that can easily wipe out an entire file server, it’s a good habit to test our Robocopy commands before running them on production data. We want to do whatever we can to prevent an oh no, not again type of situation.
Running your commands against test files and folders is a great way to ensure your command is doing what you want it to do. However, there is one other testing method that you should probably start using before you go full contact IT on your network, and that’s the /L switch.
/L → Provides details about the command you are running, with all of the files and folders that would be affected, without actually running the command.
You can use the /L switch to give you a preview of what will happen when you actually run your command. I like to also send the results to a log file for review.
robocopy "source" "destination" /E /COPYALL /L /TEE /LOG:log_file
As you can see, the job looks like it runs and returns all of the results, but if I view the destination folder, it will be empty, just like in my dreams.

Another easy way to tell if the job didn’t actually run is you won’t have the percentages next to the file indicating the copy status.
Now let’s remove the /L switch and compare the actual results.

As you can see, with the /L switch removed, the copy status of the files is displayed.
What do Robocopy return codes mean?
Here is a list of the Robocopy return codes and their meanings. Exit codes 0–7 are success codes, and anything >= 8 indicates a failure.
How do you troubleshoot common Robocopy errors?
Start by dry‑running with /L and logging to a file, then fix paths, quoting, permissions, timestamps, and retry settings. Add /Z (or /ZB if needed) for flaky networks, remove risky /MIR until tested, and tune /R and /W to avoid long retry stalls.
Quick triage checklist
Rerun with
/L /TEE /LOG:"C:\Logs\robocopy_diag.txt" /V /FP /TS.Verify quoted paths and use UNC instead of mapped drives.
Run elevated; add
/Bor/ZBif hitting ACL issues.Set retries:
/R:5 /W:10.For timestamp weirdness between filesystems, add
/FFTand optionally/DST.
How do you run Robocopy with PDQ Connect?
Looking to run a Robocopy job against remote and on-prem machines? PDQ Connect has your back. Sign up for a free trial to give it a try.
In PDQ Connect, click Packages > Create package.
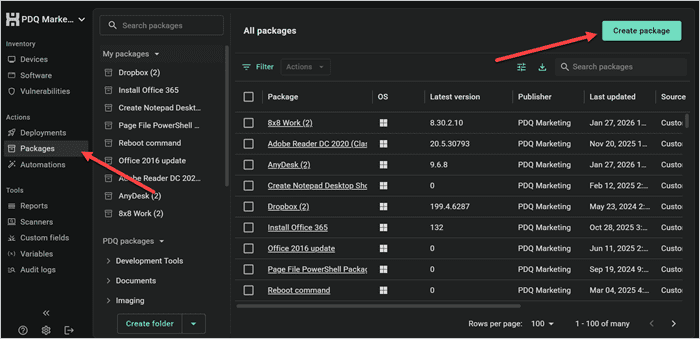
Give your package a name.
Click Add install step > Add script step.
Set the type to Cmd, enter the Robocopy command you want to run against targets.
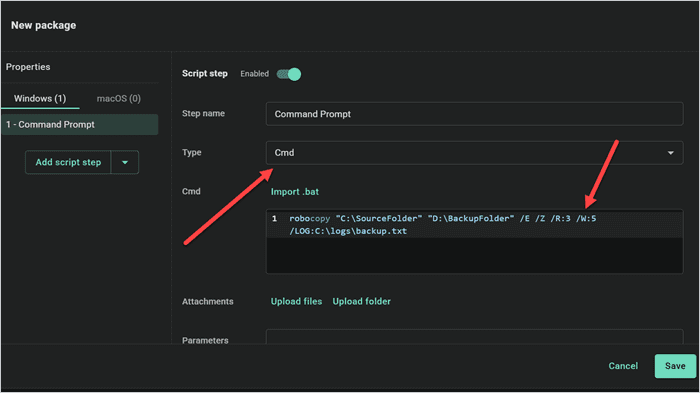
Add the success codes 0,1,2,3,4,5,6,7.
Click Save, and your package is now ready to deploy to your targets.


How do you run Robocopy with PDQ Deploy?
Need to run a Robocopy job against multiple machines? PDQ Deploy will have you transferring files all over the place in no time. PDQ Deploy allows you to deploy a command or batch file with just a few clicks. Don’t have PDQ Deploy? Download a free trial so that you can follow along.
With PDQ Deploy open, click New Package.
Give your package a name.
Click New Step > Command.
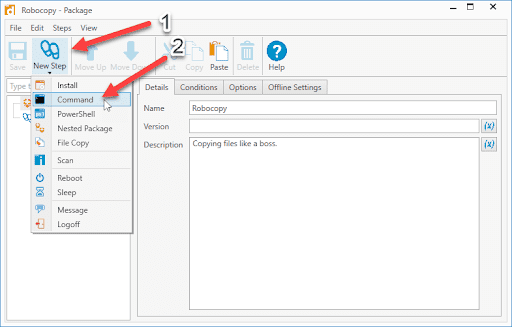
Enter the Robocopy command you want to run against targets.
Add the success codes 0,1,2,3,4,5,6,7.
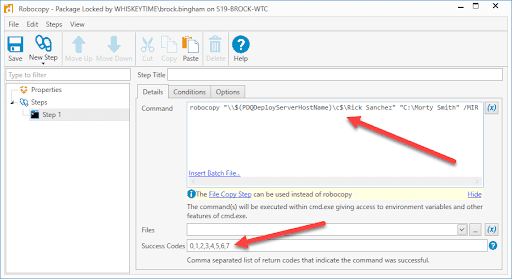
Click Save, and your package is now ready to deploy to your targets.


What are alternatives to Robocopy?
I've never really given it much thought, but there are a lot of different ways to move a file. Let’s go over a few other common methods of transferring files and see how they stack up to the competition.
Drag and drop
Hover your mouse over a file, click and hold, drag the file to another location such as another open folder or the desktop, then let go of the file.

Just to note, you might expect a Hitchhiker’s Guide-esque result if the file you copy is huge:
“For a moment, nothing happened. Then, after a second or so, nothing continued to happen.”
In other words, this manual approach takes a notoriously long time for large files. Godspeed, friend.
Right-click, copy/cut, and paste
Right-click on a file and select Copy or Cut. Right-click anywhere in the destination folder and select paste. Copy obviously copies the file. Cut removes the file from the current location once it’s been moved to its new destination. This is usually my go-to method when I need stuff moved and don’t really care about the details.


Ribbon menu
Select the file you want to copy and select Home from the ribbon menu. Next, select Move to or Copy to. If the destination you want is in the list of locations, select it; otherwise, select Choose location… and browse to the destination folder, then select either Move or Copy. (I’d be interested to see how many people actually use this method. As for me, I’m far too lazy.)

Command Prompt
If you’re old school or aspire to be a hacker one day, then you’ve obviously been using Command Prompt to transfer files. The commands you want to use are the move or copy command. Here’s the syntax.
move "source_file" "destination"or
copy "source_file" "destination"Example:
move "C:\Users\brock.bingham\Music\Movin’ On Up.mp3" "C:\Users\brock.bingham\To The East Side"PowerShell
PowerShell is the option of choice for those sysadmins who try to accomplish everything, and I do mean everything, with PowerShell. Need to rename a shortcut on a desktop? PowerShell. Need to reboot? PowerShell. But how does it compare to Robocopy? Well, I know a few PowerShell fanatics, and even they usually stick with Robocopy, though they may launch it from the PowerShell console instead of the Command Prompt. I think it’s because they prefer the color blue.
Here’s the syntax:
Move-Item -Path "C:\Folder 1\file.txt" -Destination "C:\Folder 2\"or
Copy-Item -Path "C:\Folder 1\file.txt" -Destination "C:\Folder 2\"Example:
Copy-Item -Path "C:\Users\brock.bingham\Documents\Super Secret Files\Unannounced Marvel Movies Roadmap.txt" -Destination "C:\Users\brock.bingham\Documents\Not So Secret Files"PowerShell power user?
Check out The PowerShell Podcast: a weekly exploration of tips and tricks to help you step up your PowerShell game.
PowerShell cmdlet table
PowerShell has cmdlets that overlap with some Robocopy workflows, especially copying, moving, deleting, checking paths, and creating folders. They aren’t one-to-one replacements for Robocopy switches, but they’re useful for smaller file tasks or for wrapping Robocopy in larger automation scripts.
Cmdlet | Robocopy-ish equivalent | What it does | Example |
|---|---|---|---|
| Basic copy | Copies files or folders from one path to another. |
|
| robocopy | Copies folders and their contents recursively. |
|
| robocopy | Moves files or folders to another location. |
|
| Similar cleanup behavior to | Deletes files or folders. |
|
| Precheck before running Robocopy | Checks whether a file or folder path exists. |
|
| File discovery/filtering | Lists files and folders, often before copying or deleting. |
|
| Create destination folder | Creates a new file or folder. |
|
| Run Robocopy from PowerShell | Starts an external process, including Robocopy. |
|
Robocopy or PowerShell?
Scenario | Better choice | Why |
Copy one file locally | PowerShell |
|
Copy a folder with lots of subfolders | Robocopy | Better performance, retry handling, and logging. |
Mirror two directories | Robocopy |
|
Copy across a flaky network | Robocopy |
|
Build a larger automation script | PowerShell + Robocopy | PowerShell can handle variables and logic while Robocopy handles the transfer. |
Delete files based on script logic | PowerShell |
|
Xcopy
Xcopy (extended copy) has been around for a long time. We’re talking DOS 3.2 long. Xcopy was developed to provide more functionality than just the “copy” command. Xcopy is still available to use with Windows 11, Windows 10, and Windows Server 2019, though it has been deprecated in favor of Robocopy.
Here's the syntax.
XCopy "source_file" "destination"Example:
XCopy "C:\Users\brock.bingham\Documents\Super Secret Files\How The Universe Was Actually Created.txt" "C:\Users\brock.bingham\Documents\Not So Secret Files"There are many more parameters that can be used with Xcopy; this is just the basic usage.
File copy step in PDQ
PDQ allows you to build custom packages that you can then deploy to hundreds or even thousands of targets. One option when creating a package in PDQ is the file copy step. With the file copy step, you simply select a source and a target folder. It’s about as simple as it gets. Okay, maybe it’s not quite as simple as the drag and drop method, but when you need to do it for hundreds of computers, this option is one of the best.
In PDQ Connect
Launch PDQ.
Click Packages > Create Package.
Name your package.
Click Add install step > Add file copy step.
Select your source folder.
Select your target folder.
Click Save.
In PDQ Deploy
Launch PDQ Deploy.
Click New Package.
Name your package.
Click New Step > File Copy.
Select your source folder.
Select your target folder.
Click Save.
Your new package is ready to be deployed to all of your adoring fans … I mean users.
It’s really quite impressive how many options one tool can have for a task as simple as copying files. However, once you dive into the intricacies of file copying, you begin to realize why Robocopy has such a massive number of options. When it comes to protecting data, you need to account for every what-if scenario you may encounter along the way.
Hopefully, this blog has cleared up some of Microsoft's vague parameter explanations and you’ve gained a better understanding of how to implement these options into your Robocopy commands. Honestly, the best way to understand how most of these options work is to simply test them out.
The best way to learn Robocopy is to test each command with /L, review the output, and only then run it against real data. That one extra step can save you from a very long afternoon with a very uncomfortable amount of silence.
Now, if you’ll excuse me, I need to go ice the nubs where my fingers used to be.


