Some of our users have recently commented that they’ve discovered that they can copy files and shortcuts to all their computers using PDQ Deploy. That’s correct. While we don’t often discuss other smaller features, it’s worth latching on to one or two from time-to-time. There are several different ways you can copy files to your target computers. One method is to include the files you wish to copy as part of your PDQ Package. (Using the Additional Files feature). Another method is to have the source files stored on an accessible file server and simply run a command to copy the files from the source to the target. Both examples are discussed below.
Looking for other ways to copy files quickly? Learn how to deploy Mouse without Borders, which allows you to control up to four network-connected computers with a single mouse, making it easy to drag and drop files.
Copying shortcuts
In this example we will be using the Command step in PDQ Deploy.
1. Open a new PDQ Deploy package. Add a Command Step. (Note: the default step is an Install step. Simply create a command step and then delete the default Install step.)
2. Create the shortcuts you want to use. Specify these shortcut files that you wish to copy in the Additional Files field. You can specify multiple files. Remember that a shortcut which points to a folder or file on a mapped drive or a UNC path ends with a .LNK extension and a shortcut file that points to a website will have a .URL extension.
3. Enter the copy command. Here’s an example where we copy all the included files that end with .LNK to the Public Desktop of our target computers.
copy .\*.lnk %PUBLIC%\Desktop /Y
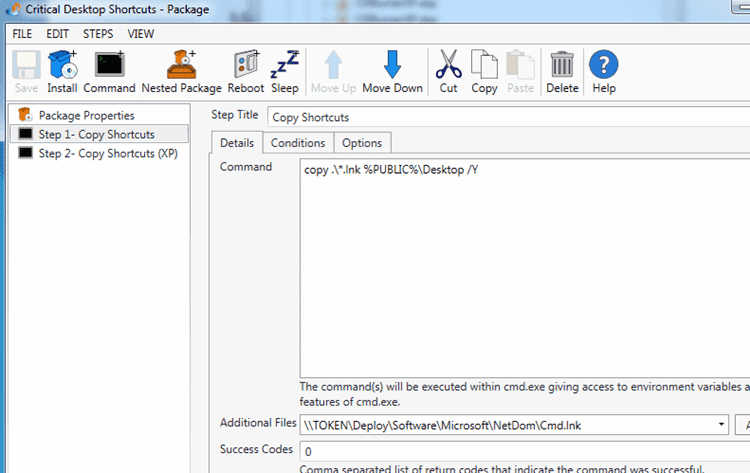
If there are any conditions that you wish to add then simply click on the Conditions tab. A common example of a condition would be to specify OS. For instance the above command uses the %PUBLIC% variable, which is only used in Vista and higher. (XP and Server 2003 wouldn’t recognize this variable).
See the video below for examples of how to only run the copy on specific OS’s by using the Conditions tab.
That’s it. Your package is created and you’re ready to deploy to multiple computers. Save and close the package and then click on the Deploy… button. From the Deploy screen you can deploy to computers in Active Directory, Spiceworks, PDQ Inventory, text files, or you can manually type the computer hostnames.
Copy files
In this example we will copy the appropriately popular PSTools to multiple computers.
Create a new package for PSTools. In this case we’re not going to add each of the PSTools files separately (that’s a lot of files). Rather we’re going to run xcopy in our command step.
Follow the same procedure as above to create a new package and add a Command step. This time however keep the Additional Files blank and in the command window, type the following:
xcopy "\PSTools" "%WINDIR\PSTools\PSTools" /I /E /Y
This command will grab all the files in PSTools and copy the files to the target computers Windows directory and create a subdirectory called PSTools (if it isn’t already created).
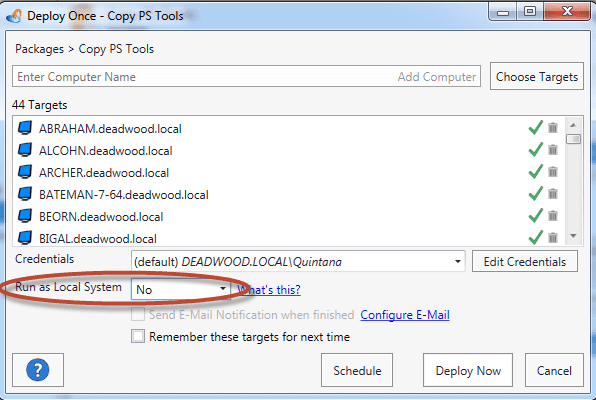
Important: If you use this method of copying files you cannot use the Run as Local System option when you deploy. Why? When a deployment is set to Run as Local System then any command that attempts to access a remote file share (such as our xcopy command) will fail because the Local System account won’t have access to the file server. (unless you allow your local computer accounts access to the file share. This is hardly ever allowed in corporate networks). See image below for an example.
If you want to use Robocopy (I’ve always loved this utility) then you should be aware that you will need to modify the Success Codes values for the Robocopy Step. Basically use the Success Codes 0,1. Otherwise a successful Robocopy will be reported as a failure.
Video – Copying shortcuts and files
Shane and Lex walk you through both of these examples using PDQ Deploy.
Loading...

