

PDQ Connect comes packed with features to help sysadmins manage their remote endpoints. One of Connect’s most powerful features is the ability to create custom packages. Custom packages allow you to deploy your favorite applications and scripts to your Windows clients right from Connect’s streamlined interface. Sound too good to be true? Read on to discover how custom packages in PDQ Connect can take your IT game to the next level.
PDQ Connect features
PDQ Connect shares many of the same great features that its older siblings, PDQ Deploy & Inventory, are known for. Features include:
An extensive prebuilt package catalog
Detailed asset information
Advanced filtering
And, of course, the ability to create custom packages
However, the most apparent change, and the one that users will notice first, is the modern and streamlined user interface. Built for the web, this interface simplifies navigation and ensures users are only ever a few clicks from where they want to be. PDQ Connect’s new interface also means some processes have a different, yet familiar, workflow, including the custom packages creation process. Let’s look at the various components of custom packages in PDQ Connect.
Custom package and step properties in PDQ Connect
The properties page is where you’ll define your package details. This information includes the name, version, and description of the package. You can also define a timeout period for the package deployment.

The install step
This is where the real magic happens. The install step is where you’ll attach your install files, set parameters, configure run modes, and more. If you’ve struggled to deploy packages to your remote PCs, the install step will become your new best friend.

You’ll find the following fields and settings on the install step page:
Step name: While not necessary, naming your steps helps others identify what each package step does.
Installer: Installer is where you’ll attach your install file, such as an EXE, MSI, MSU, or MSP file.
Attachments: Attachments is where you would attach any additional files or folders required by the installation.
Parameters: This is where you would input installation parameters, such as silent switches for EXE installers.
Success codes: In the Success codes field, you can include any error or return codes that should indicate a successful installation.
Run as: This drop-down menu sets the run as mode for the deployment.
Error mode: Error mode is used to configure what happens when a deployment encounters an error.
The PowerShell step
PowerShell is an extremely versatile scripting language capable of executing complex tasks. However, running PowerShell scripts against remote targets can be frustrating enough to make a grown sysadmin cry. Thankfully, the PowerShell step in Connect makes deploying all your favorite scripts almost too easy.

While the PowerShell step shares many of the same settings as the Install step, there are a couple of different options that I should mention.
Import .ps1: The Import .ps1 link is used to navigate, select, and import your PowerShell scripts.
Script pane: The script pane allows you to manually enter your PowerShell code. This pane also autopopulates with the code from imported PowerShell scripts.
The file copy step
The file copy step is a simple way to transfer files to your endpoints. Why stress over email attachment size limits and cloud storage platforms when you can easily transfer files with PDQ Connect?

The are few unique options found on the file copy step.
Attachments: The Attachmentsdropdown is where you will attach your files or folders to be copied.
Target folder: This is the destination folder you are copying the files to. If the folder doesn’t exist on the targeted endpoint, it will automatically be created.
Overwrite existing files: This option overwrites existing files of the same name on the destination device.
The reboot step
The reboot step is a great way to send a reboot command to your workstations. This step is useful to add to your packages when an installer requires a reboot after installation. It’s also handy for those users that never restart their computers even after you’ve t̶h̶r̶e̶a̶t̶e̶n̶e̶d̶ t̶h̶e̶m̶ asked them nicely.

Here are the unique options of the reboot step:
Delay: The delay setting designates how long to postpone the reboot command before it executes. This is useful if you need to provide additional time for an install step to complete before rebooting the system. It can also be used to provide users enough time to save what they’re doing before the reboot.
Message: The message step gives you the option to display a message prompt that the device will reboot. While you may be tempted to restart computers without warning your users, I can assure you that you’ll receive far fewer help desk calls if you warn your users first.
The nested package step
The nested package step gives sysadmins the ability to nest multiple packages into one package. This can be very helpful for baseline packages or if you have several different packages that always need to deploy together.

There is only one setting unique to the nested package step.
Package: The package setting lets you select from the prebuilt and custom packages in your PDQ Connect instance.
It’s important to note that more than one nested package step can be added to a package.
Creating a custom package in PDQ Connect from start to finish
Now that we’ve gleaned all the glorious details about custom packages in PDQ Connect, it’s time to put what we’ve learned into action. Grab your beverage of choice, slap your do not disturb sign on the door, refocus your chakra, and let’s do this.
For this example, we’ll build a custom package for a screen capture software called PicPick. You can substitute PicPick for an application of your choice, but be aware that some configuration settings are not relevant for other installers.
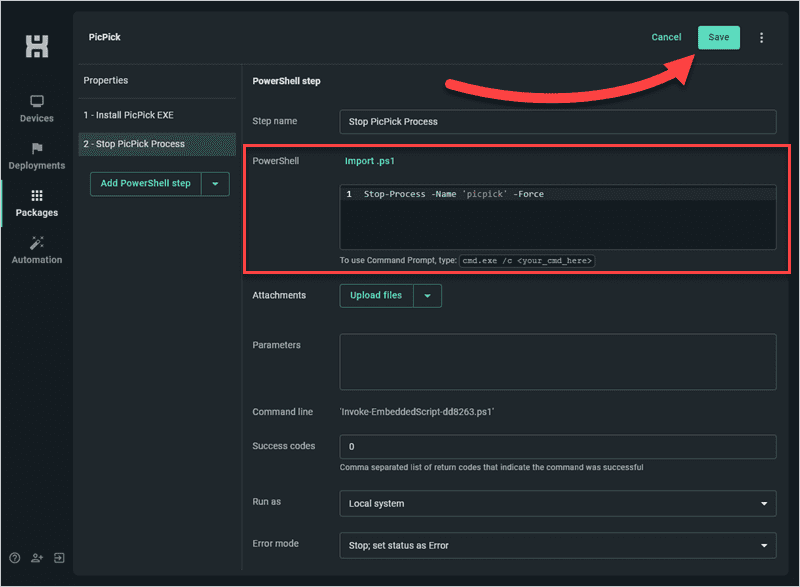
Before we build the package, we need to create a PowerShell script. PicPick is eager to get started, launching immediately after installation. While I love the enthusiasm, having a random application unexpectedly pop up on a user’s machine is a surefire way to get a bunch of help desk phone calls. This script is designed to stop the application from automatically launching after it installs. Here is the PowerShell script:
Stop-Process -Name ‘picpick’ -ForceOnce we’ve saved the PowerShell script, we can begin creating the package.
With PDQ Connect open, click Packages.
Click Create package.

Add your package parameters.

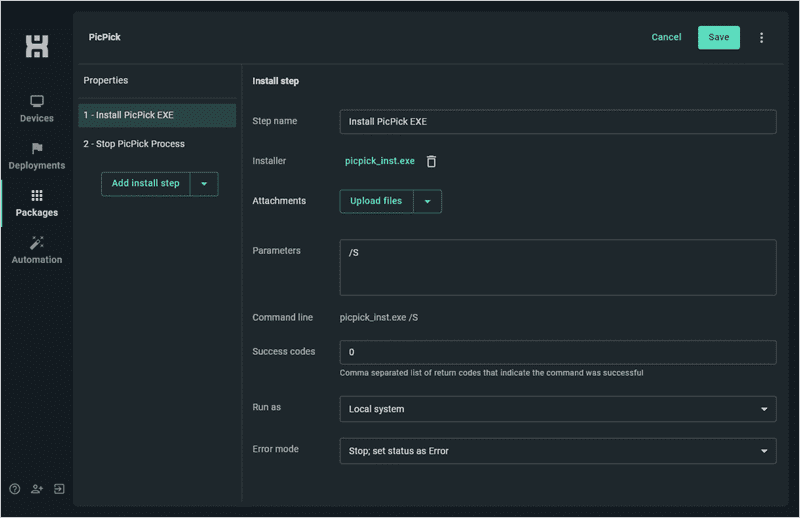
Click Add install step, then name the step.
To attach the PicPick installer, click Attach installer file, then navigate to the installation file, select it, and click Open.
Add the silent parameter /S into the Parameters field.
Using the drop-down menu, click Add PowerShell step.
Name the step, then click the Import .ps1 link. Browse to the PowerShell file we created at the start of this tutorial, select it, and click Open.
Keep the rest of the default settings, then click Save to save the package.


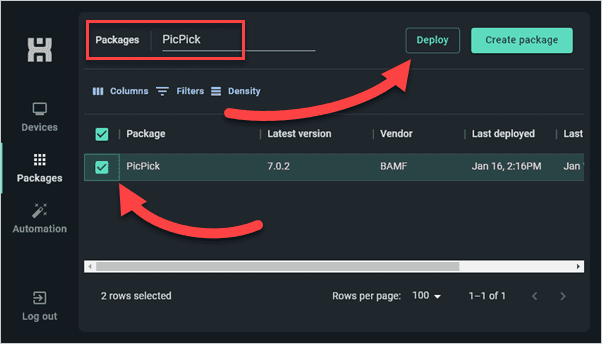
All that’s left to do is deploy the package to a test machine to make sure everything’s working.
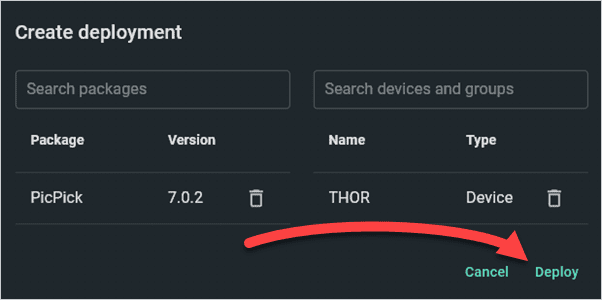
On the Packages page, search for and select the PicPick package, then click Deploy.
Enter the name of the test device you want to deploy the package to, and select it.
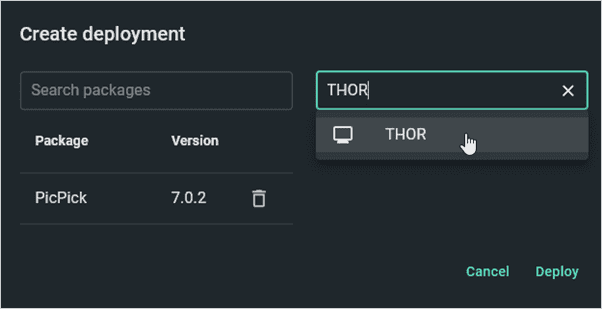
Click Deploy.


If the device is online, the package should deploy very quickly. You can monitor the deployment by clicking on the Devices page and locating the device you deployed the package to.

PDQ Connect, keeping you connected to your remote endpoints
If you manage a large fleet of remote devices, PDQ Connect can help. Stop stressing about the complexities of remote management, and let Connect simplify your workflows. From patching to inventory management, Connect has everything you need to get the job done with none of the overhead. Don’t wait — try PDQ Connect for 14 days absolutely free. It may not change your life, but it will make it easier.


