

TL;DR: .NET Framework is a core Windows runtime that many apps (including PDQ) rely on, and Windows 10/11 include .NET 4.8 by default. You can check which versions are installed using the Registry, PowerShell, or Command Prompt, and enable older versions like .NET 3.5 through Windows Features or DISM if needed. While .NET can’t be fully removed from Windows, optional versions can be disabled, and common issues can usually be fixed with Windows updates, the .NET Repair Tool, or built-in system repair commands like DISM and SFC.
Many Windows applications require .NET Framework, including PDQ Deploy & Inventory. To keep apps running smoothly, you need the right framework versions installed. This guide explains how to check, install, remove, and repair .NET Framework on Windows 10 and 11.
What is .NET Framework?
.NET Framework is a development framework used to build and run Windows applications.
For developers, .NET Framework is an attractive development model as it has an extensive class library containing common types and APIs that software engineers can use to rapidly create applications. Its Common Language Runtime (CLR) execution engine not only manages running applications but also provides services, such as memory management, exception handling, and more.
For users, .NET Framework runs silently in the background of Windows, enabling applications built on it to function. While most .NET Framework applications are compatible with current versions, some legacy applications may require specific versions of .NET Framework to function.
What is the difference between .NET Framework and .NET?
.NET Framework is the Windows-only runtime that ships with Windows 10 and 11 for classic apps. .NET (formerly .NET Core) is the modern, cross‑platform runtime for new development and installs side by side with .NET Framework.
Feature | .NET Framework | .NET (5, 6, 7, 8) |
Platform scope | Windows only | Windows, Linux, macOS |
Status | Mature line; ships with Windows 10 and 11 | Actively developed with annual releases |
Support cadence | Serviced via Windows Update | Even-numbered versions are STS, odd are LTS |
Install and updates | Included in Windows | Runtime or SDK installed per version; package managers supported |
Versioning model | Uses in‑place updates | Side‑by‑side installs for multiple majors (for example, 6 and 8) |
App types | Windows Forms, WPF, ASP.NET (classic) | ASP.NET Core, console, services, MAUI/Blazor |
Compatibility | Many enterprise apps require specific Framework versions | Not a drop‑in replacement for Framework apps without porting |
Coexistence | Can run alongside .NET | Can run alongside .NET Framework |
Which should I install?
If the vendor says “.NET Framework required,” install that version. PDQ Deploy and PDQ Inventory rely on .NET Framework.
If you are running modern cross‑platform apps or building new services, install .NET (prefer LTS).
Both can coexist. Installing .NET does not remove or replace .NET Framework.
How do I check my .NET Framework version?
You can identify which versions of .NET Framework are installed by using either Windows Registry Editor, Windows Explorer, Command Prompt, or PowerShell. Let’s briefly go over how to use each method.

Manage Windows & macOS devices from anywhere
With PDQ Connect, get real-time visibility into remote and local devices, deploy software, remediate vulnerabilities, automate routine maintenance, and remotely troubleshoot endpoints from one easy-to-use platform.
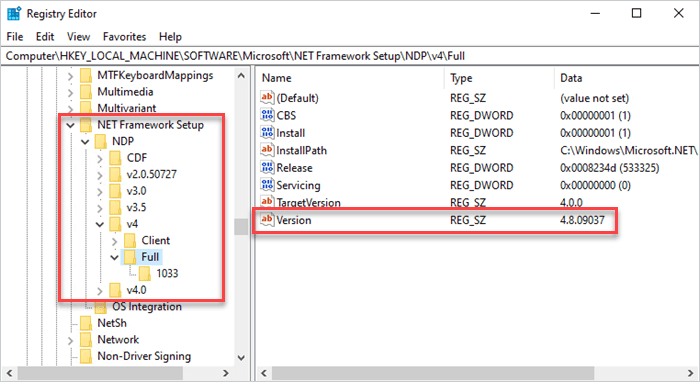
1. Identify .NET Framework versions with Windows Registry Editor
Enter regedit into the Windows search field, then click Registry Editor.
If prompted with a UAC prompt, click Yes.
Navigate to
HKEY_LOCAL_MACHINE\SOFTWARE\Microsoft\NET Framework Setup\NDP.The registry keys of the .NET Framework versions you have installed will display.
Click into the subkeys to identify the specific version number.

You can also use these registry keys to build a registry scanner in PDQ Inventory and PDQ Connect.
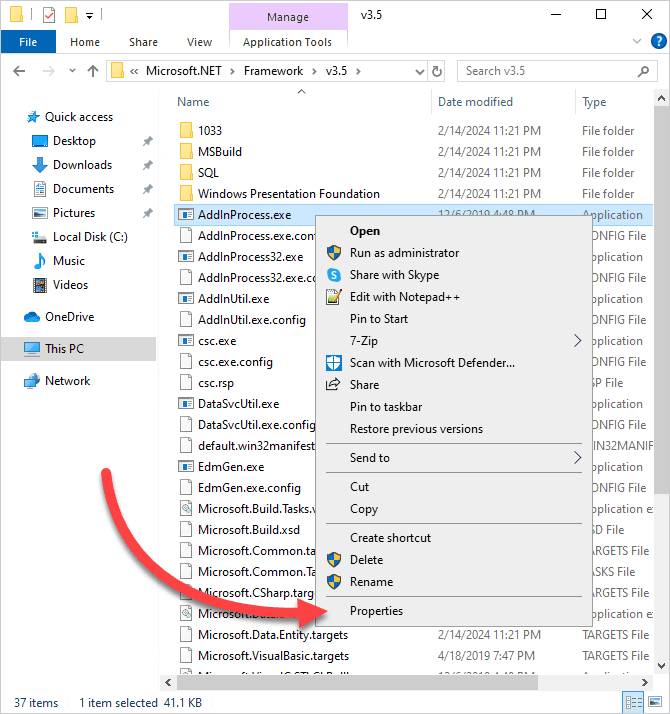
2. Identify .NET Framework versions with Windows Explorer
Open Windows Explorer (Win + E), then navigate to
C:\Windows\Microsoft.NET\Framework.You’ll see the various major versions of .NET Framework broken out into separate folders.
To find the specific version for any of the .NET Framework installs, click into one of the folders, then right-click on a DLL or EXE file, and click Properties.
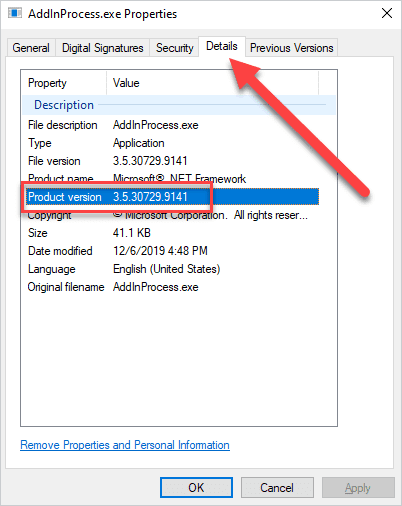
Click on the Details tab.
The product version is listed in the Details tab.


3. Identify .NET Framework versions with Command Prompt
Enter cmd into the Windows search field.
Right-click on the Command Prompt result, then click Run as administrator.
Click Yes at the UAC prompt.
Enter the following command:
reg query "HKLM\SOFTWARE\Microsoft\Net Framework Setup\NDP" /sDepending on the number of different .NET Framework versions you have installed, this may return quite a few results. However, you should be able to identify the various versions by scrolling through the results.


4. Identify .NET Framework versions with PowerShell
Enter PowerShell into the Windows search bar.
Right-click on the PowerShell results (version shouldn’t matter), then click Run as administrator.
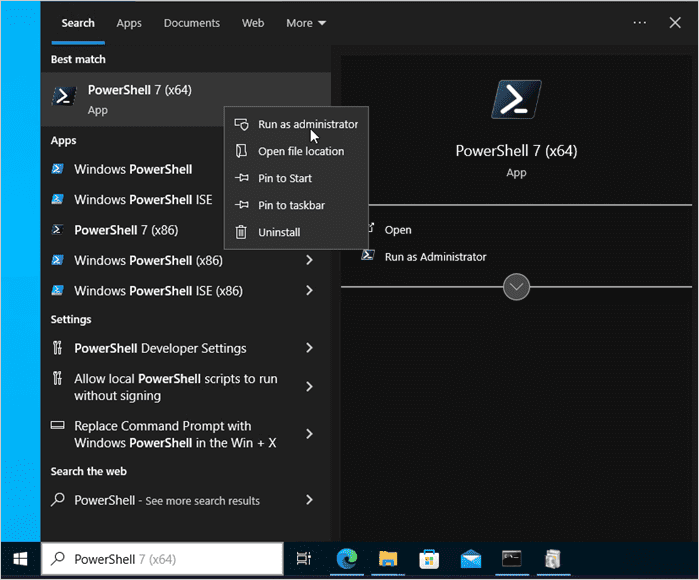
Click Yes at the User Account Control prompt.
Enter and run the following command:
Get-ChildItem 'HKLM:\SOFTWARE\Microsoft\NET Framework Setup\NDP' -Recurse | Get-ItemProperty -Name version -EA 0 | Where { $_.PSChildName -Match '^(?!S)\p{L}'} | Select PSChildName, version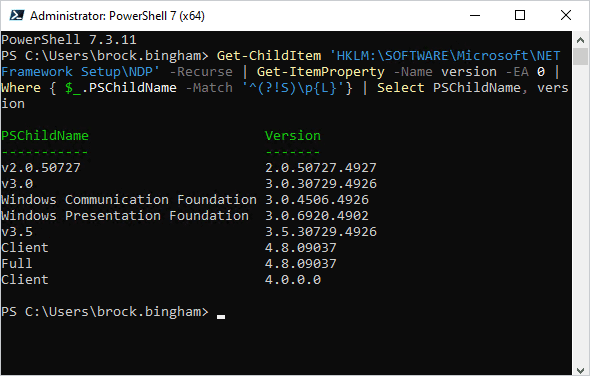


Unsurprisingly, PowerShell does an amazing job gathering the necessary details and outputs it in an easy-to-read format.
Run PowerShell scripts on remote devices
Execute PowerShell scripts on managed devices from anywhere with PDQ Connect.
Can I install multiple .NET Framework versions?
Yes, multiple versions of .NET Framework can be installed on a single device without conflict. Some applications require specific versions, so this is common. (Now if I could just get my kids to coexist without conflict, that would be great. Maybe I should have them learn about .NET Framework.)
How do I install .NET Framework on Windows 10 or 11?
Windows 10 and Windows 11 come preinstalled with .NET Framework 4.8 or 4.8.1. However, if you need to install a different version, follow these methods:
How do I install .NET Framework 3.5?
You can easily install .NET Framework 3.5 Service Pack 1 using the Turn Windows features on or off menu.
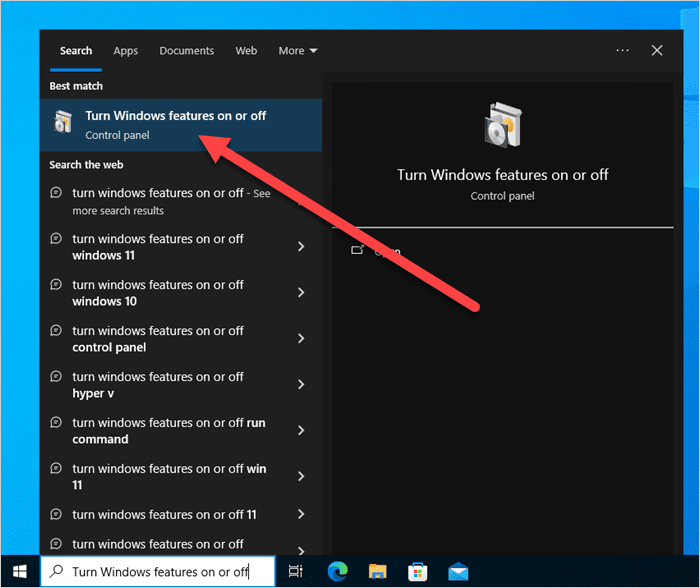
In Windows 10 or Windows 11, enter Turn Windows features on or off in the Windows search bar.
Click the Turn Windows features on or off result.
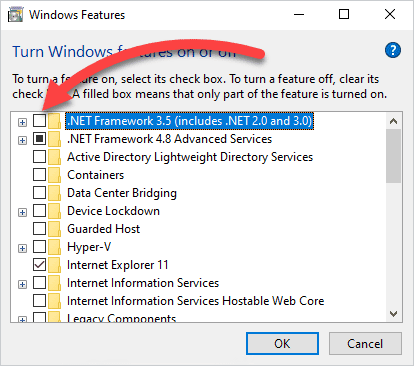
Select .NET Framework 3.5 (includes .NET 2.0 and 3.0), then click OK.
If you receive a Windows prompt indicating it needs files from Windows Update, click Let Windows Update download the files for you.


Windows will download the necessary files for .NET Framework SP1 and apply the changes. You may need to restart your PC for the changes to take effect.
Alternatively, you can use this easy command to achieve the same results with way less clicking (and you get to feel like a hacker, which is an obvious bonus):
DISM /Online /Enable-Feature /FeatureName:NetFx3 /All

How do I install other versions of .NET Framework?
Download the runtime from Microsoft’s .NET Framework page.
Run the installer and follow prompts.
Once the installer downloads, double-click the installer file and complete the setup. And this may be obvious, but try to avoid using .NET Framework versions that are no longer supported. Your friends in cybersecurity will thank you.
You will not be able to install earlier versions of .NET Framework 4.x on devices with the latest version of .NET Framework already installed because .NET Framework 4.x uses in-place updates. However, you most likely shouldn’t need to use earlier versions of .NET Framework 4.x because of its built-in backwards compatibility.
How do I uninstall .NET Framework on Windows?
While the .NET Framework from Windows 10 and Windows 11 cannot be completely uninstalled (it’s considered a core component of the operating system), you can uninstall .NET Framework 3.5 SP1 by disabling the feature.
Windows features method:
In Windows 10 or Windows 11, enter Turn Windows features on or off in the Windows search bar.
Click the Turn Windows features on or off result.
Uncheck .NET Framework 3.5 (includes .NET 2.0 and 3.0).
Click OK.
After you click OK, Windows removes the .NET Framework 3.5 SP1 files and makes the necessary changes. You may need to restart the computer for the changes to be recognized, but in our testing, this wasn’t the case.
Command Line method:
From Command Prompt, run this command to remove .NET Framework 3.5 SP1:
DISM /Online /Disable-Feature /FeatureName:NetFx3
How do I repair .NET Framework on Windows?
You can repair .NET Framework 4.8 by:
Using the .NET Framework Repair Tool: This is a Microsoft-developed tool designed to detect and fix common issues with .NET Framework, and it works on all currently supported versions of .NET Framework.
Installing the latest Windows updates: .NET Framework 4.8 is updated through Windows updates, which automatically tries to install missing updates.
Running the System File Checker: You can try running built-in Windows tools to repair .NET Framework. From an elevated Command Prompt, run
DISM.exe /Online /Cleanup-image /Restorehealth. When that finishes, runsfc /scannow.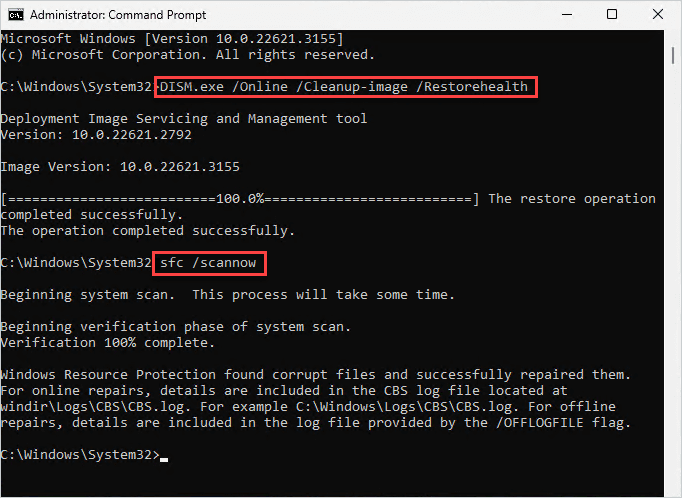

Because .NET Framework is a core component of Windows 10 and Windows 11, it can’t be repaired by uninstalling and reinstalling it. However, you can use the methods above to repair .NET Framework 4.8 if it becomes corrupt or is missing files.
If you’re trying to repair .NET Framework 3.5 SP1, you can try removing it and then reinstalling it using the methods described in the previous sections.
.NET Framework, it’s dot com
The .NET Framework has seen many improvements over the years, including how it’s managed. Making it a core component of Windows 10 and 11 has (for the most part) drastically simplified things. Kind of like how energy drinks and synthwave beats are a core component of who I am as a person.
And while I may have just revealed my age, if you caught the reference/Easter egg in this section’s header, just know I’m showering you with digital praise from a subnet far, far away.
Now, if you’ll excuse me, I need to restock my fridge and charge my headphones.
How to manage .NET Framework on Windows 10 & 11: FAQs
Does .NET Framework come preinstalled on Windows?
Yes, .NET Framework comes preinstalled on Windows 10 and Windows 11. Both versions of Windows come with .NET Framework 4.8 or 4.8.1. .NET Framework 3.5 is included as an optional Windows component but is not enabled by default.
Where do I find the .NET Framework on my computer?
To find the .NET Framework on your computer, navigate to C:\Windows\Microsoft.NET\Framework in File Explorer or check the Windows Registry (HKEY_LOCAL_MACHINE\SOFTWARE\Microsoft\NET Framework Setup\NDP).
What’s the difference between .NET Framework and .NET 5/6/7?
.NET Framework is the original, Windows-only development framework introduced by Microsoft in the early 2000s.
.NET 5 and later (aka .NET) is the cross-platform, open-source successor to .NET Framework.
Is .NET Framework still needed with .NET 5/6/7?
Yes, .NET Framework is separate from newer .NET (Core) versions. Some apps still require the legacy framework.
Can I have .NET Framework and .NET 6 installed at the same time?
Yes, .NET Framework and newer .NET versions like 6 or 7 can coexist because they target different application types and runtimes.


