

Managing Windows feature updates with Windows Server Update Services (WSUS) can simplify the operating system upgrade process. Leveraging groups in WSUS ensures feature updates are distributed to Windows 10 and Windows 11 devices on a schedule that limits user impact, enables testing, and follows established patch management plans.
I enjoy managing feature updates as much as the next sysadmin, which is to say not at all. However, this guide should help simplify the process for you and get your organization ready for the next round of feature update releases. But if managing feature updates is still a thorn in your side, maybe it's time to replace WSUS with PDQ.
What are Windows feature updates?
Feature updates are new versions of the Windows operating system. They include new features, security improvements, visual differences, and more. Released annually in the fall, feature updates are Microsoft’s alternative to new OS releases every few years.
As an example, a feature update would take you from Windows 11 version 22H2 to Windows 11 23H3. Terrible version naming aside, feature updates are essentially OS upgrades and are categorized as such in WSUS.
Windows 10 vs. Windows 11 feature updates
When it comes to Windows 10 vs. Windows 11, there are not many differences in the way that feature updates are managed between the two operating systems. However, while Windows 11 continues to receive feature updates, Microsoft has stated that Windows 10 will no longer receive them, officially making Windows 10 22H2 the last version of Windows 10. The most recent version of Windows 11 is 23H2, which was released on October 31, 2023.
While there are many other differences between Windows 10 and Windows 11, not all of them welcome (I’m looking at you, Windows 11 ads), feature updates are essentially managed the same way between both operating systems.
Quality updates vs. feature updates
Quality updates are the standard updates generally released once a month on the second Tuesday of the month, better known as Patch Tuesday. These updates include things such as bug fixes, patches for security vulnerabilities, and system stability improvements. Unlike feature updates, quality updates do not introduce new features or significant changes to the OS.
Because quality updates don’t introduce significant changes to the OS, less testing is required to ensure system compatibility. In comparison, you may want to postpone feature update installations or even skip specific feature updates all together depending on your environment.

Automate patching with PDQ Connect
Keep Windows & macOS devices patched and secure from anywhere.
Establish a patch management plan
Before we dive into WSUS, I recommend having a patch management plan in place to use as a reference while configuring WSUS. A patch management plan should provide guidance on your patching schedules, testing procedures, user responsibilities, critical systems, rollback processes, and whether feature updates should be postponed or skipped altogether depending on overall system compatibility.
I cannot emphasize this enough: a good patch management plan can save your bacon. Developing one should be a high priority if you don’t already have one in place. (Great, now I can’t stop thinking about bacon.)
How to configure WSUS to manage Windows feature updates
There are several steps we need to go through to ensure WSUS is properly configured to manage feature updates for our Windows 10 and Windows 11 devices. We’ll cover each step to ensure your environment is configured correctly.
Configure groups
With your WSUS console open, the first thing we want to do is create a few groups to help organize our deployments. I like to break up my feature update deployments into three groups — preview, broad, and critical — but you should configure your groups to meet the needs of your IT environment. You may even want to break your groups into Windows 10 and Windows 11 devices.
The preview group is a small set of computers that will be the first to receive feature updates. This group evaluates new feature updates and ensures product compatibility.
The broad group is where the majority of the workstations will reside. This group will receive the feature update once the preview group has thoroughly tested the update.
The critical group is for devices that are vital to maintaining operations. This group will be the last to receive feature updates and may skip specific feature updates altogether to ensure system compatibility.
To create a group, expand Computers, right-click on All Computers, and click Add Computer Group.

Name your group and click Add. Repeat this process for the remaining groups.

Assign computers to groups
Now we need to assign our computers to their appropriate groups. Click on All Computers to view the full list of computers in WSUS. To add a computer to a group, right-click on a device, and select Change Membership. This brings up the list of groups we created. Select the desired group and click OK.

If you have a substantial number of computers in WSUS, there are few things you can do to help this process go more quickly. First, you can highlight multiple computers at once as you normally would with the Shift and Ctrl keys. Another suggestion is to use the Search option located in the Action pane on the right side of the window. Lastly, a Group By option is also found in the Actions pane, which allows you to group your devices by operating system, version, server, make, model, firmware, and mobile operator.
Configure auto approval for the preview group
With our workstations assigned to their appropriate groups, we’re ready to configure the preview group to approve feature updates for installation automatically.
You don’t have to configure automatic approvals for your preview group if you want more control over when the updates are pushed out.
Click on the Options menu item in the menu tree.
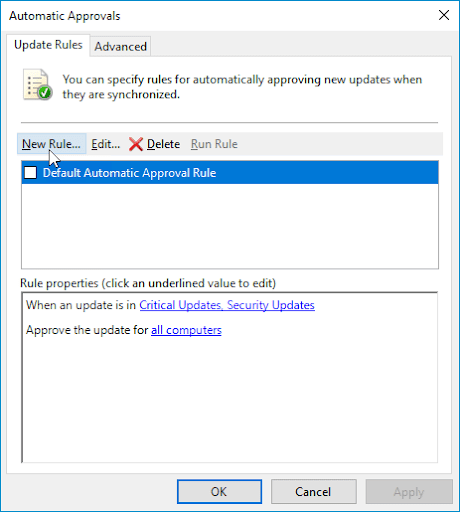
Click Automatic Approvals.
Click New Rule in the Automatic Approvals window under the Update Rules tab.
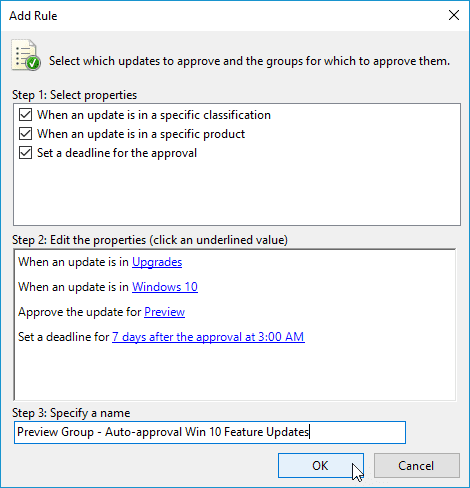
In the Add Rule window, select When an update is in a specific classification, When an update is in a specific product, and Set a deadline for the approval.
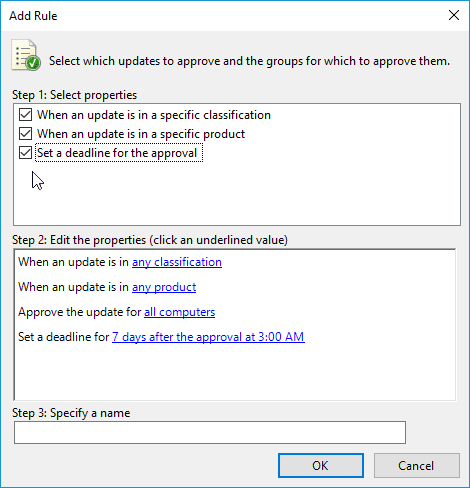
In the Edit the properties section, click any classification.
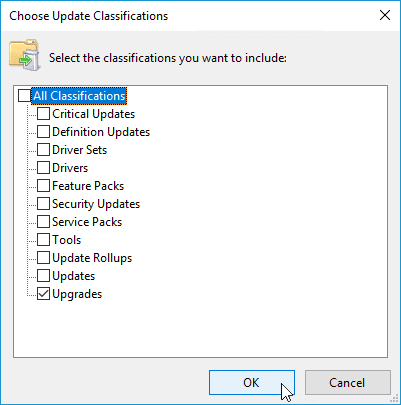
Unselect all classification types except for Upgrades, then click OK.
Click any product.
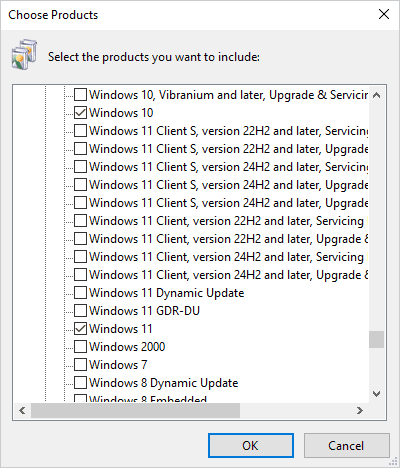
Unselect everything except for the versions of Windows you want the upgrades for, then click OK. I’ve selected Windows 10 and Windows 11.
Click all computers.
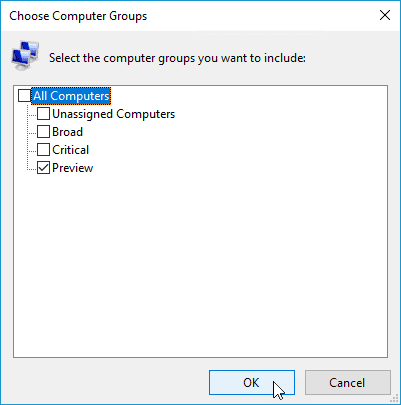
Select the Preview group and ensure no other groups are selected. Click OK.
Configure your deadline. I’ve chosen to leave mine at its default setting.
Name the rule, then click OK.
Click OK in the Automatic Approvals window


Feature updates are now automatically approved for installation for the preview group. Since we postpone deploying feature updates for our broad and critical groups, these updates need to be manually approved. Refer back to your patch management policy to determine how long you should postpone an update before deploying it.
How to manually deploy feature updates
Once your preview group finishes testing all the latest OS features and ensuring compatibility, it’s time to roll out the feature update to your broad group. We’ll start by creating a view in WSUS that contains only the updates we want to see.
Click Updates in the menu tree in WSUS.
Click New Update View in the action pane on the right.
Select Updates are in a specific classification and Updates are for a specific product.
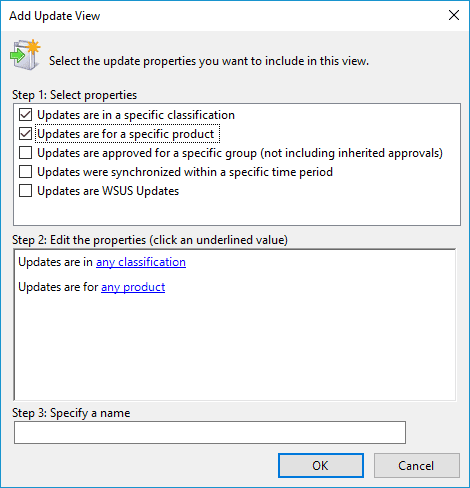
Click any classification, uncheck all options except for Upgrades, and click OK.
Click any product, then uncheck all options except for Windows 10 and Windows 11, then click OK.
Specify a name for the view, then click OK.

With our new view created, all that’s left to do is deploy the update.
Click on the newly created update view in the menu tree.
Right-click on the update you want to deploy and click Approve.
Click the down arrow next to the Broad group and click Approved for Install.
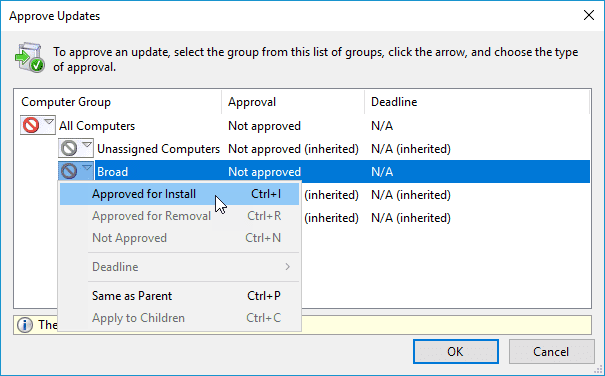
Click the drop-down next to Broad once again and select Deadline > One Week.
Click OK. The Approval Progress window should appear with the results.
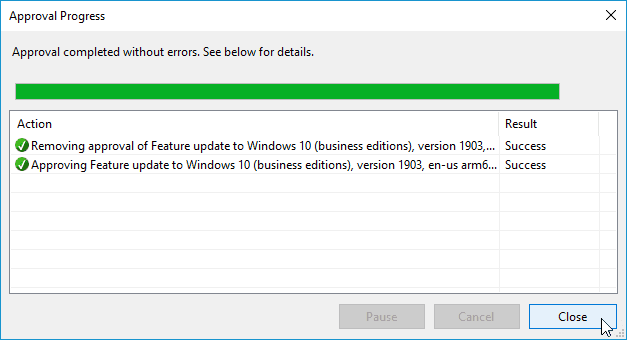
Click Close.


Deploy feature updates with PDQ
WSUS is generally a good solution for what it does. However, Windows Server Update Services lacks the control and feature set that many sysadmins rely on when deploying packages and updates to their organization. PDQ Deploy & Inventory give you greater control over the entire deployment process. Learn how to manage feature updates with Deploy & Inventory. When you’re ready, download a free trial and discover how to truly take control of your IT assets.


