

TL;DR: You can use PDQ to push Windows feature updates and enablement packages. Build a package, keep batches small, monitor closely, and deploy after hours to avoid angry calls from users whose machines reboot midtask.
Ask any sysadmin, and they'll tell you that managing Windows feature updates is one of their favorite things to do. Honestly, what's not to like? Obnoxiously large file downloads? Check! Tediously long install times? Double check! Crippling anxiety that things could go terribly wrong at any given moment? Triple check! If, for whatever reason, these fringe benefits don't interest you and you just wish deploying feature updates were a little easier, PDQ can help.

Managing a remote or hybrid fleet?
PDQ Connect brings the best of Deploy & Inventory to the cloud with an agent-based approach so that you can manage hard-to-reach devices from anywhere. It also adds remote desktop, vulnerability management, macOS support, and more — all in a single pane of glass.
The disclaimer
If you've ever watched our weekly webcast, you know that we get asked a lot of questions about our products and IT topics in general. One recurring question that comes up almost weekly is if it's possible to deploy feature updates with PDQ Deploy. The answer is that it's possible, but there's a catch.
The reason we haven't come out and officially supported feature updates in PDQ Deploy is that we are unable to track the status of the deployment accurately. Often, this results in PDQ Deploy returning a successful deployment status when, in fact, the upgrade is still in progress on the client. Because the returned information is unreliable, users need to actively monitor these deployments to ensure they are successful.
It's also important to remember that feature updates make pretty extensive modifications to the operating system, meaning there's a lot that can go wrong. While errors are relatively uncommon, they're not unheard of. Incompatible drivers, damaged files, and insufficient free space on clients can quickly turn your good day into a bad day. To minimize the impact of errors and limit your network bandwidth consumption, it's best to deploy feature updates in small batches.
With that word of caution out of the way, let's look at how to deploy feature updates with PDQ Deploy.
Feature updates vs. enablement packages
Feature updates come in a couple of different varieties these days. There are the traditional feature updates that we all know and love, and then there are enablement packages.
Feature updates are large files that install new OS features and generally take 30 to 90 minutes to install, depending on your hardware. Feature updates introduce significant changes to the operating system.
Enablement packages, on the other hand, are small files that turn on features that were previously downloaded as part of a quality update but were left in an inactive state. Using an enablement package is only viable when upgrading to a version of Windows that shares a common core as the existing OS — for example, Windows 10 versions 21H1 and 22H2 share the same core OS files and Windows 11 22H2 and 23H2 share the same core OS files.
Let's look at how to build deployment packages for both enablement packages and full feature updates using PDQ Deploy.
If you don’t already have PDQ Deploy and PDQ Inventory, make sure to download a free trial so you can follow along as we work through these processes.
How to build an enablement package in PDQ Deploy
For this example, we'll upgrade from Windows 10 21H1 to 21H2, but this process should be the same for both Windows 10 and Windows 11.
The first thing we need to do is download the enablement package. Unfortunately, Microsoft doesn’t make these files easily accessible via the Microsoft Update Catalog. However, with some simple Google ingenuity, I found a Reddit post that provides direct links to the files I’m looking for. I was also able to find a source for the Windows 11 23H2 enablement package. Once you download the file, save it to your PDQ Deploy repository, and we'll get started.
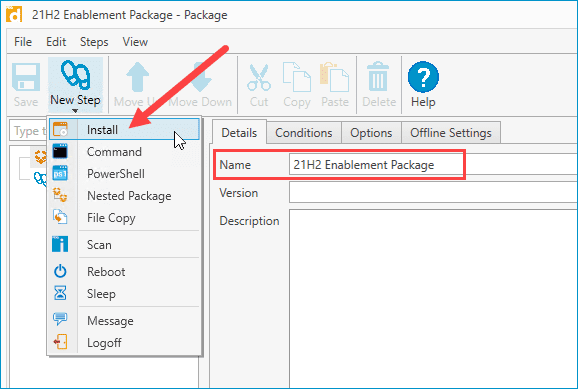
In PDQ Deploy, click New Package.
Enter a name for your package and click New Step > Install.
Enter the path to the enablement package file in the Install File field.
Click the drop-down next to MSI Options and change Restart to Always.
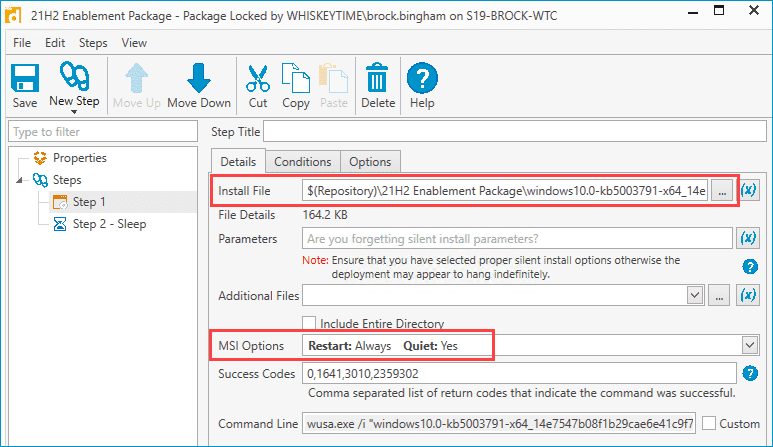
Lastly, click New Step > Sleep. Set Sleep Time to 300 seconds and click Save to finish creating your package.
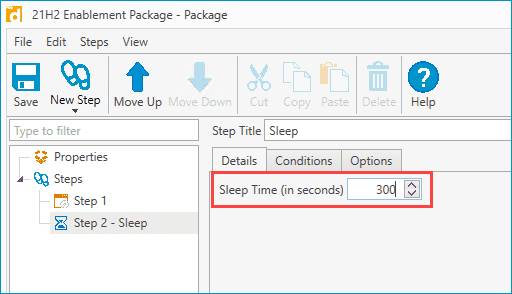


While enablement packages don't take nearly as much time to install as feature updates, they still require a reboot and take a few minutes to finish. We've included the sleep step to allow enough time for the installation to complete before PDQ Inventory scans the computer. Depending on your hardware, you may need to extend the sleep step if you notice your upgrades are taking longer than 5 minutes (300 seconds).
Because this deployment makes the target computer restart, you obviously shouldn't deploy while the computer is in use. If you don't want the computer to restart, you can leave the default MSI/MSU option, which disables restarts. However, the computer won't fully upgrade until the restart happens, so your data in PDQ Inventory won't reflect the OS upgrade until it's restarted and rescanned.
Remember, enablement packages are only applicable for systems running the same OS core and architecture as the update, so it’s important to confirm that using an enablement package is a viable option for your version of Windows 10 or Windows 11. This particular enablement package only works on systems running 2004, 20H2, and 21H1. It's a good idea to use PDQ Inventory to target specific systems running the necessary OS with this package.

Install (and uninstall) without disruption
Try PDQ Deploy & Inventory — free for 14 days.
How to build a feature update package in PDQ Deploy
If using an enablement package isn't an option because you're upgrading from a different core OS, you'll need to do the full feature update. This process isn't much more difficult, but the deployment itself takes much longer and the results are a bit less reliable.
Before we can create our package, we need to get a copy of the ISO of the OS we're upgrading to. Download the Windows 10 media creation tool or Windows 11 media creation tool and work through the prompts to create an ISO of the OS (Create installation media > Verify OS and architecture > ISO). When the ISO file finishes downloading, right-click on it and click Mount. Select all the files from the mounted ISO, then copy and paste them into a folder in your repository.

Once we've got the files copied to the repository, we can build our deployment package.
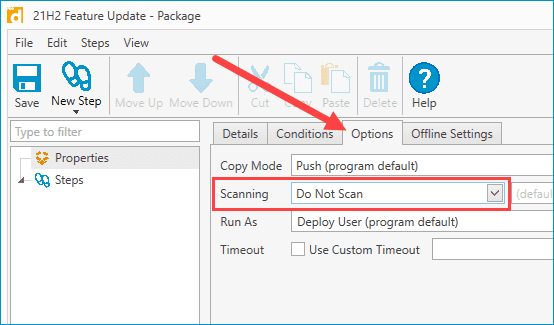
In PDQ Deploy, click New Package.
Give the package a name, click the Options tab, and change the Scanning option to Do Not Scan.
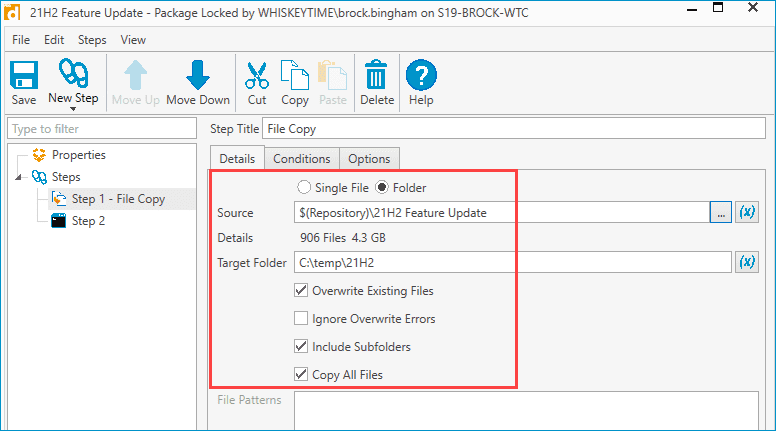
Click New Step > File Copy.
Select Folder, then enter the path to the feature update folder in your repository.
Enter a target folder to copy the files to. I've used C:\temp\21H2.
Select Overwrite Existing Files, Include Subfolders, and Copy All Files.
Click New Step > Command.
Enter this command into the command window:
C:\temp\21H2\setup.exe /auto upgrade /migratedrivers all /ShowOOBE none /Compat IgnoreWarning /Telemetry Disable /DynamicUpdate disable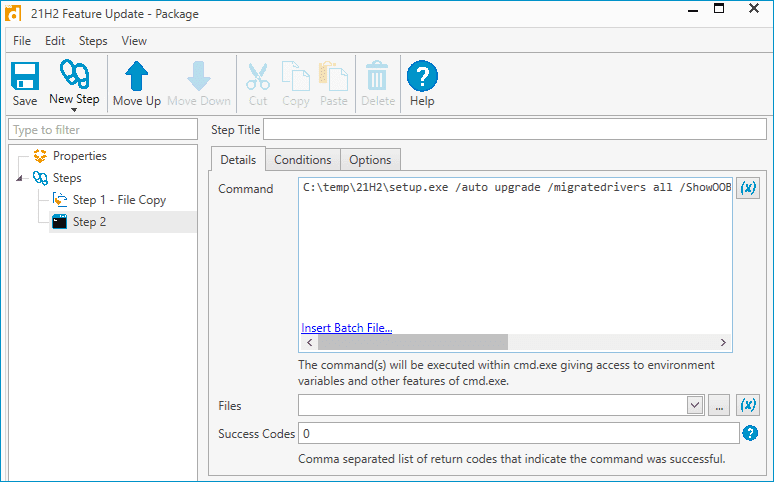
Click Save to finish creating the package.


At this point, the package is ready to deploy. During the deployment process, the package first copies over the necessary files, then runs the installation command. We disabled the option to scan after deployment because the scan will always fail. Once the upgrade finishes, I recommend manually scanning the target device, which should update PDQ Inventory with the new OS version information.
Actively monitor feature updates
Because of the nature of these updates, you'll want to actively monitor their deployment. Don't just fire these off and hope for the best. Also, keep your deployment batches small. If an issue occurs, you'll thank yourself that you only deployed to a handful of machines instead of hundreds. Oh, and this is probably obvious, but you'll most likely want to deploy feature updates after hours unless you love getting phone calls from angry users whose computers randomly shut off on them.


