

Some people hear the word “scheduling” and immediately cringe. Thoughts of calendars, dates, times, meetings, and extra work start filling their heads. PDQ.com’s users, on the other hand, get excited because they know that scheduling means automation, and automation means relaxation. Sick and tired of manually running reports? Schedule it! Fed up with manually pushing out packages? Schedule it! With PDQ Deploy and PDQ Inventory, scheduling is what takes you from working too hard to hardly working. Today we’ll cover one of the scheduling features that doesn’t get talked about often enough, setting up and scheduling your scans in PDQ Inventory.
Scans Versus Active Directory Sync
Before we dive into scans, let’s first clarify the difference between scans and Active Directory Sync. Active Directory Sync, which is only available with PDQ Inventory Enterprise Mode, is the process that allows you to synchronize PDQ Inventory with your Active Directory environment, meaning PDQ Inventory will import computers and network devices it finds in AD. Active Directory Sync does not actually scan the devices for information gathering. AD Sync can be configured and scheduled by going to Options > Preferences > Active Directory.

Once you enable Auto Sync and configure your sync settings, you’ll have the option to customize the sync schedule. By default, the sync is scheduled to run every hour.
Scanners and scan profiles are the processes that scan each individual device. These scans will return various information such as hardware, software, and configuration data depending on which scanner was run. By default, the only scan profile configured on a schedule is the Standard scan profile, which is set to run once the last scan age has reached 7 days old.

Scanners Versus Scan Profiles
Now that we know the difference between Active Directory Sync and scanning let’s look at the difference between scanners and scan profiles. Scanners define what data the scan will look for and return. There are many built-in scanners, such as Applications, Displays, Hardware Devices, etc. There are also four custom scanners that users can configure, Files & Directory, PowerShell, Registry, and WMI. You can set up a new scanner by clicking on the New Scanner button and selecting which type of scanner you want to create.

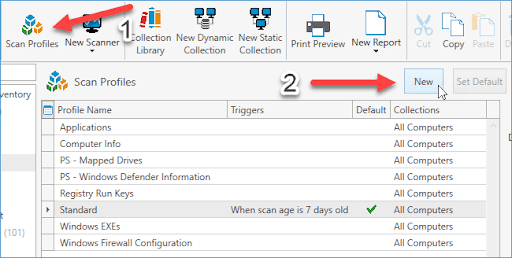
On the other hand, scan profiles are a collection of one or more scanners that can be run manually or configured to run on a schedule. They can also be set to scan specific dynamic or static collections in PDQ Inventory. Scanners can only be run when they are part of a scan profile, meaning if you create a new scanner, the only way to run it is first to assign it to a scan profile. You can view the built-in scan profiles and create new ones by clicking on the Scan Profiles button.

Built-In Scan Profiles
As mentioned, by default, the only scan profile configured on a schedule is the Standard scan profile, which is set to run when the last scan age has reached 7 days old. The Standard scan profile is also designated as the default scan profile, which means it will run automatically when a computer is added to PDQ Inventory. The default scan profile also appears at the top of the scan profiles list when you click the Scan button or when you right-click on a computer and select Scan Computers or Scan Collection. To get more detailed information about any of the included scan profiles, such as which scanners are being used and how the schedule is configured, just click the Scan Profiles button and then double-click on any of the available scan profiles. This is the details window of the Standard scan profile.

As you can see, the Standard scan profile includes a lot of scanners that will return loads of useful information. All of the scanners listed here are built-in scanners. You can use the Add button to attach more scanners, such as custom scanners that you’ve created.
By clicking on the Triggers button, you can see how the schedule is configured for the Standard scan profile.

Creating And Scheduling A Scanner And Scan Profile
With all this newly acquired scanner and scan profile information fresh in our minds, let’s go over the process of creating a custom scanner and scan profile, and then we’ll configure it to run on a schedule. The scanner we’ll create will scan for .jpeg, .jpg, .png, .mp3, and .mp4 files in user directories, so we can see who is filling up their drive with non-work-related data.
Click the Scan Profiles button in PDQ Inventory
Click New
Name your new scan profile. I’ve named mine Wasted Space
If you’re an overachiever, enter a description for the scan profile
Select Scan User for the Scan As field
Click Add > Files & Directories
In the Include Pattern(s): field, add the following paths: %SYSTEMDRIVE%\Users\*\Pictures\**\*.jpeg
%SYSTEMDRIVE%\Users\*\Pictures\**\*.jpg
%SYSTEMDRIVE%\Users\*\Pictures\**\*.png
%SYSTEMDRIVE%\Users\*\Music\**\*.mp3
%SYSTEMDRIVE%\Users\*\Videos\**\*.mp4
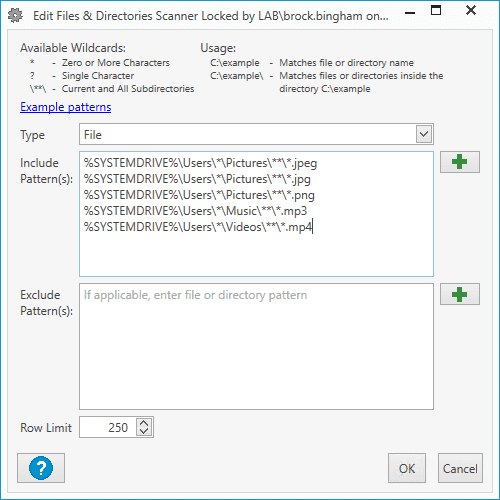
(Note) These paths will ensure we’re only scanning all users Pictures, Music, and Videos directories
To reduce the number of results returned, I’ve changed my row limit to 250. This change will help keep your database from getting too big
Click OK
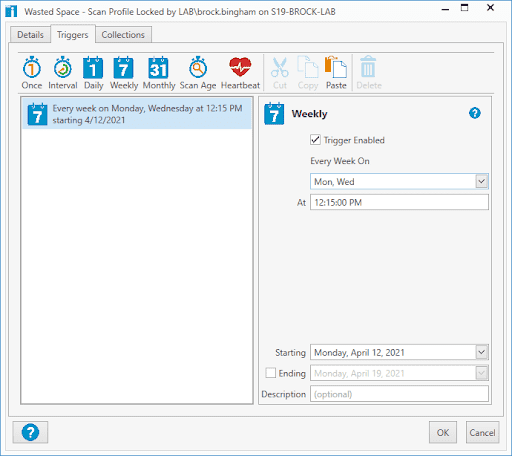
Click the Triggers tab
Since we deeply care about our disk space, let’s configure the scan to run twice a week. Click Weekly and select Monday and Wednesday at 12:15:00 PM
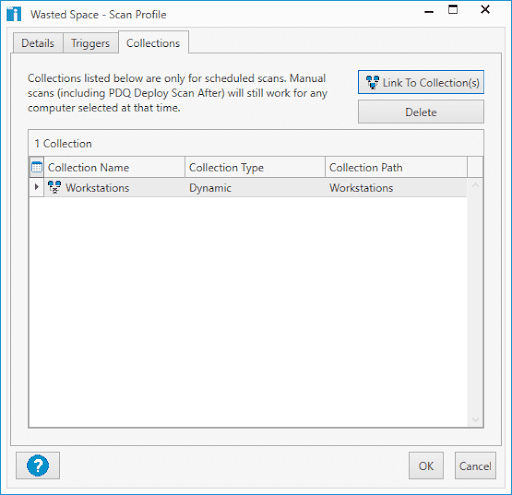
Since we don’t want this scan to run on servers, we’ll click the Collections tab to specify a collection
Next, click the Link To Collection(s) button
Select the Workstations collection and click OK
Click OK again to close the Scan Profile window


That’s all there is to it. If you’re impatient like me and want to ensure everything works, we can go ahead and select a computer to scan with our new scan profile. Right-click on a computer in Inventory and click Scan > Wasted Space. After the scan finishes, double-click on the computer and click Files & Directories. If the computer has any matching files, they will appear here.

Wrapping Up
PDQ Inventory comes packed with a ton of great scanners built-in. However, the ability to create your own scanners ensures you can gather the data that’s relevant to your environment. Being able to schedule these scanners to run automatically is the cherry on top. Configuring an aggressive scan schedule will ensure that you’re data in PDQ Inventory is always up to date, leaving you with enough time to schedule more critical things, like that mani-pedi you’ve been putting off for far too long.
If you’ve got too much on your plate and you need a one-way ticket to relaxation station, download our free 14-day trial of PDQ Deploy & Inventory. PDQ Deploy & Inventory will help you become the mayor of Leisure Town in no time!


