A widely used architecture in many web services today, REST APIs provide a standardized way for applications to communicate via the Internet. Unlike regular APIs, REST APIs follow a fixed set of rules so you know what to expect and can use them easily across different systems and platforms. We’ll break down the key components of REST APIs and show you how to use them with PowerShell to streamline repetitive IT tasks, design more efficient workflows, and make sysadmin life more bearable.
REST API principles
A Representational State Transfer (REST) API is a type of technology or architecture that allows different web applications to talk to each other and exchange data in a predictable manner. For example, say you need to interact with 10 different web services when setting up a user device. REST APIs allow you to do that programmatically and more efficiently — thanks to the following REST API principles.
1. REST APIs provide a uniform interface
All REST APIs follow a set of standard rules that make them universally applicable. You can easily use commands like Invoke-RestMethod to program and execute tasks across different apps, systems, and platforms.
2. REST APIs are stateless
With REST APIs, each API request is standalone and must contain all the information necessary for the programmed task. Because there’s no need to manage state or session information, REST APIs are more flexible and easier to interact with, making it easier for sysadmins to set up automated workflows.
3. REST APIs have native support for JSON data
Most modern REST APIs return data in JSON format, making it easier to handle with PowerShell (more on that later).
Key components of REST APIs
To understand how REST APIs work, you need to know what the key components of a REST API are. Here’s a breakdown.
1. Uniform resource identifier
A uniform resource identifier (URI) is the address of the resource(s) that you want to access or interact with — and appears most commonly as a URL. REST APIs typically have a base URI and an endpoint at the end, which is sometimes followed by a query string.
2. Endpoints
Endpoints refer to the specific part of the API that you want to query. An endpoint spells out the location of a particular service that you want to access. In the following URI example, the endpoint is /users.
https://jsonplaceholder.typicode.com/users3. Query string
A query string is sometimes added to the URI after the endpoint to set query parameters, specifying what you want to access and filtering out what you don’t. In the REST API example below, the query string is ?id=10&username=Moriah.Stanton. This query parameter returns users with the following ID and username.
https://jsonplaceholder.typicode.com/users/?id=10&username=Moriah.StantonAlways check your API documentation to confirm the parameters you can query. And remember that query strings are case sensitive.
4. Headers
REST API headers are used to control and add additional information about the request. Most of the time, this is where you set up your authorization to handle credentials for authentication.
5. Body
In REST APIs, body is often used in addition to or instead of a query string in a URI. And unlike the query string, the body doesn’t change how the URI appears. Body parameters are often used when there’s a change to a resource.
6. Method
Every REST API request has a method — in the form of a verb that indicates the type of API request that’s being sent. Common methods are GET, POST, PUT, PATCH, and DELETE. (It’s like you’re training a really smart golden retriever.) For the Invoke-RestMethod, the default method is GET and, just like in PowerShell, is used to retrieve information.
How to use REST APIs in PowerShell
PowerShell and REST APIs make a dynamic duo. By using PowerShell to interact with REST APIs, sysadmins can send requests to managed devices, gather data, and automate IT tasks, like configuring the Wi-Fi settings on the office router — without leaving the ergonomic comfort of their seat.
Which version of PowerShell should you use with REST APIs
Most versions of PowerShell will work with REST APIs. While there are improvements in PowerShell 7 that might be useful, especially for authentication, that’s more for highly complex tasks and less common scenarios.
We’ll walk through some common REST API examples that show you how to use REST APIs in PowerShell. The test API in these examples is jsonplace.typicode.com and the default method is GET.
How to use REST API in PowerShell via Invoke-RestMethod
When it comes to REST APIs, using Invoke-RestMethod allows you to interact with APIs and show the results as objects. Using Invoke-RestMethod automatically parses the JSON or XML returned by the API, so you don’t have to do it yourself. (The ability to do more with less is a highly marketable skill in IT.)
If you’re new-ish to REST APIs, the Invoke-RestMethod is the way to go. It’s easy to start with, yet flexible and allows you to use advanced features, like the pipeline. Here’s an example of a GET client request that returns a list of users. If you want data on individual users, you can just add a query string at the end to specific your parameters (see the next example).
$baseUrl = 'http://jsonplaceholder.typicode.com/'
$endpoint = 'users'
$url = $base + $endpoint
Invoke-RestMethod -Uri $url
How to use REST API in PowerShell with a query string
A query string always starts with a ? and an evaluation of property > value. And it’s the same when using REST APIs in PowerShell. You can also add subsequent queries and connect them with an &. In this example, ?id=1&id=2 is the query string. This query parameter returns users that have an ID of 1 or 2.
$baseUrl = 'http://jsonplaceholder.typicode.com/'
$endpoint = 'users'

# query for users with an id of 1 and 2
$queryString = '?id=1&id=2'

# Put it all together to get a URL
$url = $baseUrl + $endpoint + $queryString
$response = Invoke-RestMethod -Uri $url -Method Get
$response
How to use REST API in PowerShell with a body
You can use bodies when sending something to the API. You can create a body by creating a hashtable and converting it to JSON. In the following example, we’re using REST APIs in PowerShell to create a new post.
# Build the URL
$base = 'http://jsonplaceholder.typicode.com/'
$endpoint = 'posts'
$url = $base + $endpoint

# Build the body as a PowerShell object
$body = @{
title = 'Why did the programmer bring a ladder to work?'
body = 'Because he wanted to reach new heights in cloud computing. ☁️'
userId = 10
} | ConvertTo-Json

# Build and send the request
Invoke-RestMethod -Uri $url -Method Post -Body $body -ContentType 'application/json'
How to use REST API in PowerShell for basic authentication
When using APIs in a work environment, they typically require authentication. With REST APIs, basic authentication is common. In this example — which works in both Windows PowerShell and PowerShell 7 — we use Get-Credential to grab the username and password. (By the way, always avoid putting your passwords into plaintext. And for the love of IT, never write them on Post-its.)
PowerShell 7 comes with big improvements to the Invoke-RestMethod. An additional Authentication parameter offers built-in support for more authentication options, including Basic, Bearer, OAuth, or None.
When setting up authentication, we recommend checking your API documentation to see what they’re looking for.
# Build the URL
$baseUrl = ‘http://jsonplaceholder.typicode.com/’
$endpoint = ‘posts’
$url = $baseUrl + $endpoint

# Get credentials
$credential = Get-Credential

# Create a base64 string for the Authorization header using creds
$base64AuthInfo = [Convert]::ToBase64String([Text.Encoding]::ASCII.GetBytes((“{0}:{1}” -f $credential.UserName, $credential.GetNetworkCredential().Password)))

# Build the headers
$headers = @{
Authorization = “Basic $base64AuthInfo”
}

# Send the request
$response = Invoke-RestMethod -Uri $url -Headers $headers -Method Get

# Output the response
$response
How to use PDQ Connect’s REST API
Now that you know the basics of using REST APIs in PowerShell, you can apply that knowledge to inventory devices and deploy packages using PDQ Connect’s API. With Connect’s API, you can use PowerShell to deploy ad hoc packages to clients or groups. You can also tie PowerShell with other systems like ticketing to automate package deployment based on the tickets created.
In the following section, we’ll look at how to use PowerShell with Connect’s API to:
Query devices
Query packages
Query groups
Deploy packages
For those who already have Connect installed, you can follow along with the API documentation here or check out our Help Center article on Connect's API for more details.
Create the API key in Connect
To get started, you first need to create an API key in Connect.
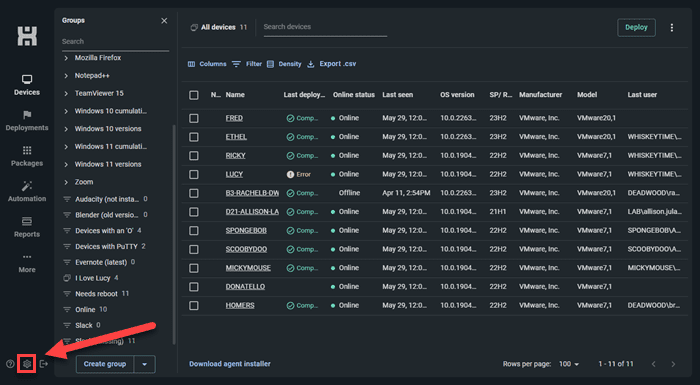
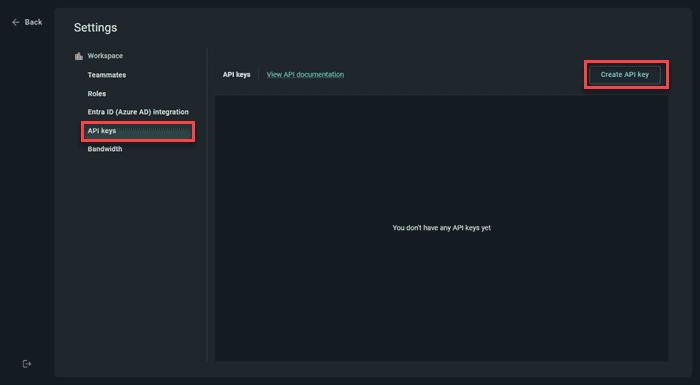
Click Settings > API Keys > Create API Key.
Give it a name to help you identify the API key.
Store your API in a safe place for future reference. (And no, a Post-it under your keyboard is not what we’d call a safe place.)


Authenticate with your API key
After creating your API key in PDQ Connect, the next thing you want to tackle is authentication. Here’s what the code looks like.
$ConnectAPIbaseURL = "https://app.pdq.com/v1/api"
$secureAPIToken = Read-Host -AsSecureString -Prompt "Enter Connect API key"
$tokenPtr = [System.Runtime.InteropServices.Marshal]::SecureStringToGlobalAllocUnicode($secureAPIToken)
$plainAPIToken = [System.Runtime.InteropServices.Marshal]::PtrToStringUni($tokenPtr)

# clean up
[System.Runtime.InteropServices.Marshal]::ZeroFreeGlobalAllocUnicode($tokenPtr)

# Now we can use $plainAPIToken in a call to an API as a bearer token
$headers = @{'authorization' = "Bearer $plainAPIToken"}
This code will prompt you for your API key as a secure string before converting it into plain text and inserting it into the $headers variable. Voilà! You now have a $headers and a $connectApiBaseUrl variable to use in future requests.
Query devices using PDQ Connect’s API
You can also query devices using the endpoint /devices using Connect's API. The information to look for is stored in the data property of the query results.
# Grab the device data
$devices = (Invoke-RestMethod -header $headers -uri "$connectApiBaseUrl/devices").Data

# Display all the properties of the devices
$devices | Format-List *

$devices = (Invoke-RestMethod -header $headers -uri "$connectApiBaseUrl/devices").Data

# grab a specific device id
$deviceID = (Invoke-RestMethod -Headers $headers -Uri "$ConnectApiBaseUrl/devices").data | Where-Object hostname -eq 'IROH.whiskeytime.club' | Select-Object -ExpandProperty id

# Grab all properties from your devices
$properties = "disks,drivers,features,networking,processors,updates,software,activeDirectory,activeDirectoryGroups,customFields"

# URL encode the properties
$encodedProperties = [System.Web.HttpUtility]::UrlEncode($properties)

# Grab ALL the data
$devices = (Invoke-RestMethod -header $headers -uri "$connectApiBaseUrl/devices?includes=$encodedproperties").Data
Query packages using PDQ Connect’s API
When querying packages, the code below also takes advantage of the page query string, looping through and returning the full set of results.
It’s important to note that the API only returns up to 100 responses. If you have more than 100 packages and want to list them all, you’ll need to submit multiple requests using code like the one below.
# find packages containing a string, like firefox
(Invoke-RestMethod -Headers $headers -Uri "$ConnectApiBaseUrl/packages?filter[name]=~firefox").Data

# return packages containing a package name
$name = "Uninstall Firefox (per User)"
$encodedQuery = [System.Web.HttpUtility]::UrlEncode($name)
$packageID = (Invoke-RestMethod -Headers $headers -Uri "$ConnectApiBaseUrl/packages?filter[name]=$encodedQuery").Data.ID

# Loop through and return all packages

$page = 1 # Initialize page number
$hasMoreResults = $true
$packages = @()

while ($hasMoreResults) {
# Call the API with the current page number
$response = Invoke-RestMethod -Uri "$ConnectApiBaseUrl/packages?page=$page" -Headers $headers

# If the response's data property is empty, no more results
if (!$response.Data) {
$hasMoreResults = $false # Stop looping
}
else {
# Process the results
$response.Data | ForEach-Object {
$Packages += $_
}

# Move to the next page
$page++
}
}

Write-Output $Packages
Query groups using PDQ Connect’s API
When querying groups, the groupID is helpful to have on hand for future deployments. Since the API returns only up to 100 responses each time, you can use the code in the previous section to loop through your groups if necessary and get the full results.
$groups = (Invoke-RestMethod -Headers $headers -Uri "$ConnectApiBaseUrl/groups").data
$groupID = $groups | Where-Object Name -eq "Missing Office" | Select -ExpandProperty id
Deploy packages using PDQ Connect’s API
For package deployments, the code below takes advantage of the $packageID and $deviceID, which we’d set earlier when querying packages and devices.
$Uri = "$ConnectApiBaseUrl/deployments?package=$packageID&targets=$deviceID"
Invoke-RestMethod -Headers $headers -Method Post -Uri $Uri
And that, my friends, is how you can use PowerShell, REST APIs, and a handy device management tool like PDQ Connect to carry out day-to-day tasks a little more efficiently. Now, you can go forth and automate at will.
For sysadmins managing a ton of different devices and daily tasks, using REST APIs is a pretty neat way to bring order to the chaos. You can try PDQ Connect for free to see how you can better manage devices anywhere from the cloud.


