

TL;DR: Collections in PDQ Inventory group computers for easier management and deployment targeting. Use static collections for fixed groups like departments or locations, and dynamic collections with filters to automatically track devices by app, version, or hardware — including PowerShell-generated collections that update with a single variable change.
In the world of information technology, knowledge is power. And nothing helps you fill your biological hard drive with useful information faster than collections in PDQ Inventory. In this article, we’ll take a deep dive into PDQ Inventory collections and discover how to maximize their potential.
What are collections?
Collections are logical groupings of computers. They’re primarily used to provide insights into your managed computer environment and act as targets for package deployments. Collections help organize the tremendous amount of data gathered by PDQ Inventory and format it into a directory-type structure, which, as a long-time sysadmin, just makes sense.
PDQ Inventory comes with hundreds of prebuilt collections maintained and updated by PDQ called the Collection Library. However, Inventory also provides all the tools necessary for sysadmins to create their own custom collections.
Collections can take two forms: static or dynamic.
What are static collections?
Static collections are groups of devices that sysadmins manually create and maintain. These collections always contain the same devices unless you update them manually.
Static collections are good for distinguishing consistent groupings of computers. Some examples include grouping machines by department, distribution group, or physical location.
How to build a static collection in PDQ Inventory
Need an in-depth refresher on collections?
Learn how to create variables, collections, and reports in PDQ Inventory.
Building static collections in PDQ Inventory is as easy as hitting a printer with a baseball bat.
In PDQ Inventory, click New Static Collection.
Enter a name for the collection and maybe even a description if you’re feeling ambitious.
Select the computers you want to add to the collection, then click the right-arrow (>) button to add them to the Members section.
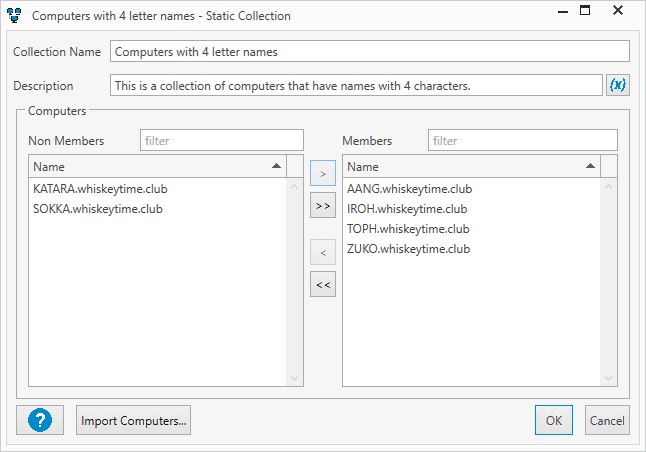
Click OK to save and close the Static Collection window.

Click on the new collection to view the results.

There are also several ways you can create static collections directly from the All Computers page in Inventory. Start by selecting each device you want to add to the collection, keeping in mind that you can use the Shift or Ctrl keys to select multiple targets at a time. With your machines selected, there are three ways to create a static collection.
Method 1: Click New Static Collection.
Method 2: Right-click on the selected devices, then click New Static Collection.
Method 3: Hit Ctrl+Shift+N on your keyboard.
If you’re looking for sysadmin clout, I definitely recommend the keyboard shortcut method; it’ll get you one step closer to “hackerman” status.
What are dynamic collections?
Dynamic collections utilize filters to group devices together that satisfy filter requirements.
As the name suggests, dynamic collection memberships are constantly evolving. If a computer suddenly satisfies a collections filter, it’s automatically added to the collection. Likewise, if a machine no longer meets the filter requirements, it’s automatically removed from the collection.
Dynamic collections are great for gaining rapid insights into your environment. You can quickly identify devices that meet certain hardware and software conditions.
Additionally, dynamic collections are incredibly effective when used to target computers with package deployments in PDQ Deploy. With dynamic collections as your targets, you can fully automate your patch management needs.

PDQ Connect user?
Collections are referred to as groups in PDQ Connect — but they're essentially the same. Learn more about static and dynamic groups in PDQ Connect.
How to create dynamic collections in PDQ Inventory
To create a dynamic collection in PDQ Inventory, click the New Dynamic Collection button or hit Ctrl+N on your keyboard. This opens the Dynamic Collection window, which consists of several filtering tools and options. If you’re brand new to dynamic collections, check out our dynamic collections documentation, which goes over the various components of dynamic collections.

Let’s look at a few examples of dynamic collections, each increasing in complexity.
Example 1: Identify devices with a specific application installed
We’ll start with an example of a basic dynamic collection that filters for computers with a specific application installed.
Inside the Dynamic Collection window, add a name and a description to the collection.
Set the group filter to All.
Add the value filter Application | Name | Contains | <app_name>.
Click OK to save and close the Dynamic Collection window.


In this example, I filtered for the application name AudibleSync. To verify the results, I can select the collection which should now contain devices with AudibleSync installed.

You can easily include additional applications to this collection by changing the group filter to Any, then adding a new value filter for each application you want to add. Keep in mind that you’ll want to update the name and description to match the changes.
This example returns devices that have AudibleSync, Discord, or Audacity installed.

Example 2: Identify computers with multiple applications installed
In this example, we’ll create a dynamic collection that groups computers that contain multiple specific applications.
You might consider altering the group filter of our previous example from Any to All, but that wouldn’t return any results. Rather, that would look for computers with an application that contains AudibleSync, Discord, and Audacity in one application name because the entire filter is evaluated against each application installed on the computers instead of looking for three individual applications.
Instead, we need to apply an Allgroup filter with each individual application filter. We also need to change the initial group filter to All.

This collection only contains computers that have AudibleSync, Discord, and Audacity installed. You can see that each value filter is broken up with an All group filter. I’ve also modified the collection description to reflect these changes.
A simple example of when to use a collection like this is to identify computers that have both Microsoft Office and Office 365 installed at the same time.
Example 3: Utilize PowerShell to automatically create collections
For this last example, we’ll utilize PowerShell to automatically create dynamic collections that follow the same structure as the prebuilt collections in the Collection Library. Follow along by downloading the ‘CreateXML.ps1’ and ‘Name of your Application.xml’ files from the PDQ Bonus Content repository and saving them together in the same directory location on your console.
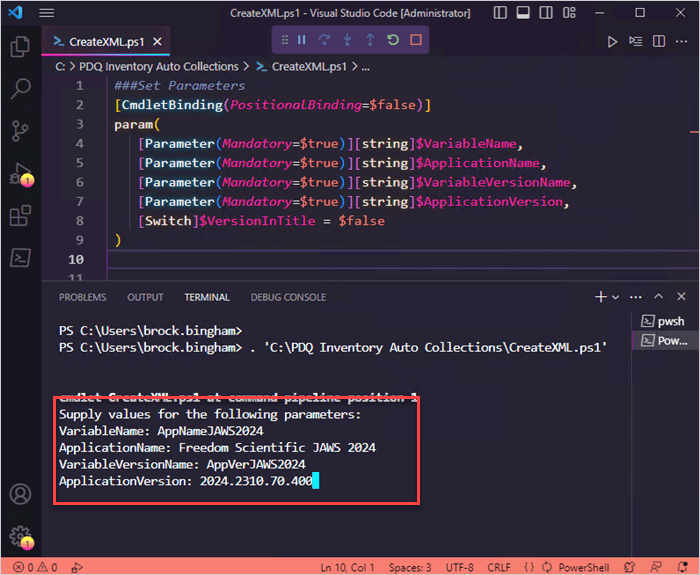
Before we begin the guide, you’ll want to know the exact name and the current version of the software you want to track. For this tutorial, I’ll use a screen reader application called JAWS. To find the name and version, I can open the details window for a computer in PDQ Inventory that has the software installed and click on the Applications list item. The Applications page should contain the information we need.

Now that we’ve got the exact name and version number of the software, we’re ready to use the PowerShell script to create the collections.
Run the CreateXML.ps1 file as an administrator.
The script asks you to provide several variable names and values. I followed PDQ’s naming scheme for the variable names and copied the values directly from the application information I gathered from Inventory.
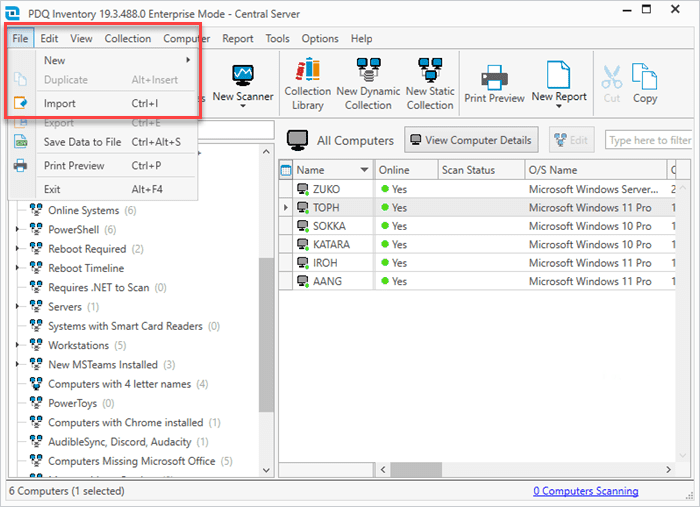
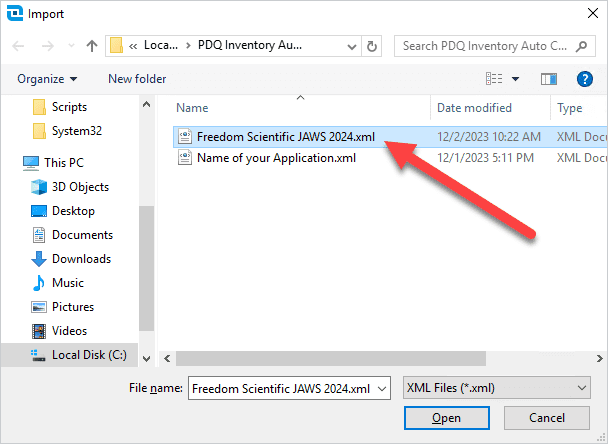
The script then generates an XML file and saves it in the same location as the PowerShell script. Import the XML into Inventory by clicking File > Import.
Navigate to and select the generated XML file, which should have the same name as the software, then click Open.


Once the import finishes, the new collections are added to the bottom of your collections list. You should have the following collections:
A base collection for all computers with the software installed.
A subcollection for devices with the latest version installed.
A subcollection for devices that don’t have it installed.
A subcollection for just workstations that don’t have it installed.
A subcollection for machines with an old version installed.


The great thing about this method is that since it utilizes variables, you only need to update the variables when a new version is released to keep all the collections updated. You can find and modify the variables by clicking on Options > Variables in Inventory.

Take system management to the next level with advanced collections
Collections in PDQ Inventory give you the insights necessary to keep your managed systems up to date and secure. Let PDQ Inventory help you become an omniscient sysadmin. Download a 14-day free trial of PDQ Deploy & Inventory today.


