

There are two types of laziness. There's lazy, lazy. And then there is smart, lazy.
A lazy, lazy individual usually doesn't have much drive or motivation. They avoid difficult tasks, procrastinate whenever possible, and avoid exerting themselves. You know the type.
A smart, lazy individual doesn't necessarily suffer from a lack of motivation, and they don't shy away from difficult tasks. Instead of procrastinating, they seek to complete their tasks as quickly as possible to get them out of the way. They'll exert extra effort in the pursuit of efficiency. Manual processes are the bane of smart, lazy people, and automation is their goal.
With those differences made clear, let's find out how PDQ Inventory and PDQ Deploy can help you become the smartest lazy sysadmin at your office.
Working smarter, not harder
PDQ Inventory and PDQ Deploy were designed for sysadmins who live by the philosophy, "work smarter, not harder." If you're short-staffed, you don't have the resources to manage your systems manually. Instead, let Inventory and Deploy automate much of your current workflow, leaving you time to focus on more important things.
Synchronizing with Active Directory
This first step on your journey to lazy greatness is to make sure you've got all your computers in PDQ Inventory. The simplest way to do this is to synchronize PDQ Inventory with Active Directory.
With PDQ Inventory open, click Options > Preferences
Click Active Directory
Click Include Container
Select the containers you want to synchronize with Inventory and click OK. You can use ALT + left-click or SHIFT + left-click to select multiple containers
If you want to ensure the computers in Inventory are as accurate as possible, select Mixed Sync or Full Sync for the delete mode, which will remove computers that are no longer found in the synchronized AD containers
Ensure Auto-Sync is enabled
If your environment frequently changes, keep your sync period short
When you're finished, click Save and Sync Now

With the sync running, you should start to see the computers in the containers you included start to populate into PDQ Inventory. As the computers are added to inventory, they will be scanned with the standard scan profile.
Creating and modifying scan schedules
Speaking of scan profiles, the next thing you'll want to do is to make sure you're gathering all that precious data on a schedule of your choosing. Only one scan profile is configured to run on a schedule by default, and that's the Standard scan profile. To view the schedule, click Scan Profiles, then double-click the Standard scan profile. When the profile window opens up, click on the Triggers tab to view the schedule. You'll see that by default, the Standard scan profile is configured to run once the last scan age has reached seven days old.

Additionally, since the Standard scan profile is also configured as the default scan profile, it will run against computers as they are added to PDQ Inventory.
You can modify this schedule to best work with your environment by adjusting the scan age setting or adding additional triggers. Likewise, if you create your own scan profiles, you can create schedules for each one under the triggers tab.
If you don't feel the need to create additional scan profiles, a common practice is just to add additional scanners to the standard scan profile. This is a good solution as long as the standard profile schedule doesn't conflict with how often you need your additional scanner to run.
Creating auto reports from existing collections
If there's one thing that almost every boss loves (and secretly hates), it's reports. If there's one thing that nearly every employee hates (and secretly hates even more), it's generating reports. PDQ is well aware of this and is more than happy to create reports for you. So the only thing you have to worry about is making the initial report. Afterward, you can schedule Inventory to generate and send the reports automatically.
The easiest way to create a report is to convert a dynamic collection into a report. I'll show you how to create a report from the existing Chrome Enterprise (Old) collection and then attach it to a new auto report.
Expand the Collection Library in PDQ Inventory
Expand Applications > Internet Browsers > Chrome Enterprise
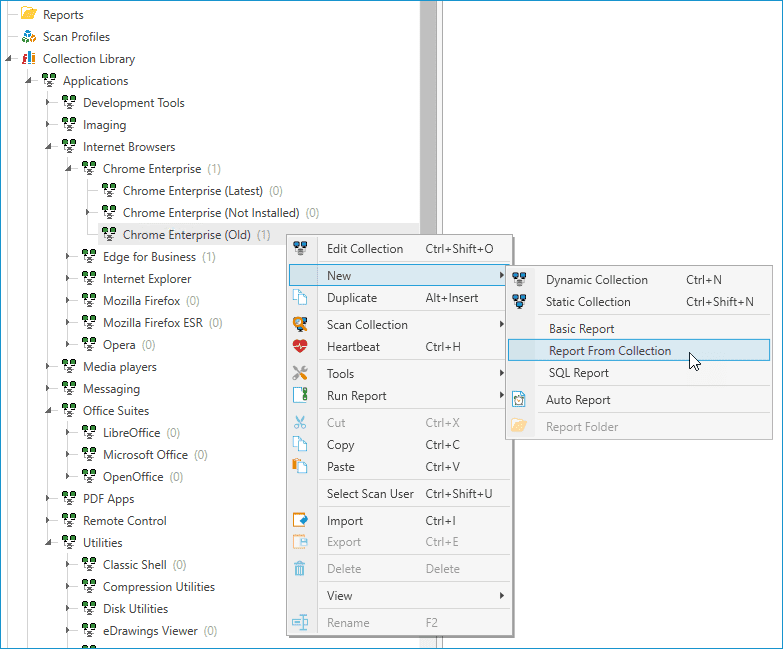
Right-click on Chrome Enterprise (Old)
Select New > Report From Collection
When the report window opens, review the report and add any additional columns you would like included in the report. Once you're done, click Save
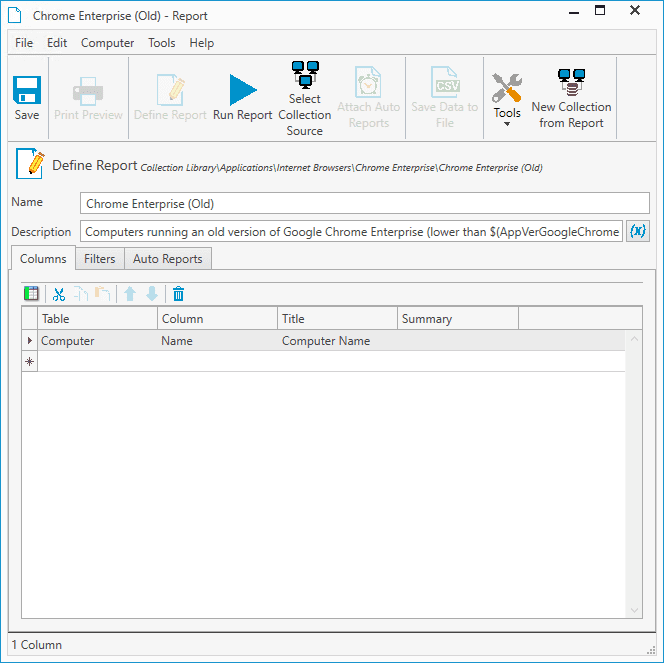
Close the report window
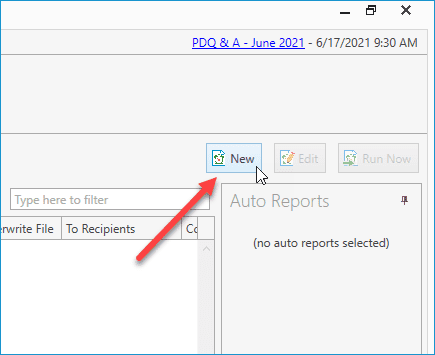
Next, click Auto Reports
Click New
When the auto report window opens, give your auto report a name
If you want to save the file to a network location, click the ellipsis button to specify a folder path
Create a file name, or use one of the recommended file names provided by clicking the down arrow next to the File Name field
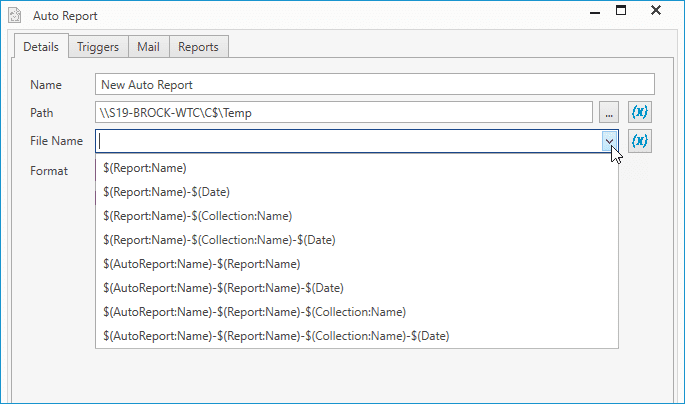
Select the report format, such as .xlsx or .pdf
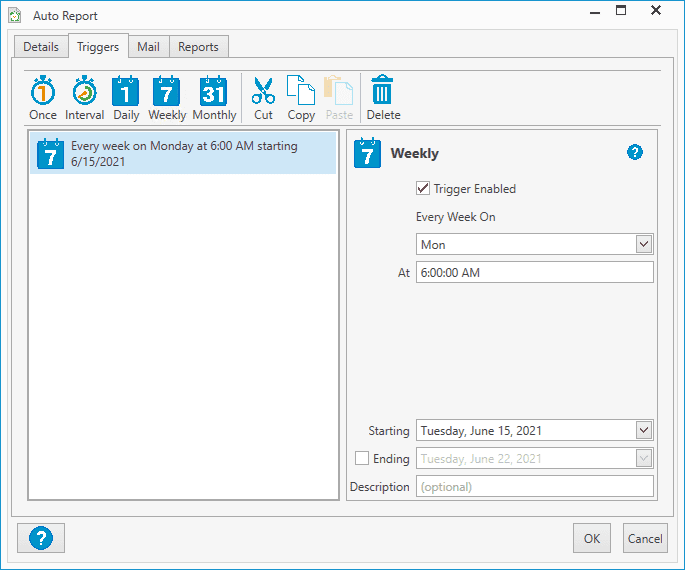
Click the Triggers tab
Configure how often you want the auto report to run. I'll select weekly to have it run once a week on Monday morning
If you'd like the report emailed, configure it under the Mail tab. You'll need to have your SMTP settings configured in the preferences menu as well
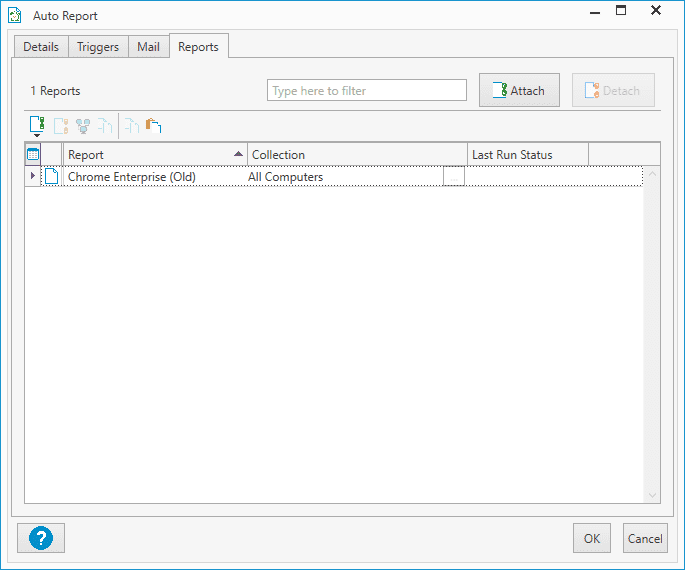
Next, click the Reports tab
Click the Attach button
Select the reports you want to be attached to the auto report. You can select as many reports as you want
When you are finished, click OK


That's all there is to it. Your reports will automatically be generated and saved, or emailed according to your preferences.
PDQ Deploy auto-download packages
If you're using PDQ Deploy and you're not using auto-download packages, then you're doing it wrong. Auto download packages are like having your very own department of package builders constantly churning out the latest updated packages for you. When the phenomenal folks at PDQ.com publish a new package, it will automatically become available in your Deploy console. If you've added the package as an auto-download packaged, then it will automatically download to your console as well, depending on your auto-download settings configured in preferences.
The process of downloading auto-download packages couldn't be easier. Simply click on the Package Library option in PDQ Deploy, select the packages you want to download, then click Download Selected (As Auto-Download).

You'll know the package is an auto-download package if it has the blue arrow going arrow package symbol.

Next, you'll want to ensure you have your auto-download preferences configured correctly.
In PDQ Deploy, click Options > Preferences
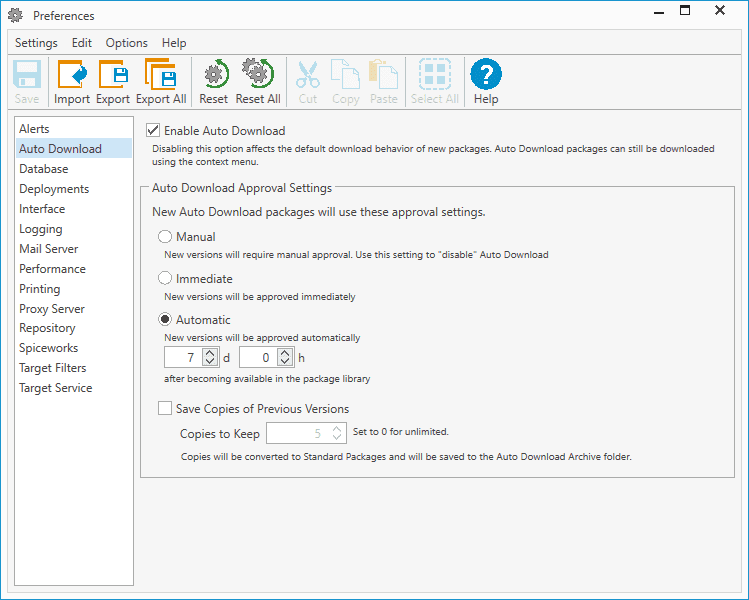
Click Auto-Download
Make sure Enable Auto-Download is checked
Set your approval settings. The default settings are automatic approval after seven days
Click Save when finished

Schedule your deployments
Before you bust out the hammock and hang it up in your cubicle, there's one more thing you need to automate. While it's great that our packages are being created and downloaded automatically for us, we need to actually configure those packages to be deployed automatically as well. Let's look at configuring Slack to deploy on a schedule automatically.
Make sure you first have Slack already downloaded as an auto-download package by following the steps above
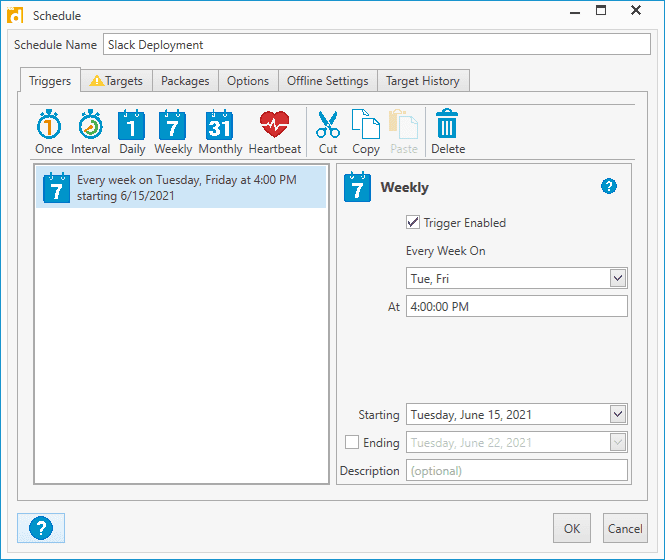
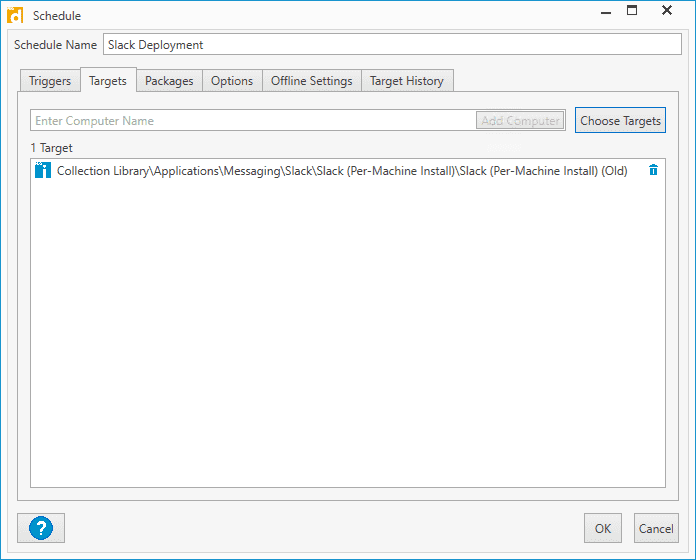
Click on New Schedule
Give your schedule a name
Click on the Triggers tab if it's not already selected
Configure your schedule. I've set mine to deploy twice a week on Tuesday and Friday
Click on the Targets tab
Click Choose Targets > PDQ Inventory > Collection
Expand Collection Library > Applications > Messaging > Slack > Slack (Per-Machine Install) and select Slack (Per-Machine Install) Old
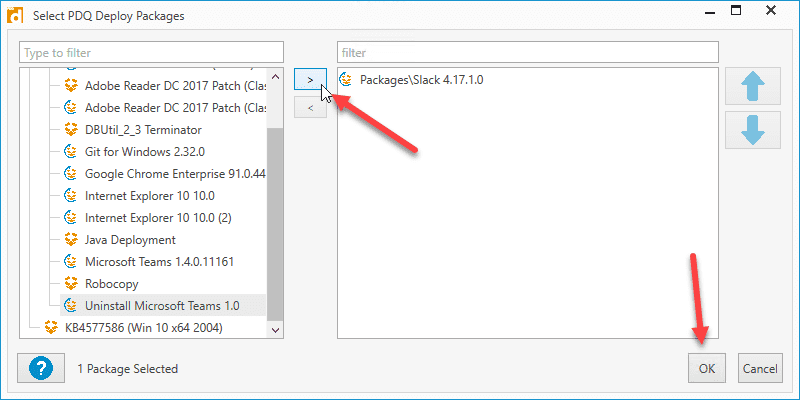
Click on the Packages tab
Click Attach Packages
Select the Slack package and click the > button
Click OK
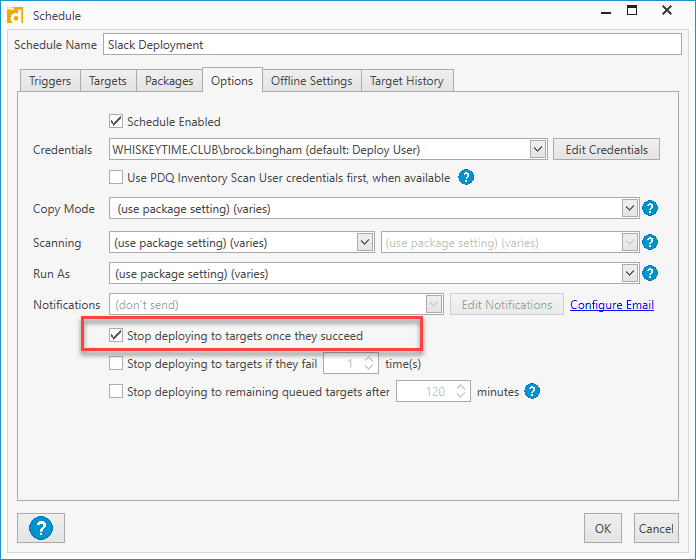
Click the Options tab
Make sure Stop deploying to targets once they succeed is selected
Click OK to close and save the new schedule


With your schedule created, now would be a good time to bust out the hammock. Actually, you probably want to set up a few more schedules to take care of the rest of the packages in your environment. Then it's hammock time!
Wrapping up
Laziness (the smart kind) should be celebrated. It's at the root of many modern inventions. The easier we can accomplish something, the more likely we are to succeed at it. Remember, Bill Gates once said, "I choose a lazy person to do a hard job, because a lazy person will find an easy way to do it."


