

Want to turn video games into a classroom asset? This guide shows you how to deploy Minecraft Education to managed Windows devices using PDQ Connect or PDQ Deploy — making learning fun with tools students already love.
Minecraft: Education Edition is a learning tool built around the popular video game, Minecraft. While Minecraft Education includes many of the same features and gameplay characteristics as the base game, it also adds functionality to assist with lesson development — and it has business-level licensing options.
What is Minecraft Education, and why use it in schools?
Minecraft Education is a classroom-friendly version of the world’s best-selling video game. It includes tools for educators to create interactive lesson plans and a business-grade license for large-scale deployments.
But Minecraft isn't just a video game; it's a phenomenon. With over 204 million active players and the distinction of being the best-selling video game of all time, even the most judicious technophobes have likely heard of it. But what makes it a good resource for the education sector?
Utilizing video games as a learning tool is nothing new. I grew up with many '90s classic video games designed to instruct and inspire naïve youth. Mavis Beacon played a crucial role in developing my mediocre typing skills. Number Munchers helped me realize I shouldn't pursue a math degree. And The Oregon Trail taught me not to get dysentery. But all these "games" were limited in scope and application.
Minecraft Education takes things to the next level by giving teachers the tools necessary to teach their various curricula and tailor each lesson plan to meet the needs of their students. Plus, chances are high that most learners these days have been thoroughly exposed to regular Minecraft and are well aware of its mechanics and fundamentals.
What are the command-line options for Minecraft Education?
One crucial step to any deployment is identifying the command-line options or parameters necessary for a silent deployment. Thankfully, Microsoft is on top of things and gives us all the information we need so we don't have to go looking for it.
/? or /help | Display command line options |
/extract: <directory> | Extracts all files to the specified directory |
/listlangs | Lists the languages supported by setup |
/exenoui | Launches EXE setup without a UI |
/exebasicui | Launches EXE setup with basic UI |
/exelang <langid> | Launches EXE setup using the specified language |
/proxyusername | Username used by proxy |
/proxypassword | Password used by proxy |
/L*V <path_to_file> | Creates a verbose log file at the specified path. Use just /L to only do basic logging. |
INSTALL_UPDATER="NONE" | Does not create the task scheduler events for update checks. (App will need to be manually updated) |
<msioptions> | Options for msiexec.exe running the MSI package. For example /qn runs the MSI install as quiet with no user interface. |
APPDIR= | Changes the install path for Minecraft Education, for example: |
Source: Windows Installation Guide
Loading...
How do I deploy Minecraft Education using PDQ Connect?
To deploy Minecraft Education to remote student devices, use PDQ Connect — an agent-based deployment tool for Windows endpoints.

The following guide requires PDQ Connect. If you're not already using the best time-saving system management tools on the market, what are you waiting for? Sign up for a free trial so you can spend less time managing Windows devices and more time slaying zombies and herding ocelots in Minecraft.
Download the Minecraft Education desktop installer.
In PDQ Connect, click Packages.
Click Create package.
Add a name to the package, then click Add install step.

Click Attach installer.
Navigate to the Minecraft Education installer, select it, then click Open. The installation file is large, so uploading it may take a few minutes.
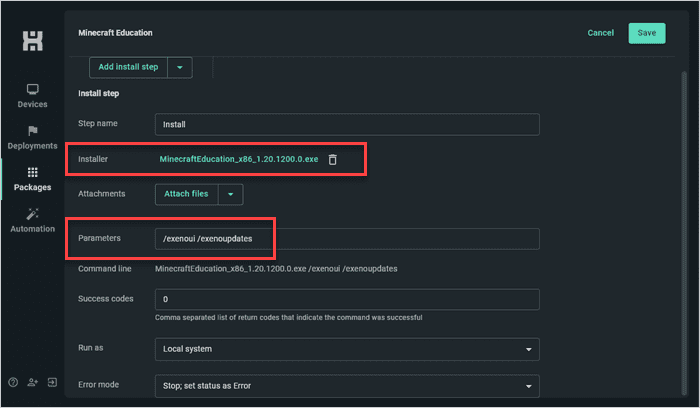
Once the installer has finished uploading, add your command-line options in the Parameters field. Many of the parameters are optional, but make sure you add the /qn or /exenoui silent parameters. I'll use /exenoui and the /exenoupdates command line options for this example. Then, click Save.


With the Minecraft Education package saved, you're ready to deploy it.
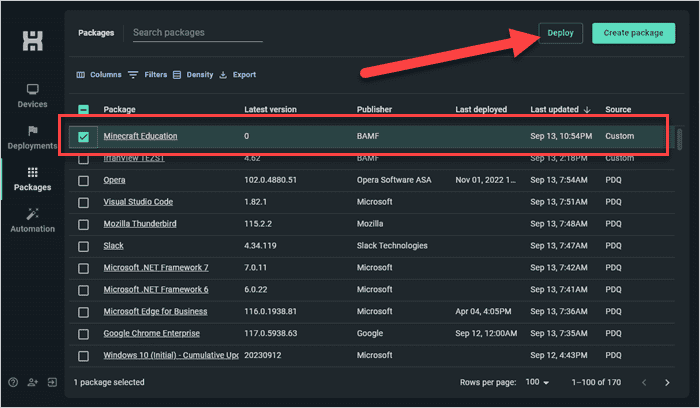
Click Packages.
Select the Minecraft Education package you just created, then click Deploy.
Enter your targets into the Search devices and groups field, select them, then click Deploy when ready.

You can monitor the status of the installs using the Deployments tab. Minecraft Education should install on your targeted remote Windows endpoints within a few minutes.
How do I deploy Minecraft Education with PDQ Deploy?
PDQ Deploy is ideal for installing Minecraft Education edition because distributing it to classrooms and computer labs is the most common deployment scenario. This could result in dozens or even hundreds of installations. PDQ Deploy can easily handle this workload and save you precious hours of manual clicking. (After all, finger sprains are no laughing matter.)

Want to see PDQ Deploy & Inventory in action?
Sign up for a 14-day free trial.
Here's how to deploy the Minecraft Education edition app with PDQ Deploy.
Download the Minecraft Education desktop installer.
Add the installation file to your PDQ repository.
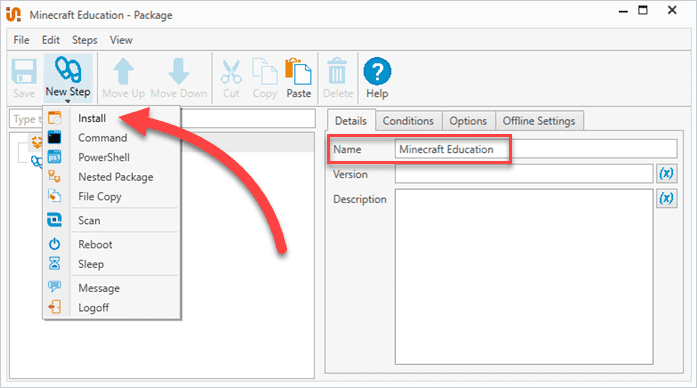
In PDQ Deploy, click New Package.
In the Details tab, enter a package name.
Click New Step > Install.
Click the ellipsis button next to the Install File field.
Navigate to the Minecraft Education installation file, select it, then click Open.
Add the parameters you want to the Parameters field.

Review your package settings, then click Save. Close the package window.


At this point, we're ready to deploy Minecraft Education. However, to make the deployment process easier, I'll quickly create a collection in PDQ Inventory to ensure we're targeting the proper devices.
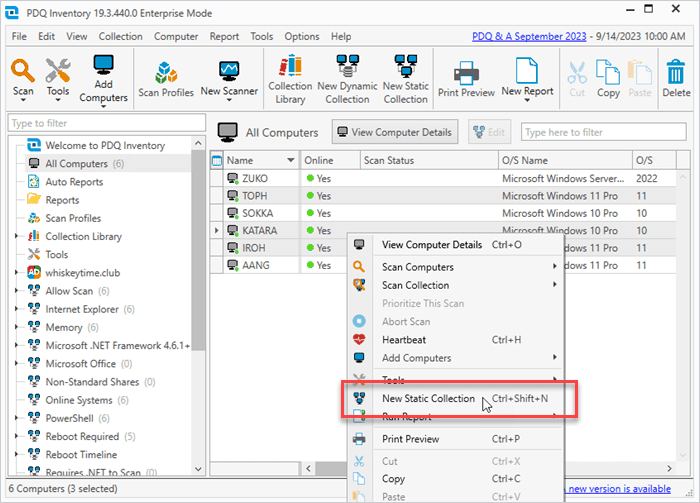
In PDQ Inventory, highlight the computers you want added to your Minecraft Education deployment.
Right-click on the highlighted targets, then click New Static Collection.
Enter a name for the collection, review the collection members, then click OK.


Now that we have our collection created, we're ready to deploy Minecraft Education.
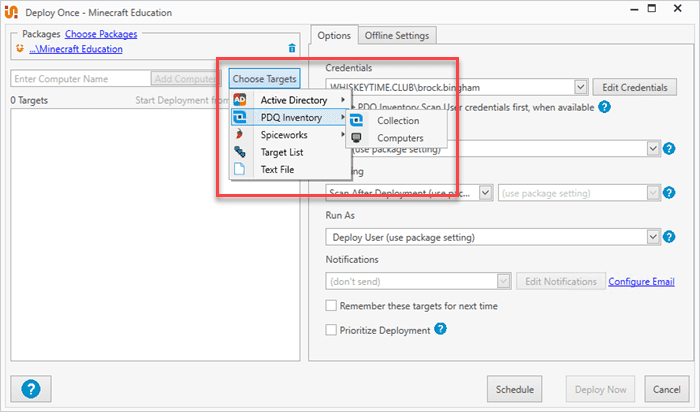
In PDQ Deploy, click on the Minecraft Education package, then click Deploy Once.
Click Choose Targets > PDQ Inventory > Collection.
Select the collection you created in the previous section, then click OK.
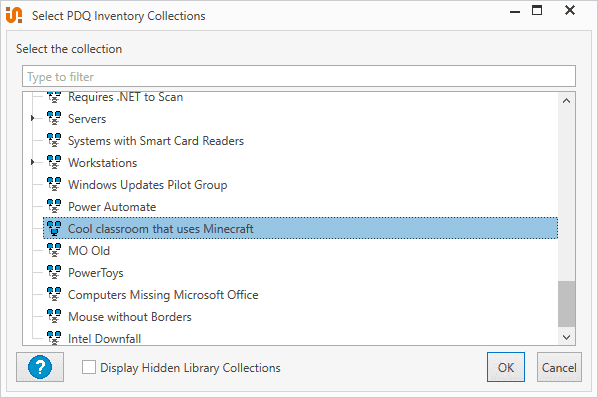
Click Deploy Now to start the deployment.


Minecraft Education is a decent-sized installation, so the deployment could take a few minutes to complete. Monitor the status and ensure each installation finishes successfully.

With Minecraft Education, your students will brag about getting to play video games at school. And one of two things will happen: Students will either learn to love learning or learn to loathe Minecraft. Either result sounds like an absolute win in my book. As for me, I never financially recovered from my kids filling my humble Minecraft home with TNT. I can still recall the twinkle in their eyes as they watched it blast into a million pieces.


