

Running PowerShell commands against remote computers opens up a world of possibilities for endpoint management and automations. But just like any good Slurpee machine, you’ve got several options to choose from. Let’s take a look at some of the most common methods to run remote PowerShell commands — and a few easy alternatives.
Integrated remote PowerShell cmdlets
Running commands on remote computers is nothing new. Sysadmins have been supporting remote devices long before Ferris Bueller ever missed a day of school. But the process has changed over the years. For many, PsExec — the ever-popular Sysinternals utility — was a mandatory part of their sysadmin toolkit, allowing them to run commands and execute programs remotely.
Enter PowerShell, which has made running commands on remote devices easier than ever. Using WinRM, sysadmins can leverage cmdlets like Enter-PSSession, New-PSSession, and Invoke-Command to manage and gather information from remote devices. In fact, many commands have built-in remoting using the -ComputerName parameter.
Enter-PSSession
Enter-PSSession starts an interactive session with a remote device. You can think of Enter-PSSession almost as if you were physically working directly on the remote device. Enter-PSSession is great for interacting with one remote device at a time.
Here’s a basic example of Enter-PSSession.
Enter-PSSession -ComputerName <computer_name>
This simple command should give you a direct session with the remote computer. If you have any issues connecting, make sure you enable WinRM.
When you connect to a remote computer, you should see the computer name in brackets at the beginning of your shell prompt. But you can also verify the connection by returning some information that would be specific to the target device. For example, I could return the disk information of the connected device.

In the image above, you can see that I returned the C: drive information for my local device using the cmdlet Get-PSDrive. Then, I used Enter-PSSession to connect to a remote device and returned the C: drive data of the remote device. As expected, the data that was returned was unique to each endpoint.
When you’re ready to end the session and return back to your local console, just enter the keyword, exit.
New-PSSession
New-PSSession is great for creating persistent connections to remote targets. You can assign persistent sessions to a variable and enter the session at any point using the Enter-PSSession command.
New-PSSession -ComputerName <computer_name>
This command created a new remote session with a remote computer. However, you can see after calling the computer name environment variable, I’m not in the session I created. I’m still on my local device. But this created the remote session, which I can now connect to and exit from at will as long as I don’t delete the session or close the console.
Now I can use Enter-PSSession to connect to my persistent remote sessions.
Enter-PSSession -Name <runspace_name>
This command allows me to enter the remote session I created using the runspace name or session ID, which I can return by running Get-PSSession. However, best practice is to actually assign the remote session to a variable, like this:
$sesh = New-PSSession -ComputerName <computer_name>With the session assigned to a variable, we can refer to it without needing to remember the Runspace name or session ID.
The real power of New-PSSession comes from its ability to open several remote sessions at once by simply adding more remote targets to the command.
$sesh = New-PSSession -ComputerName <computer_name1>, <computer_name2>, <computer_name3>
Assigning multiple remote sessions to a variable lets you quickly send commands to multiple remote devices. For example, now I can return the disk information for each remote computer assigned to my session variable at once using the Invoke-Command cmdlet.
Invoke-Command -Session $sesh -ScriptBlock {Get-PSDrive C | Select-Object -Property Name, Free, Used}
Invoke-Command
Invoke-Command is another native PowerShell cmdlet that lets you fire off commands to remote computers. With Invoke-Command, you can target multiple remote computers at once or use existing remote sessions like in the previous example.
Invoke-Command is usually accompanied by a list of computers or an existing remote session to target and a script block containing the command you want to run on the remote devices. Here’s the general syntax of Invoke-Command.
Invoke-Command -ComputerName <computer_name1>, <computer_name2> -ScriptBlock {Command-ToRun}Here’s an example:
Invoke-Command -ComputerName AANG, TOPH, KATARA -ScriptBLock {Get-WindowsEdition -Online}
In this example, I use Invoke-Command to target three computers defined by the -ComputerName parameter. Then, inside the -ScriptBlock parameter, I run the command Get-WindowsEdition -Online against the remote targets.
The results for the Windows edition on the remote computers returned Professional edition. When I run the same command against my local machine, it returns ServerStandard.
I like to use Invoke-Command when a command doesn’t natively have remoting built in. For example, Get-Service has the -ComputerName parameter, which lets me target remote computers without using a dedicated remote PowerShell command. However, many commands don’t accept the -ComputerName parameter. You can use the help documentation (Get-Help) to check if a cmdlet natively lets you target remote computers with the -ComputerName parameter.
Don’t let the complexity of running remote commands bumfuzzle you. Let PDQ Deploy & Inventory drastically simplify the process. Worried about your off-prem devices? Don’t be. PDQ Connect ensures any computer with an internet connection is just a few clicks away. Try them out for yourself and discover what simplified IT management looks like.
How to run remote commands with PDQ Inventory
PDQ Inventory makes it super easy to run remote commands. With all the necessary functionality baked right into the Inventory console, you’ll be firing off remote commands faster than your users can click on malicious links. Here’s how the process works.
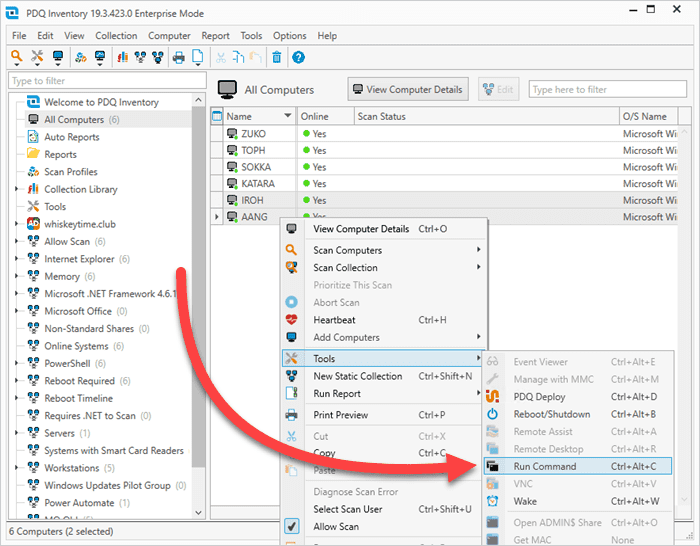
In PDQ Inventory, select a computer (or multiple computers).
Right-click on the selection, then click Tools, then click Run Command.
Enter your command into the command line, then hit the Execute button.
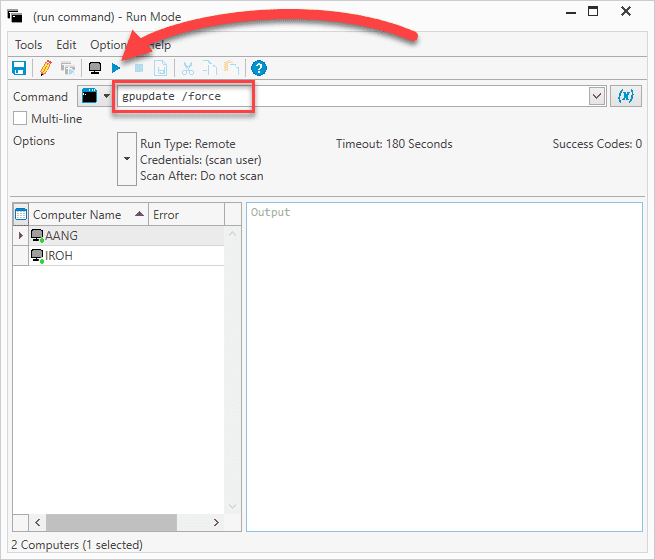


When your command finishes executing, the run command window displays the output from the remote device(s).

There are a few other things I should point out in this window. Next to the command line, there is a drop-down option to change to a PowerShell prompt. You can also select the Multi-line option to add commands that are more than just one-liners. You can configure different settings by clicking the Options drop-down menu, such as the run as mode, the timeout settings, success codes, and more. Lastly, you can add more targets by right-clicking in the computers field in the bottom left of the window, then clicking Choose Computers.

Once you get comfortable running commands from PDQ Inventory, take things to the next level by building your own custom tools in PDQ Inventory.
How to deploy commands and scripts to remote devices with PDQ Deploy
PDQ Deploy is well known for simplifying application and patch deployments. But did you know that Deploy also makes sending out commands and scripts to on-prem devices easier than sleeping through your alarm on a Monday morning? Here’s how easy it is to distribute commands and scripts using PDQ Deploy.
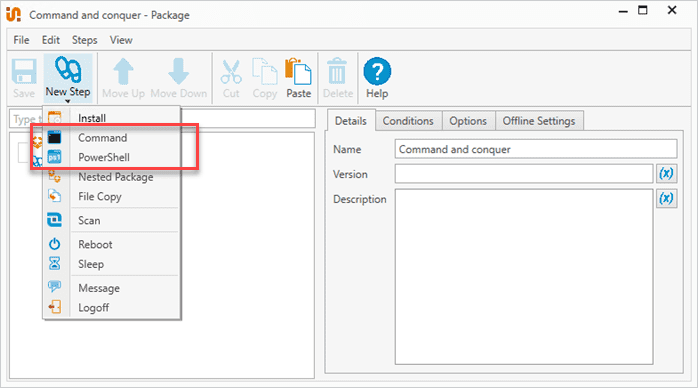
In PDQ Deploy, click the New Package button.
Enter a name for the package, then click New Step > Command or New Step > PowerShell. In this example, I’ll use a PowerShell step.
If you have a script already, you can click the Insert PowerShell Script link; otherwise, just enter the command into the PowerShell window.
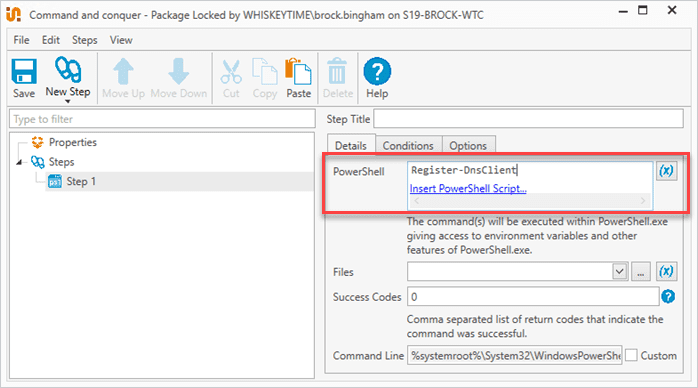
Click Save when finished, and close the package editor window.


With the package saved, your command or script is ready to deploy to your devices whenever needed. When you’re ready, here’s how to deploy the package to your devices.
Select the package, then click Deploy Once.
Enter the names of your target computers, then click Add Computer.
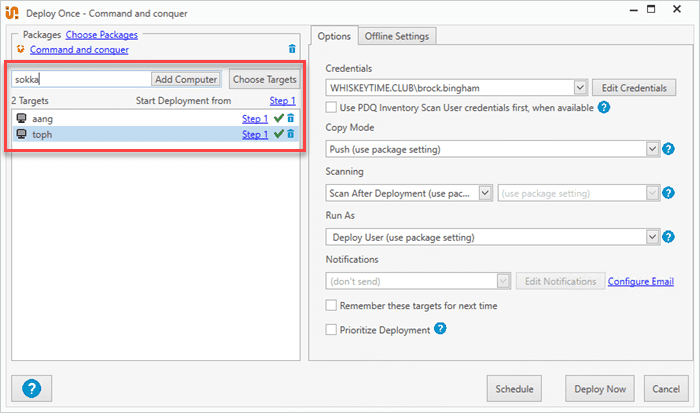
With your targets added, click Deploy Now.

That’s it. That’s the entire process. You can add as many or as few devices as you want to a deployment. You can also target collections in PDQ Inventory to ensure you’re deploying to the correct computers.
How to run commands on remote endpoints using PDQ Connect
Up until now, we’ve been covering processes for executing PowerShell commands on remote targets that are still connected to your local network or perhaps connected to your network via a VPN. But with PDQ Connect, you can run your picture-perfect PowerShell commands against anything with the PDQ Connect agent and an internet connection. That one user that basically lives at Starbucks? Piece of cake. Ken Adams who is currently backpacking through Western Europe? No problem. Matthew McConaughey as he travels through a wormhole to a distant solar system? Not yet, but a guy can hope.
PDQ Connect commands console
The commands console in PDQ Connect lets you run PowerShell and Command Prompt commands against a remote computer as if you were sitting at the device. It’s great for running commands against one device at a time.
To use the commands console in PDQ Connect, click on a device, then click the Commands tab.

You can use the drop-down menu to change between PowerShell and Command Prompt. When you’re ready, enter a command, then click Run command.

In this example, I ran Get-WindowsOptionalFeature -Online to see which features were enabled on this PC. PDQ Connect then returned all the information to the commands window.
Deploying commands and scripts to remote devices with PDQ Connect
If you need to run commands against multiple remote endpoints managed by PDQ Connect, the best way to do it is by creating a custom script package.
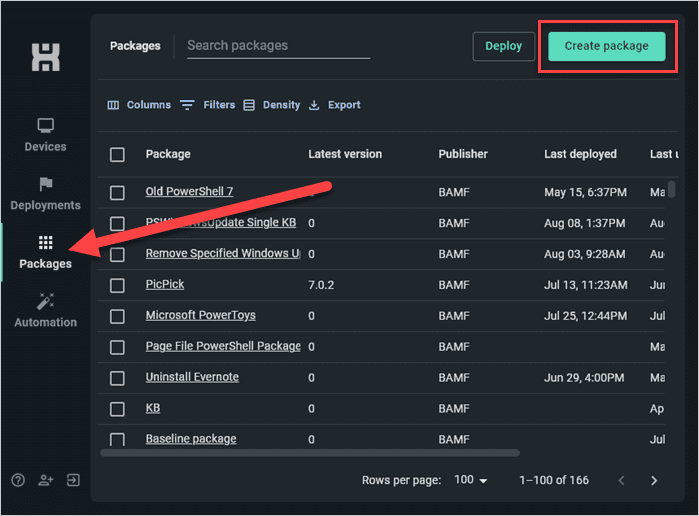
In PDQ Connect, click the Packages tab.
Click Create package.
Name the package.
Click the drop-down arrow next to Add install step, then click Add script step.
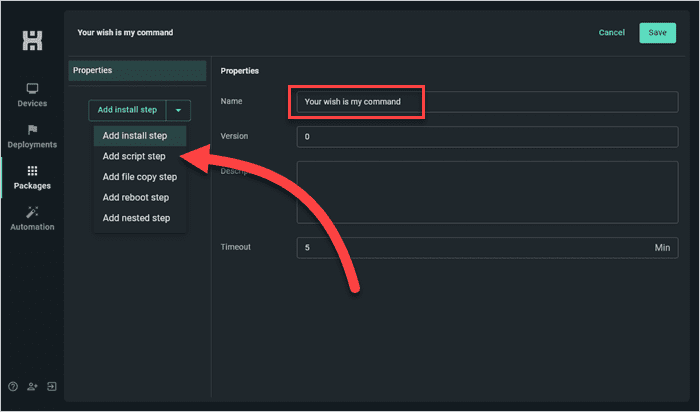
Set the script type, either PowerShell or CMD. I’ll use a CMD command for this example.
Click the Import link to import a script, or type your command into the scripting pane.

When finished, click Save to save your package.


With your package saved, it’s ready to deploy to all those users working in Timbuktu — or Cleveland. Simply select the package you just created (it’ll be located in the Packages tab), then click Deploy. Add your devices or groups to the deployment, then click Deploy.

Within minutes (more likely, seconds), your deployment surfs its way across the web to the targeted devices. If you want to see the results of the deployment, you can click on the Deployments tab, then click the status link of one of the devices you deployed the script to.


Congrats! You’re ready to execute commands on a global scale. Next stop, deploying commands to space? I’ll reach out to my contacts at NASA.

