

PDQ Inventory is an incredibly versatile tool that helps you manage your Windows devices. Maybe you think I have some sort of bias towards PDQ.com products, and yes, you may have a point. But still, PDQ Inventory never ceases to amaze me with what you can do with it, and today, I will show you how to pull data from Active Directory and populate that data into custom fields in PDQ Inventory.
Active Directory info in PDQ Inventory
You can see what data PDQ Inventory pulls from Active Directory by double-clicking on a computer and clicking on the Computer menu option. You’ll see a section called Active Directory.

You can also view what Active Directory groups the device is associated with by clicking on the Active Directory Groups menu option. While this information is handy to have, it barely scratches the surface of the amount of data you can store in Active Directory. Let’s take a look at a computer object in Active Directory for reference.

Several of the tabs you see in this properties window contain fields that can hold data, but most of these fields are not populated by default when a computer is added to AD. To get really detailed, you can even open up the Attribute Editor tab, which contains more attributes than you can shake a stick at.

Today, we’ll focus on pulling data from the department attribute in AD. I’ve got a few computers with this attribute set, two of them in sales and one in management.
Exporting data from Active Directory Using PowerShell
If we want to be able to store this data in PDQ Inventory, we first need to find a way to extract the data from AD. PowerShell makes this process pretty simple with a few lines of code.
$csv = "C:\Scripts\AD Attributes Custom Fields\AD_Description_Export.csv"Get-ADComputer -Filter * -SearchBase "OU=Test,OU=PDQDemo_Computers,DC=pdqdemo,DC=net" -Properties * | Select-Object -Property Name,Department | Export-Csv -Path $csv -NoTypeInformationLet’s break down this code to see how it works so you can customize it in the future. The first line is simply assigning the path of our CSV file to the variable $csv. We will use this CSV file to store the data we export from AD. The following line uses the cmdlet Get-ADComputer, which will search for computer objects in AD. I’ve added the -Filter parameter with an asterisk because I want to return all results instead of filtering by something specific. The -SearchBase parameter is used to point to the OU I want the cmdlet to search. The -Properties parameter will ensure we are returning all properties of the objects. This is handy if you’re going to add additional properties to this script in the future. Next, we use Select-Object -Property Name,Department to specify which properties we want to export to our CSV file. Finally, the Export-Csv cmdlet is used to export our CSV file containing the name and department data.
Importing data into custom fields in PDQ Inventory
Now that we have our code creating the CSV file containing our Active Directory data, we need additional code to import the CSV file into Inventory. We could use the custom fields import wizard in PDQ Inventory, but since we want to automate this process, we’ll use PowerShell instead. Here’s the code.
pdqinventory ImportCustomFields -FileName $csv -ComputerColumn Name -CustomFields ""Department"="Department"" -AllowOverwriteAgain, let’s break it down. First, we’re calling PDQ Inventory with the pdqinventory command and following it with the ImportCustomFields command. Next, we use the -FileName parameter to point to the CSV file variable. Next, we set -ComputerColumn to Name. We then use -CustomFields to assign the department values in the CSV file to the Department custom field we’re creating in Inventory. Lastly, use -AllowOverwrite to overwrite the data in the custom fields. If the data changes for these computers in the future, we want Inventory to update the custom fields’ data.
Bringing it all together
Now we’ll combine all this PowerShell into one script.
$csv = "C:\Scripts\AD Attributes Custom Fields\AD_Description_Export.csv"


Get-ADComputer -Filter * -SearchBase "OU=Test,OU=PDQDemo_Computers,DC=pdqdemo,DC=net" -Properties * | Select-Object -Property Name,Department | Export-Csv -Path $csv -NoTypeInformation


pdqinventory ImportCustomFields -FileName $csv -ComputerColumn Name -CustomFields ""Department"="Department"" -AllowOverwrite
Before running the finished script, we first need to create our custom field in Inventory if it’s not already created. Click Options > Custom Fields. Next, click New Field > Text. Enter Department for the name and click OK.

With our custom field created, we’re ready to run our script. Here’s what my CSV file looks like after running the script.

As you can see, it pulled the name and department properties. The name value is needed to match the department value to the correct computer in Inventory.
Next, I’ll check to make sure the data imported correctly. Double-click on a computer in Inventory and click Custom Fields.

It looks like the data imported successfully, so now let’s take it a step further and build a dynamic collection for these computers.
Building a Dynamic Collection for custom fields
With this custom field populated, we’ll build a basic dynamic collection that will show us which computers have the Department custom field populated.
Click New Dynamic Collection
Name the collection
Use the following filter settings:
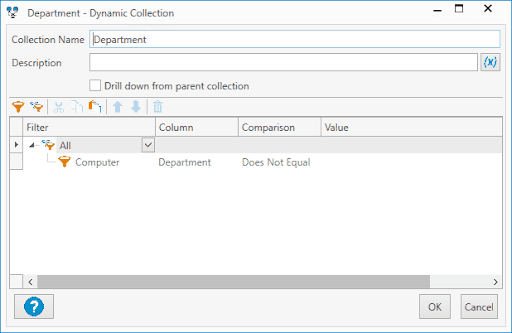
Click OK

I had three computers with the custom field populated, and my dynamic collection returned three computers, so I know that my import was successful.

Adding custom fields as columns
One of the super cool features with custom fields is that they can be added as columns to the “All Computers” list in PDQ Inventory. Adding your custom fields as columns allows you to both sort and filter on that custom field. Here’s how to add your custom field to the All Computers list in PDQ Inventory.
Click on the Customize this grid button
Select your custom field or fields in the Hidden Columns sections (CTRL + click to make multiple selections)
Click the > button to add them to the visible columns section
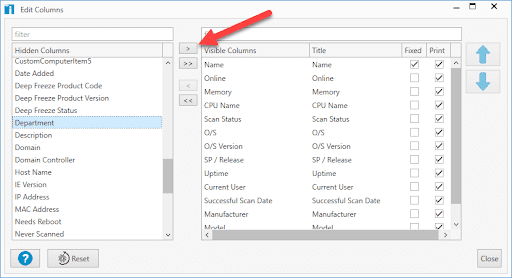
Optional: You can move your custom field column by selecting it and using the arrow keys to move it. The closer to the top of the list you move it, the farther left the column will appear. You can also use the Fixed and Print options to fix the column in place and to show the column when printing
Click Close when you are finished

You should now be able to see your custom field as a column in the All Computers list. You can click on the column header to sort by that column.

You can also use the filter field to filter based on that column's data.

With everything working, all that’s left to do is to either use PDQ Deploy or Task Scheduler to run this script on a set schedule for us automatically. That way, as these attributes get updated in Active Directory, the data will automatically get updated in PDQ Inventory, and you won’t have to lift a finger to do it.
Wrapping up
This script was a very basic example of importing data from AD into Inventory. You can add a lot more data to your CSV file by changing the script accordingly. You can also build more specific dynamic collections with these custom fields. For example, you could have a collection for each individual department. With the data in Inventory, there’s no limit to what you can do with it.
If you’ve read this entire blog and you don’t even have PDQ Inventory, bravo. Also, why the heck not? Try it out right now with our 14-day free trial. With PDQ Inventory and PDQ Deploy, your job will be so relaxing; you won’t even need to take vacations anymore.


