

Everybody loves free stuff. This is a universal truth. It doesn't matter if you're well off or a college student just scraping by; free stuff is awesome. What’s more, people will go to great lengths to get free stuff. I once stood in a 2-hour long line to get a free t-shirt at a gaming convention. It wasn't even that great of a t-shirt, and I maybe wore it once before donating it. But, it didn't matter. It was free.
However, most "free" things in life aren't really free. For example, in order to get a free smoothie from my local smoothie joint, I have to buy nine regularly priced smoothies. So, is that tenth smoothie really free? That t-shirt at the gaming convention was free, but I had to stand in line for what felt like an eternity amongst a throng of gamers who may or may not have had the best hygiene habits. Also, I had to purchase the tickets to get into the gaming convention. So again, was the t-shirt really free?
While few things in life are truly free, there are few exceptions. For instance, if you're a sysadmin in the market for a free utility to help you manage your ever-growing collection of computers, then you're in luck. PDQ Inventory, the world-class asset management application, has a free version designed to fit the needs of the smallest or even non-existent budgets.
Let's take a look at some of the incredible things you can do with PDQ Inventory Free Mode.
Import computers from Active Directory
Adding computers into PDQ Inventory is pretty much step one after installation. PDQ Inventory Free Mode makes this process extremely simple by allowing users to import computers directly from Active Directory.
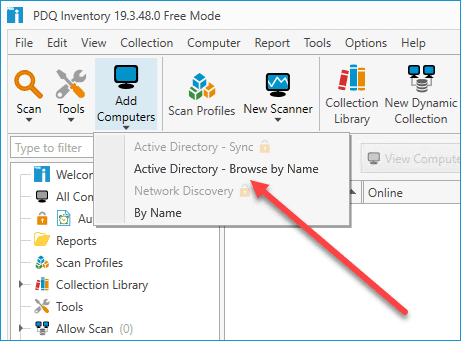
In PDQ Inventory, click Add Computers > Active Directory - Browse by Name.
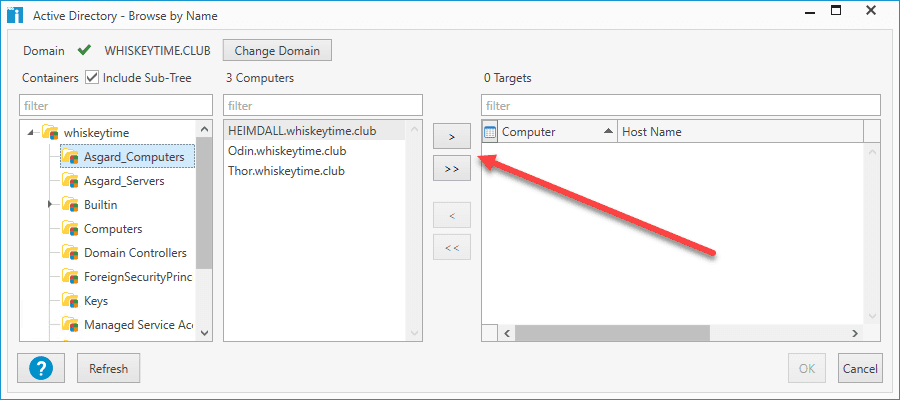
Click on the OU containing your computers. Select the computers you want to import into PDQ Inventory and click the > button. Alternatively, you can import the entire OU or multiple OUs by using the >> button. When finished, click OK.


When computers are imported into PDQ Inventory, they're automatically scanned by the standard scan profile. You can monitor their scan status by clicking on All Computers and inspecting the Scan Status column.

Scan your devices
Data returned from the devices on your network is what makes everything in PDQ Inventory possible. All of the collections, reports, and tools depend on this information, so keeping this information up to date is critical. When computers are first imported into Inventory, they are automatically scanned. However, to keep that information current, you'll want to re-scan your devices from time to time. Luckily, kicking off scans to update this information takes only a couple of clicks.
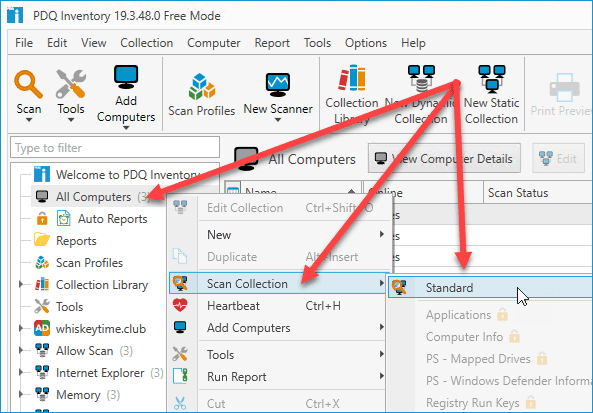
Right-click on All Computers.
Click Scan Collection > Standard.

Scanning your computers will refresh the data inside PDQ Inventory, ensuring you have the most up-to-date information about your systems.
View computer details
Now that we know our data is up to date and as accurate as possible, let's check out all the information PDQ Inventory collected. To do so, double-click on any computer in the All Computers window.

The computer details window should open up, giving you access to all that delicious data.

On the left side of the window, you'll see the navigation menu that gives you access to different information groups. The Computer section contains general information about the device such as name, IP Address, uptime, current user, OS info, Active Directory information, and system information.
The menu items with locks next to them are reserved for Enterprise users. However, I think you'll find that the information available to Free Mode users is incredibly useful. For example, the Applications menu provides details about all the installed applications installed on that computer.
In total, there are 18 different menu options available to Free Mode users that you should familiarize yourself with. The more you know about the data collected by PDQ Inventory, the more you can do with it.
Create static and dynamic collections
Collections are ways of grouping computers in PDQ Inventory. A static collection is a manually defined group of computers. They're called static because the grouping never changes unless you manually change it. Dynamic collections are groups of computers that meet certain filter criteria. Computers will automatically be assigned to a dynamic collection if it matches a collection's filters. If a computer no longer meets the filtering criteria, it will automatically be removed from the collection.
For example, if you have a dynamic collection that filters for computers with Google Chrome installed, any computer with Google Chrome installed will automatically join the collection. If you uninstall Google Chrome from one of the computers in the collection, then it will automatically be removed from the collection.
Let's look at a couple of examples. We'll start with building a static collection of computers.
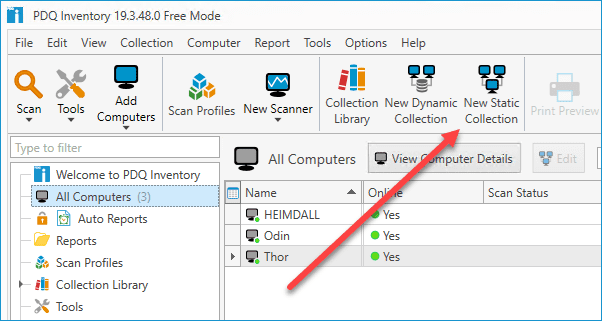
Click New Static Collection. (Note: If the new collection buttons are greyed out, click on All Computers. The buttons should then be available to click.)
The New Collection window will open. In the Collection Name field, enter a name for your collection.
Select the computers you want in the collection and click the > button.
When you are finished, click OK.
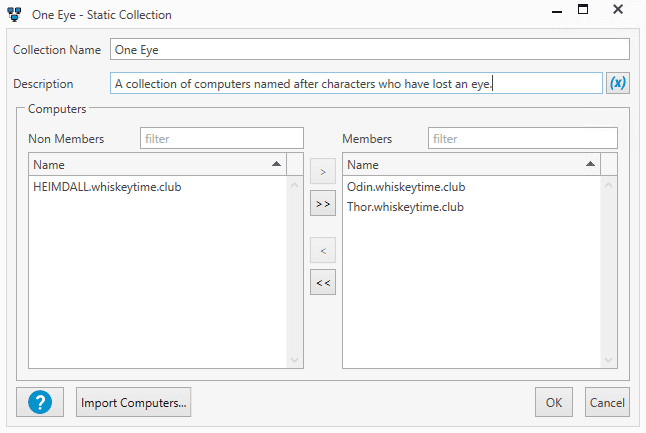


After clicking OK, you'll find your new static collection in the menu pane. It will only contain the computers you added to it.

Now, let's try making a dynamic collection. Instead of manually adding computers to this collection, we'll be creating filters. If a computer matches the filter, it will automatically be added to the collection. For this example, we'll make a collection that contains computers that have Discord installed.
Click New Dynamic Collection.
Name the collection.
Use this filter: All > Application > Name > Contains > Discord.
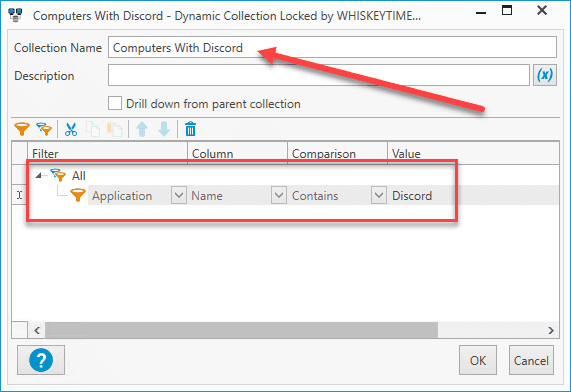
When you are finished, click OK.

Our new dynamic collection should now be accessible in the menu pane.

As you can see, I've only got one computer that has Discord installed. If I installed Discord on another computer, it would automatically join this collection. Keep in mind that as applications change on computers, the computers will need to be rescanned before they'll change collections in Inventory.
Run remote tools
Tools in PDQ Inventory are utilities that you can run against remote targets. To run a tool against a computer, simply right-click on a computer, click Tools, then click on the tool you want to run.

If we click on the Event Viewer tool, the event viewer of the remote host will open up.

One of my favorite tools is the Run Command tool, which lets you send commands to the remote computer.
Tools are a great way to manage computers from one centralized system.
Create reports
If you've ever had to deal with a really complicated report builder, then you've probably developed a chronic twitch whenever you hear the word "report." Well, let me put your worries to rest. Building reports in PDQ Inventory couldn't be any easier. In fact, Free Mode comes with several useful reports that are built-in. Don't believe me? Simply click on the Reports menu option and then double-click on the Applications report.


Within a couple of clicks, we generated a report containing a list of computers and the applications they have installed on them.
You can even edit these reports by clicking on the Define Report button. Let's add the IP Address of each computer. Click on a new row and add this column: Computer > IP Address > Computer IP Address.

Now click Run Report, and you'll see that the Computer IP Address column has been added to the report.

When you've finished building your report, simply click Save Data to File, and you can save the report as a CSV, XLSX, XLS, PDF, or HTML file.
Wrapping up
PDQ Inventory Free Mode is no slouch in the features department. Being able to scan and collect data, create static and dynamic collections, run remote commands and tools, and generate reports provides Free Mode users with a ton of utility.
If you've been using Free Mode for a while, but you're interested in checking out the additional features included with the Enterprise version, you're in luck. You can get a free 14-day trial over on our registration page. Careful though. With access to things like the collection library and PowerShell scanner, you may find it difficult to go back to living without it.

Managing a remote or hybrid fleet?
PDQ Connect brings the best of Deploy & Inventory to the cloud with an agent-based approach so that you can manage hard-to-reach devices from anywhere. It also adds remote desktop, vulnerability management, macOS support, and more — all in a single pane of glass.


