I have a problem. Not a drinking problem, not even a personal problem. A problem with how Windows handles DNS registration. When I move my laptop from my wired dock to our wireless connection, the DNS entry is, annoyingly, no longer correct. The DNS server still reports the old address. Sure, I could re-register the DNS but what should I do for end user computers? Thankfully I’ve had the time to investigate a fully automatic fix.
Working Around It, One DHCP Update at a Time
The solution? A little known feature of WMI, WMI Eventing. Originally introduced in Windows 2000, WMI Eventing lets you trigger custom actions based on events that occur during the operation of a Windows computer. The PowerShell example below should work all the way back to Windows Server 2008 R2 and Windows 7 out of the box and Windows XP SP2, 2003 SP1, and Vista provided you have PowerShell 1.0 or later installed to those OSes already. However, the group policy example below will only function with Windows Server 2008 R2 and Windows 7 or later.
To start with, the code in question. We’ll cover what each step is going to do.
# Configure persistent lease change check
$query = 'SELECT * FROM __InstanceModificationEvent WITHIN 30 WHERE TargetInstance ISA "Win32_NetworkAdapterConfiguration" AND TargetInstance.DHCPLeaseObtained <> PreviousInstance.DHCPLeaseObtained'
$filterName = 'DHCP Lease Obtained'
$consumerName = 'DHCP Lease Obtained - Perform Register DNS Action'
$command = 'ipconfig /registerdns'

$eventFilter = Set-WmiInstance -Class __EventFilter -NameSpace "root\subscription" -Arguments @{Name=$filterName; EventNameSpace="root\cimv2"; QueryLanguage="WQL"; Query=$query}

$eventConsumer = Set-WmiInstance -Class CommandLineEventConsumer -Namespace "root\subscription" -Arguments @{Name=$consumerName; CommandLineTemplate=$command}

$filterbinding = Set-WmiInstance -Class __FilterToConsumerBinding -Namespace "root\subscription" -Arguments @{Filter=$eventFilter; Consumer=$eventConsumer}
The query variable holds the WQL string used to check for DHCP lease changes every 30 seconds, that time period being defined by WITHIN 30. What it’s instructing the system to do is listen for any changes that invoke the Win32_NetworkAdapterConfiguration class and if the DHCPLeaseObtained property changes then an event will be triggered. Riveting!
The filterName and consumerName variables do exactly what they say on the tin, they’re the names of the filter object and consumer object, the consumer object being the thing-ama-bob that will actually run something with that something being the string in the command variable. All of this feels a bit like Tom Smykowski from Office Space; the filters deal with the events so the consumers don’t have to! They’re good at dealing with events, can’t you see that!?
Beyond that the three final cmdlets are implementing what we’ve talked about above: create the event filter, create the event consumer with the command to run, and finally bind them together so the filter will invoke the consumer upon the defined event occurring.
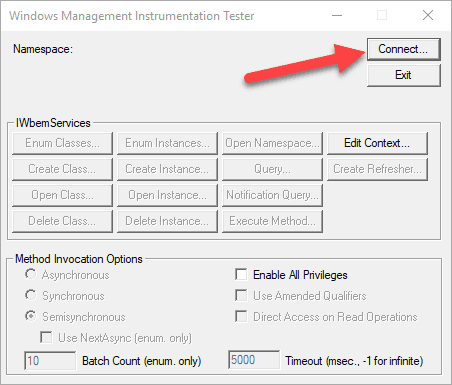
To test before running it in production you’ll want to make use of a WMI tool built into Windows, you can start it by opening Run (Win+R) and executing wbemtest to open the aptly named Windows Management Instrumentation Tester. This tester will allow us to test the test query by following the test step below. Test!
Click Connect…
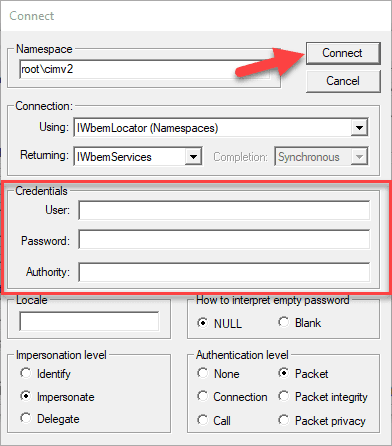
Assuming that you are using an account that has admin permissions simply click Connect, otherwise, provide credentials for an account that does and then click Connect.
In order to make these testers performant click the Asynchronous radio button, otherwise, the tester will run like your computer is on its deathbed while executing this query.
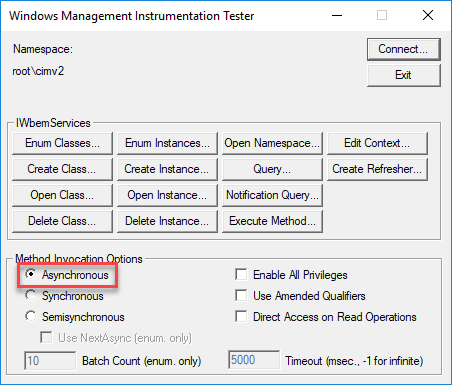
Now that our very dry and very boring startup sequence has completed we can run the test by clicking Notification Query…
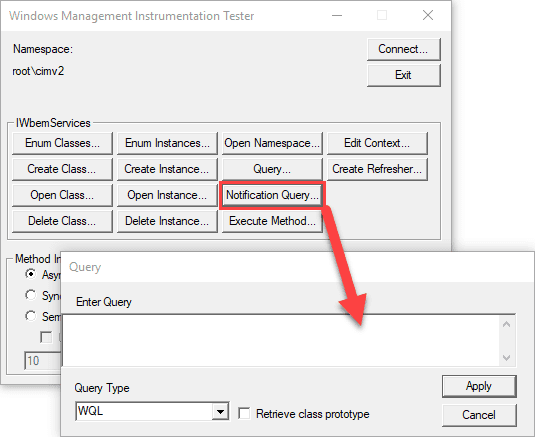
Paste the query from above.
SELECT * FROM __InstanceModificationEvent WITHIN 30
WHERE TargetInstance ISA "Win32_NetworkAdapterConfiguration" AND TargetInstance.DHCPLeaseObtained <> PreviousInstance.DHCPLeaseObtained
into the text field and click Apply.
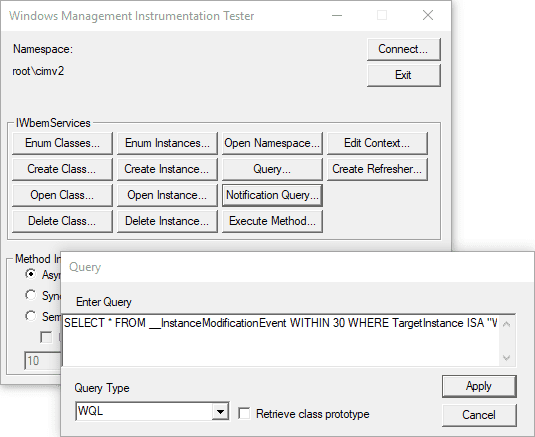
Assuming the query was entered correctly we’ll see a new window called Query Result, if not you’ll see a window that states the query is unparseable. Be sure that the query doesn’t have any quotes at the start or end of the string. If the tester is running like a fat cat who was just lazing in the sun a few moments ago be sure that the asynchronous method invocation option was selected, it really needs to be.
Now we can finally test! We can see things happen! Simply run ipconfig /release (don’t do this remotely as it will drop the connection) and then ipconfig /renew to trigger the event and within 30 seconds you should see something like the image below, which the event has been triggered four times.
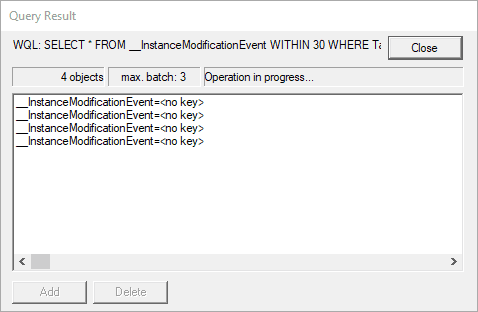
You can double click on an entry to get the instance details and if that object contains an embedded object you can get instance details from that and if that also contains, well, it’s instance details all the way down if you do it right.
Doing The Thing™
From here we’re ready for bulk deployment using Group Policy. There isn’t any built-in method to do this so a startup PowerShell script would have to be used. You can access this under Computer Configuration > Policies > Windows Settings > Scripts (Startup/Shutdown) and then the PowerShell scripts tab as shown below.
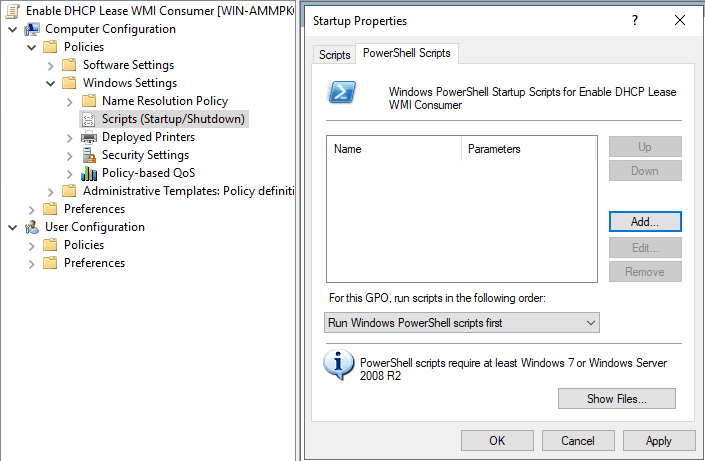
Click the Show Files… button to open the path that you’ll save the PowerShell script to. You can create the .ps1 file using the code block above this page (yes, the one all the way at the top). Once saved in the given path click the Add… button to add the script, then click Browse… to select it, it will open to the same folder that you should have placed the script into. If the script isn’t there, move it over. Simply apply the policy as needed for this test, reboot a device that the policy applies to, and then you are done!
Now you’ll need to keep track of what computers have the WMI event consumers applied. PDQ Inventory will make this easy with its WMI scanner, however, that’s an Enterprise level only feature so I recommend grabbing a trial of PDQ Inventory and Deploy if you do not have one yet.
To do so:
Navigate to Options > Scan Profiles
Click New > Add > WMI
Set the scanner name to FilterToConsumerBindings
Set the namespace to ROOT\SUBSCRIPTION
Set the WQL field to SELECT * FROM __FilterToConsumerBinding
Click OK
Click Add > WMI
Set the scanner name to CommandLineEventConsumers
Set the namespace to ROOT\SUBSCRIPTION
Set the WQL field to SELECT * FROM CommandLineEventConsumer
Click OK
Click Add > WMI
Set the Scanner name to EventFilters
Leave the namespace as ROOT\CIMV2
Set the WQL field to SELECT * FROM __EventFilter
Click OK
Now set the name and, if desired, the triggers of the scan profile
Click OK
Lastly, close the scan profiles window
Wow, let’s take a breath from that monotony; hopefully, I haven’t triggered anyone’s carpal tunnel.
Okay? Then back to it!
With the scan profile created we can now scan the computers that the Group Policy has been applied to in order to see what the current state of the filters and consumers are. Once you’ve run a scan you can view the results under the WMI section of a computer or by creating a report. By default, you may see two pre-existing filters to consumer bindings: SCM Event Log Consumer and BVTConsumer. If the scan computers have the GPO applied and have been rebooted (required for a startup script to execute) then you should also see the binding we’ve created, if you kept the same name as our example it’ll be DHCP Lease Obtained.
Undoing the Thing
Now how would you go about removing all of this? Let’s take a gander at the code block below:
# Remove the persistent WMI filters, consumers, and bindings
$filterName = 'DHCP Lease Obtained'
$consumerName = 'DHCP Lease Obtained - Perform Register DNS Action'

$f = Get-WmiObject -Class __EventFilter -Filter "Name = '$filterName'" -Namespace "root\subscription"
$f.Delete()

$c = Get-WmiObject -Class CommandLineEventConsumer -Filter "Name ='$consumerName'" -Namespace "root\subscription"
$c.Delete()

$fb = Get-WmiObject -Class __FilterToConsumerBinding -Namespace "root\subscription" -Filter "Filter = `"__EventFilter.Name='$filterName'`""

$fb.Delete()
The code block does the following:
Redeclares the names of the filter and consumer objects
Finds the EventFilter object by name using $filterName and removes it with the Delete method
Finds the CommandLineConsumer object by name using $consumerName and removes it with the Delete method
Finds the Filter and Consumer binding object by the name of the filter object and removes it with its Delete method
Using the proper WMI query filtering will ensure that only the DHCP filters, consumers, and events that we’ve created are removed. If you’re unsure then test, test, and test again!


