Remote work is not a new concept, but it’s made quite a comeback thanks to a certain global pandemic. For employees making the switch from on-prem to remote work, the transition can be jarring. For IT, the thought of user devices existing beyond the secure, familiar confines of the office is downright terrifying.
The good news is there are ways to adjust your setup to suit this strange new reality. If you’re already using PDQ Deploy and Inventory for on-prem device management, you can make certain tweaks to your server setup, firewall, and VPN configurations so you can support remote workers as well. But every environment is different, and that environment determines how you eventually set things up. We’ll walk you through the main concepts and what to consider so that you can better decide how you want to implement them.
Speaking of unique setups and the freedom to choose, we’ve got one more option for you to manage remote devices easily. PDQ Connect, a new web-based solution, lets you connect to remote user computers directly over the cloud instead of using your business VPN or your local area network. They just need to have a lightweight agent installed and be connected to the internet. You can get Connect set up in minutes, and it’s lightning quick, too. It really is the bee’s knees.
PDQ server setup
You don’t actually need to make a lot of changes to your PDQ settings to get this to work. However, you have the potential for a lot of DNS turnover. So we will need to do two things to lessen the issues from DNS.
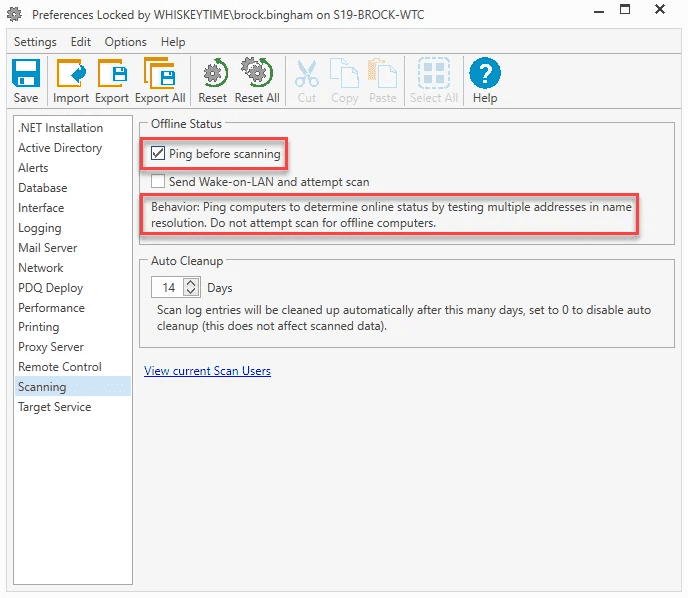
Set PDQ Inventory to check multiple addresses.
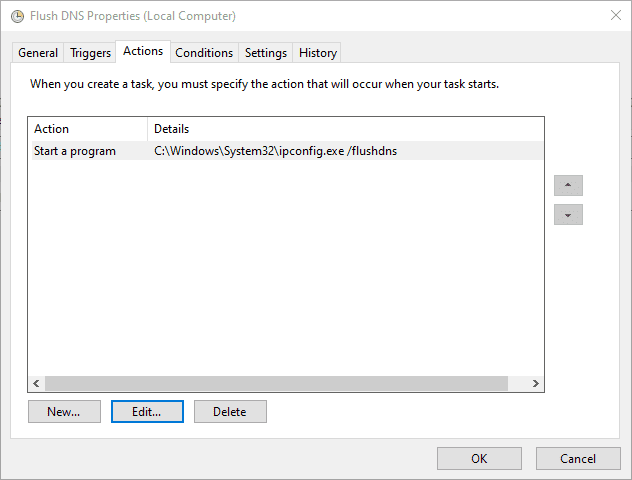
Flushing your DNS often.
In certain cases, DNS can end up having multiple (often two or three) addresses for each computer. Setting Inventory to check multiple addresses will make sure Inventory attempts each returned address until one of them responds. This comes with the downside of your heartbeat scans taking longer, but where we have a higher risk of duplicate or stale records, this gives you much more accurate results when scanning.
Keep in mind that heartbeat (the ping) has a time out of one second, so if your VPN has higher latency, it may move on to the next address before you get a response. If all addresses fail to respond within the time limit Inventory will view that computer as offline. Open preferences in Inventory (CTRL + ,) and go to the Scanning page, and then check "Ping before scanning" to enable this setting.

Now for creating the scheduled task to flush your DNS. I think about every time Inventory does a heartbeat scan, you will want to flush your DNS. The triggers will vary based on your setup, but the action is simple and captured in the screenshot below.

One other gotcha you may run into is your console user. If the credentials you are using for your local deployments do not have the same permission on your remote machine, your scans and deployments will fail. You will need to make sure the credentials in PDQ Deploy and PDQ Inventory have the correct permissions.
Firewall and VPN setup
This block is where we will do most of the heavy lifting for this configuration. The first thing you are going to need is to have a correctly configured firewall, mostly what ports you allow. Brigg wrote about this with more eloquence than I can muster, so if you are looking for a deeper dive, I recommend you read this. The quick breakdown is you need to open UDP ports 137, 138, and 445. As well as TCP ports 139 and 445. You do not need to open these up to the public, but only through traffic on the VPN Tunnel
If those ports are all set, the next step is to make sure that the Virtual IP’s (VIP) are registering properly with your DNS, if you are one of those lucky few whose firewall/VPN device can register with the DHCP server you are done! Give your network team a high five for their absolute awesomeness.
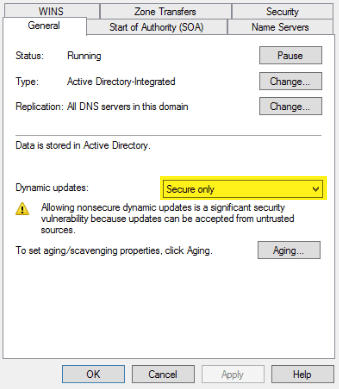
If, however, you are unable to do that, stick with me a bit longer. We have a few more steps to follow. I am going to assume that if your firewall/VPN device can’t pass right to DHCP, then it does not have a domain account, so it can’t authenticate as a domain member to update. So we'll need to head over to your DNS server and make a quick change. Open the properties for the DNS zone, and then you need to change it to allow Unsecure and Secure updates. If you have Linux clients, there is a pretty good chance this setting is changed.

The last thing to take note of is your scavenging settings. If your remote users are not always connecting and your potential number of clients is more than your reserved allotment of addresses, you may need to set some pretty aggressive scavenging. What exact setting depends on your environment, so you may have some trial and error. The success of PDQ products relies on the accuracy of your DNS, so you will want to make sure you don’t have stale records hanging around and causing issues for you.
Conclusion
That is pretty much all you need. There aren't a lot of steps, but there is enough potential for variation you will just need to customize for your particular setup.
Just remember:
Allow the proper ports on your virtual IP’s
On your PDQ Server flush your DNS about as often as you run a heartbeat
DNS requires insecure authentication if your device handling the VPN can’t authenticate with your domain controller
If you have more devices than reserved IP’s, you will need to have some aggressive scavenging set up.
Now if you'll excuse me, I'm going to turn my attention to another great comeback — playing the new Final Fantasy 7 demo.


