Tasked as you are to install Skype for Business so users can chit chat all the livelong day and collaboratively interface about marketing buzzwords, cotillions, bar mitzvahs, the annual Potato Festival, and probably work, too.
Using PDQ Deploy, there are two methods for deploying Skype for Business. One method is using the Office Customization Tool and the second is using the Office Deployment Tool (AKA Click-to-Run or C2R).
Install Skype for Business with the Office Customization Tool (OCT)
If you’re performing a fresh install of Office 2016 using the OCT. The option to install Skype for Business is included in the Office 2016 OCT configuration.
If you have already installed Office 2016 using the OCT and receive the Skype for Business quest, follow this handy walkthrough.
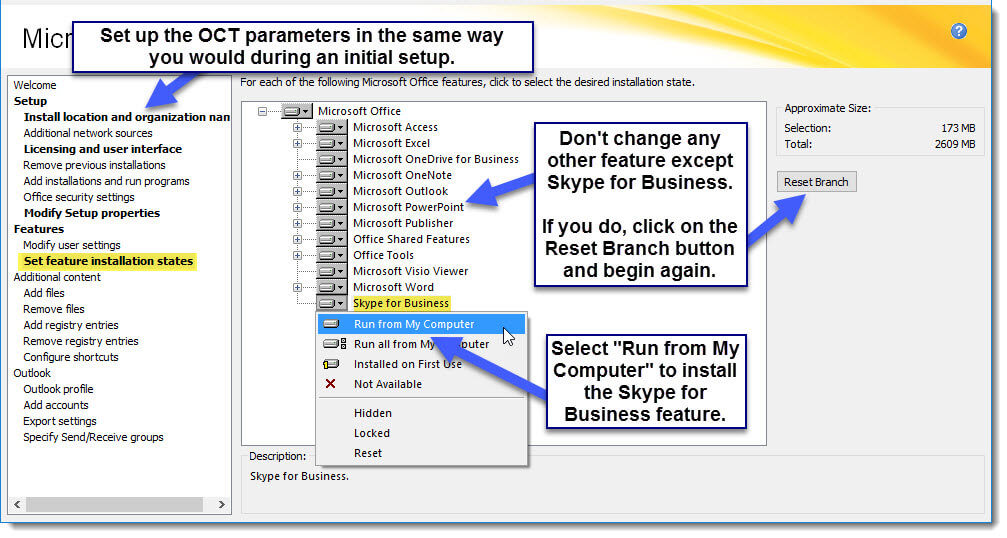
1. Create another MSP using the same parameters except for the Set feature and installation states. Change the features as seen below:

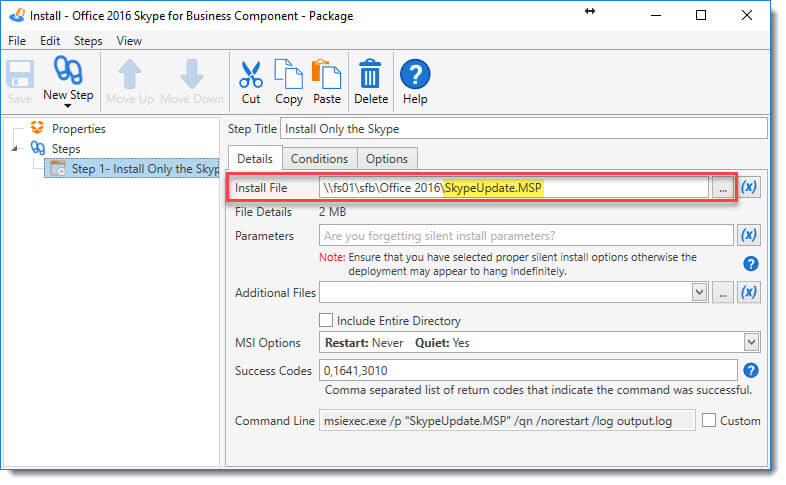
2. Save the MSP. In our example, the MSP is saved as SkypeUpdate.MSP.
3. Create a package in PDQ Deploy and add an Install step. Select the MSP file in the Install File field using the File Picker […]. The necessary parameters are added for you automatically because we are beings of light and magic. For more information on how to create the package with Conditions and Options.

4. Finally, complete your quest by deploying the package to computers with Office 2016 installed but missing the Skype for Business feature. Of course, we recommend testing first.
Install Skype for Business using Click-to-Run (C2R)
Don’t be daunted by the number of steps in this walk through. There’s no heavy lifting required, and it’s far easier to use C2R to install Skype for Business than it is to make macaroni and cheese from a box.
2. Create the necessary shared directory to serve the C2R/Skype for Business deployment: \\server\share\ (make sure the Deploy user has full share-level and NTFS permissions for the shared directory).
3. Install the Office 2016 Deployment Tool for Click-to-Run, choose the extraction location to the previously created \\server\share\ .
4. Copy the configuration.xml (installed with the Deployment Tool) to SkypeDownload.xml, or another name of your choosing, in the same directory.
5. Now edit SkypeDownload.xml. Change OfficeClientEdition to “64” if you’re deploying the 64-bit rather than 32-bit version of Skype. Change the UNC of SourcePath to match the directory created in Step 2 above. Your XML should look something quite close to this:
<Configuration>
 <Add SourcePath="\\server\share\" OfficeClientEdition="32">
 <Product ID="SkypeforBusinessRetail">
 <Language ID="en-us" />
 </Product>
 </Add>
</Configuration>
6. Once you’ve saved the XML, open a command prompt, modify, and then run the following command (modifications may include using quotes if your paths contain spaces and changing SkypeDownload.xml if you used a different XML file name):
"\\server\share\setup.exe" /download "\\server\share\SkypeDownload.xml"Wait for the download to complete. Grab a whiskey, commit to another shorter quest, or play Minesweeper. The files will be downloaded in an automatically generated directory called \\server\share\Office (you should not, and need not, create this directory beforehand). Once the download has completed, you will be returned to a prompt.
7. Next, make another copy of the configuration.xml and name it something meaningful, like SkypeConfig.xml.
8. Now edit SkypeConfig.xml and mirror any changes made in the step above (e.g. edition, branch). Your XML should look similar to this:
<Configuration>
 <Add OfficeClientEdition="32" Branch="Current">
 <Product ID="SkypeforBusinessRetail" >
 <Language ID="en-us" />
 </Product>
 </Add>
<Updates Enabled="TRUE" Branch="Current" />
<Display Level="None" AcceptEULA="TRUE" />
</Configuration>
9. Now we create the package. In PDQ Deploy, create a new deployment and name it something meaningful.
10. Next, add a Command step and modify to match your choices from above:
"\\server\share\setup.exe" /configure "\\server\share\"Set the deployment Run As option to Deploy User (Interactive).
11. Finally, save the package and then test the deployment (Right-click the completed package and select Deploy Once). If the results are acceptable, deploy at will and your quest is complete.
Notes and Addenda of Some Import
The Office 2016 Deployment Tool (C2R) can be downloaded from Microsoft’s Site.
The Office 2016 Deployment Tool (C2R) supports these Product IDs.
The XML tag, <Property Name=”AUTOACTIVATE” Value=”0″ />, is not supported for Office 365 ProPlus products.
When installing Office products, it is always a good idea to deploy using the Run As option Deploy User (interactive).
The products listed in this article are for United States English (en-us). For use with other languages, please see the Microsoft Language Identifiers site.
The process for installing Skype for Business 2013 is similar to 2016. You will need to download the Office 2013 Deployment Tool as well as use the correct Product ID for the 2013 version, which is either LyncRetail or LyncEntryRetail.
We have also covered how to uninstall Skype for Business, if you need to learn how.
Troubleshooting
Error 1603. This error occurs most frequently when Skype for Business is either already installed or a version of Office exists that is not compatible with the version of Skype for Business you are installing.
Make certain you are installing the appropriate product as expressed by the Product ID defined by Microsoft. Skype for Business has two Office 2016 options: SkypeforBusinessRetail and SkypeforBusinessEntryRetail.


