

TL;DR: Pagefile.sys is Windows virtual memory that kicks in when RAM is full, helping keep systems stable and enabling crash dumps. It can grow large because Windows sizes it for peak memory usage and dump requirements. This guide explains why it gets so big, where to find it, and how to safely manage or resize it without hurting system performance.
Pagefile.sys is a Windows system file that stores overflow data when physical RAM is full. It works as virtual memory, helping Windows stay stable during heavy workloads. It can grow large because it must cover peak memory demand and system crash dump requirements. This guide covers why it gets big and how to manage it safely.
What is a page file?
A page file is a Windows system file that provides virtual memory when random-access memory (RAM) is full. Windows 10, Windows 11, and Windows Server use it to store inactive memory pages so the OS stays responsive during heavy workloads. Think of it as an overflow lot for memory: When RAM fills up, Windows parks data in pagefile.sys to keep things running smoothly.
How does the page file works?
Windows uses the page file to offload inactive memory, support crash dumps, and maintain stability for critical services.
Moves less-used memory pages to disk: Windows shifts modified but infrequently accessed memory pages from RAM to the page file to free up physical memory and improve efficiency.
Supports system crash dumps: When Windows encounters a critical error, known as a Blue Screen of Death (BSOD), it uses the page file to save a memory dump. This diagnostic data helps identify what caused the system to crash.
Essential for certain Windows roles and services: Domain controllers, DFS replication servers, certificate servers, and ADAM/LDS all rely on the page file to operate properly.
With responsibilities like memory overflow handling, crash dump support, and compatibility with essential Windows services, it’s no wonder the page file can balloon in size. Still, it can catch users off guard when pagefile.sys starts eating up a sizeable chunk of disk space — sometimes 10, 20, or even 30+ GB.
Why is my pagefile.sys so big?
Pagefile.sys grows large because Windows reserves space for committed memory and crash dumps. Systems with high commit loads or full memory dump settings often require page files sized equal to installed RAM.
The size of your pagefile.sys depends on how your system uses memory, and for some setups, which can mean a file that’s 10 GB, 20 GB, or more. My current page file is sitting at a whopping 15 GBs. So why are some page files so substantial? The answer is — it's complicated. With so many different contributing factors, from system configuration, workload intensity, and crash dup settings, it's difficult to precisely calculate page file sizing. In fact, Microsoft even states that page file sizing is unique to each system and can't be generalized:
"Page file sizing depends on the system crash dump setting requirements and the peak usage or expected peak usage of the system commit charge. Both considerations are unique to each system, even for systems that are identical. This means that page file sizing is also unique to each system and cannot be generalized."
As a general rule, the size of the page file grows depending on how your system uses memory. Two major factors drive its growth:
Committed memory load: The more memory your system commits to active processes, the more space the page file may need to reserve to keep up.
Crash dump frequency and type: If your system is set to generate full memory dumps during crashes, the page file must be large enough to store the entire contents of physical RAM.
Sometimes, the page file can mirror your installed RAM. If you have 32 GB of RAM, you could have a 32 GB pagefile.sys.
So, what if you want to check your current page file size, or even locate where it lives on your system? Let’s walk through how to find pagefile.sys and verify its size.

Manage Windows & macOS devices from anywhere
With PDQ Connect, get real-time visibility into remote and local devices, deploy software, remediate vulnerabilities, automate routine maintenance, and remotely troubleshoot endpoints from one easy-to-use platform.
Where is pagefile.sys located in Windows?
Pagefile.sys is usually hidden on your system drive, but Windows gives you built-in tools to check its size and location. The steps vary slightly by Windows version, so let’s break it down one version at a time.
Where is pagefile.sys in Windows 10?
By default, pagefile.sys is located on the root of your system drive. For most people, this is the C: drive. Since pagefile.sys is a hidden and protected system file, you won’t see it unless you adjust your File Explorer settings. You’ll need to enable both hidden files and protected operating system files.
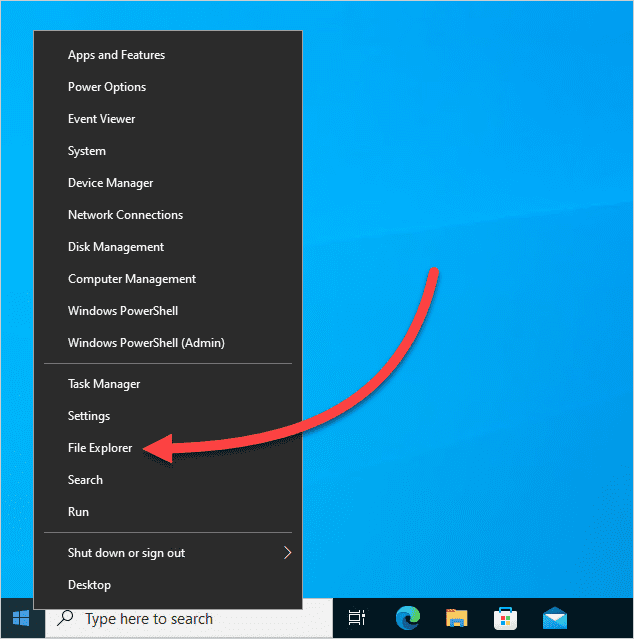
Here's how to show hidden files and protected system files in File Explorer on Windows 10.
Right-click on the Windows Start button, then click File Explorer.
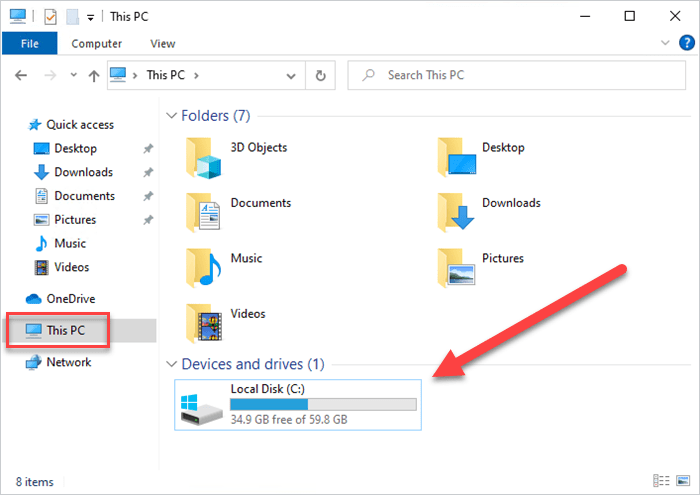
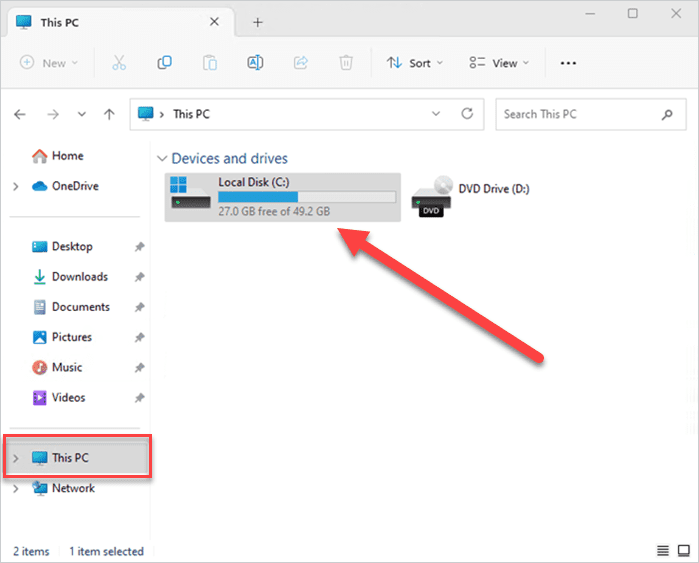
Click This PC in the left navigation bar, then double-click Local Disk (C:). If your system drive is assigned to something other than C, click on the drive letter assigned to your system drive.
Click File > Change folder and search options.

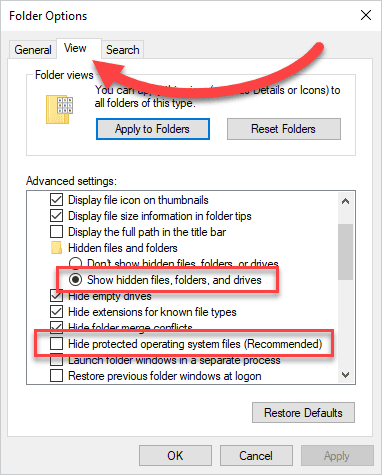
Click the View tab.
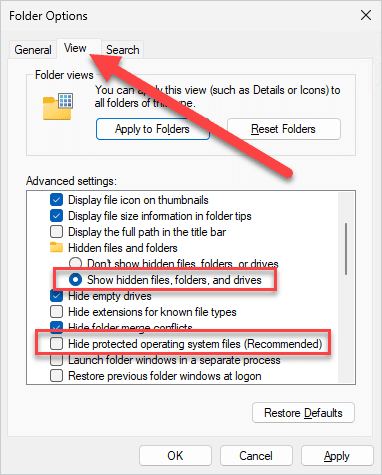
Select Show hidden files, folders, and drives, and uncheck Hide protected operating system files (Recommended). Click Yes when prompted by a warning about displaying protected system files.
Click OK to save and close the options window.


You should now see your pagefile.sys file in File Explorer. You can right-click on the page file and click Properties to view information about the file, including its file size.
Ready to migrate to Windows 11?
Here's our guide on how to create a Windows deployment plan.
Where is the pagefile.sys located in Windows 11?
In Windows 11, pagefile.sys is located in the root of your system drive, which for most people is their C: drive. As with Windows 10, pagefile.sys is hidden by default in Windows 11. To view the file, you’ll need to update your File Explorer settings, though the process is slightly different in this version.
Here's how to locate pagefile.sys in Windows 11 using File Explorer.
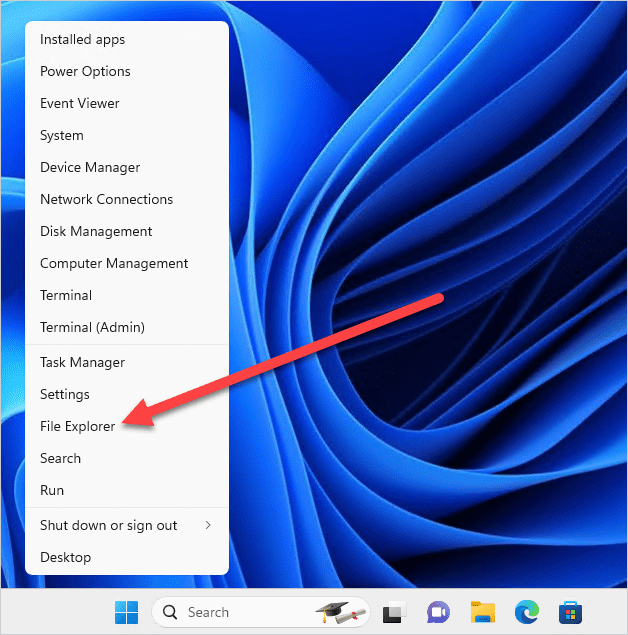
Right-click on the Start button, then click File Explorer.
Click This PC, then double-click your Local Disk (C:) drive (or whatever your system drive letter is).
In the top toolbar, click the ellipsis button, then click Options.
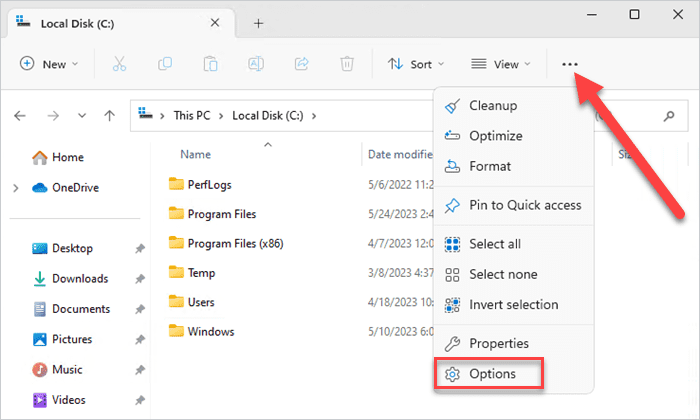
Click the View tab.
Select Show hidden files, folders, and drives, and uncheck Hide protected operating system files (Recommended). Click Yes when prompted by a warning about displaying protected system files.
Click OK to save and close the options window.


The page file at the root of your system drive should now be visible. Just be careful not to accidentally delete any critical system files while you have them visible. Definitely not speaking from experience.
Now that you’ve found pagefile.sys, you might be wondering if you can change its size or if you even should. Let’s go over how to manage or resize it without causing system headaches.
How do you resize or manage pagefile.sys?
You can resize pagefile.sys through advanced system settings or PowerShell, but Windows recommends automatic management for most systems. Always evaluate committed memory and disk constraints before reducing the size.

When should you modify pagefile.sys?
Start by monitoring your system’s resource usage during heavy tasks. Does your committed memory approach your committed limit? That’s often a sign that your system relies heavily on virtual memory.
Remember, nearly any application can be a resource hog. Even something as simple as opening way too many Chrome tabs can quickly drain your available system resources.
Try this before shrinking your page file:
Free up disk space: Clean up unnecessary files by transferring what you can to storage drives.
Offload bulky data: With Spotify and Apple Music, maybe it’s finally time to transfer your digital music collection onto a storage device.
Consider upgrading your hard disk or SSD: Converting those gigabytes to terabytes can make a substantial difference.
However, if you've exhausted your options and desperately need to free up some disk space, then it may be time to shrink your page file size. Most users shouldn't run into issues by just adjusting their page file size, but if you experience unexpected behavior, you can always undo your changes.

Ready to put that smaller page file to work?
Shrink your page file across your remote or on-prem devices in minutes.
How do you modify page file settings using advanced system settings?
Ready to put pagefile.sys on a diet? The actual process of modifying the page file size is straightforward if you know where to look. Here's how to modify your page file settings using advanced system settings in both Windows 10 and Windows 11.
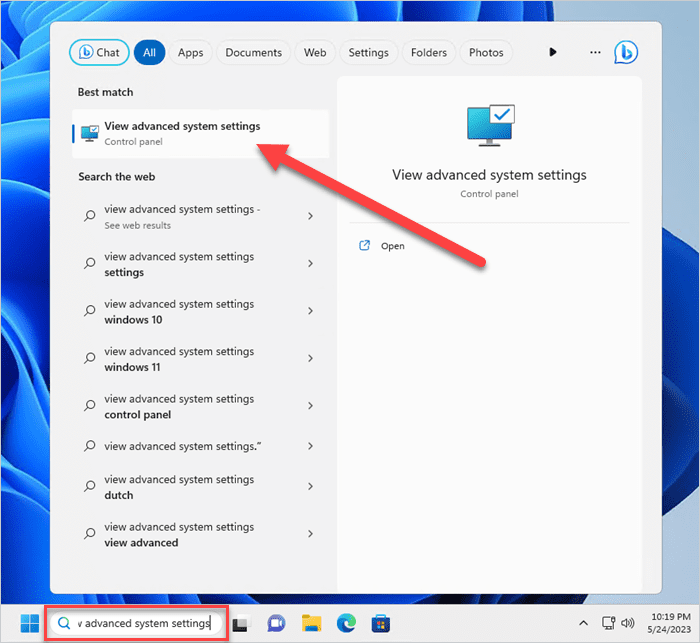
In the Windows search field, enter View advanced system settings, then click on the View advanced system settings control panel item.
In the Performance section, click Settings.
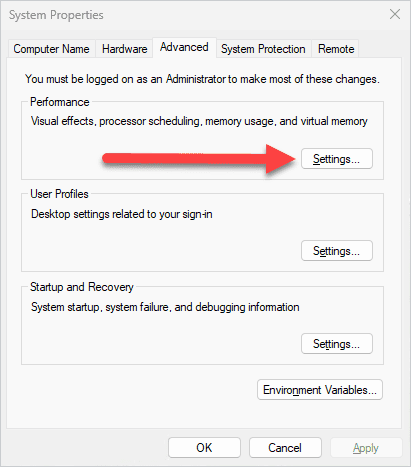
Click the Advanced tab.
In the Virtual memory section, click Change.

Uncheck Automatically manage paging file size for all drives.
Select Custom size:
Set your initial size and your maximum size. This setting varies depending on the needs of your system. Potentially set your initial size to 2048 MB and your maximum size to 4096 MB and see how your system runs. Try increasing these values if you encounter any errors about running out of memory or sluggish performance.
Click OK when you are finished.
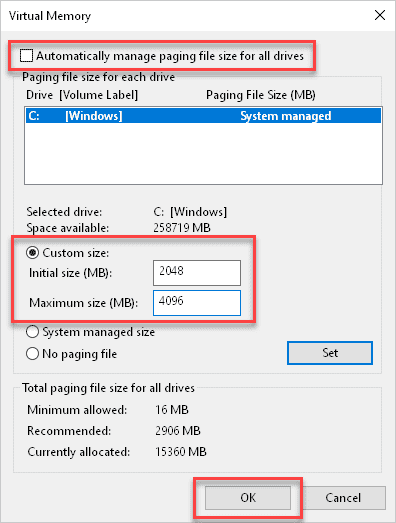
You'll receive a warning message informing you that changes won't take effect until you restart your computer.


After restarting your computer, your page file should reflect the settings you configured.
Modifying page file settings with PowerShell
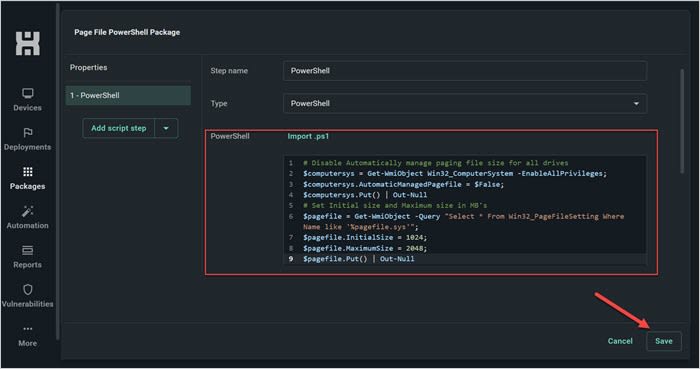
If PowerShell is more your style, here's a script that will stop Windows from automatically managing the page file size. Remember to modify the $pagefile.InitialSize and $pagefile.MaximumSize to your specifications.
# Disable Automatically manage paging file size for all drives
$computersys = Get-WmiObject Win32_ComputerSystem -EnableAllPrivileges;
$computersys.AutomaticManagedPagefile = $False;
$computersys.Put() | Out-Null
# Set Initial size and Maximum size in MB's
$pagefile = Get-WmiObject -Query "Select * From Win32_PageFileSetting Where Name like '%pagefile.sys'";
$pagefile.InitialSize = 1024;
$pagefile.MaximumSize = 2048;
$pagefile.Put() | Out-Null
This PowerShell script can quickly modify your page file settings, which is especially helpful if you need to modify settings on multiple computers.
Looking for other PowerShell pro tips?
Here are three of our favorite PowerShell modules.
How do you deploy page file changes at scale?
You can deploy page file changes at scale using PDQ Connect or PDQ Deploy to push PowerShell scripts across many devices.
Manually adjusting pagefile.sys on a single machine is simple but doing it across dozens or hundreds of devices is another story. Whether you're managing a fleet of workstations or a domain full of servers, scaling page file changes is easy with PDQ.
Deploying the page file script using PDQ Connect
If you have a mix of remote and on-prem devices, then you can use an agent-based solution, like PDQ Connect, to deploy your PowerShell scripts remotely.
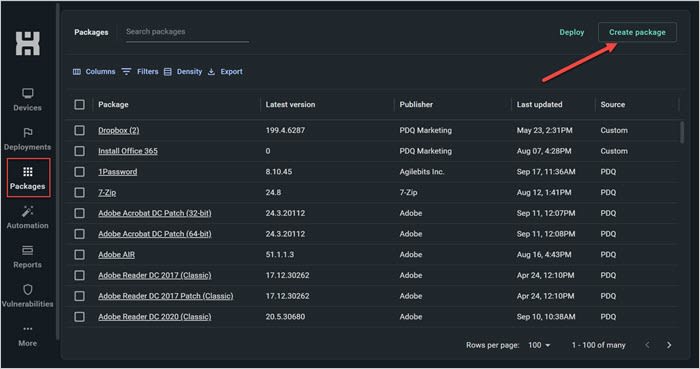
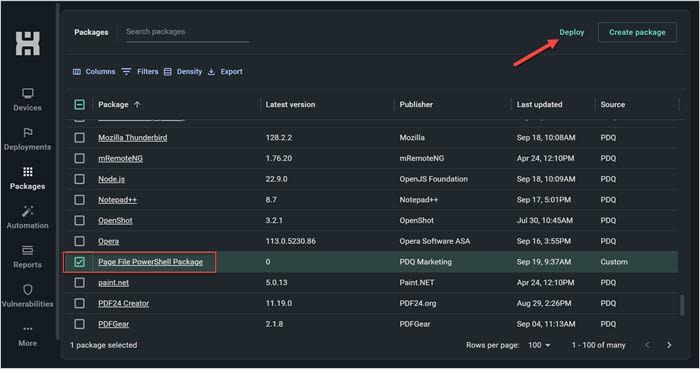
In PDQ Connect, click Packages, then click Create package.
Name the package, click the Add install step drop-down menu, then click Add script step.
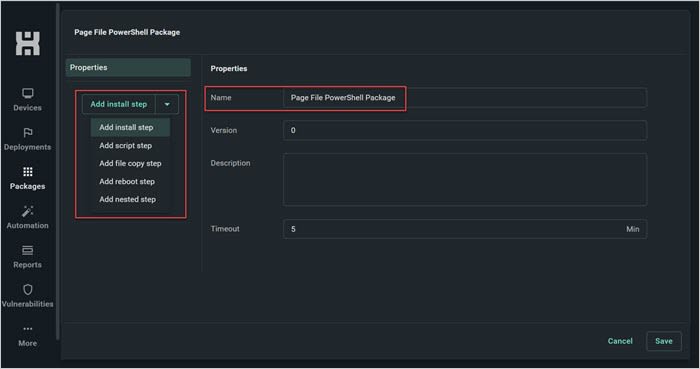
Import the PowerShell file or paste the PowerShell script into the scripting field, then click Save.
Locate and select the package you just created, and then click Deploy.
Enter the name of the devices or groups you want to deploy the package to, then click Deploy.
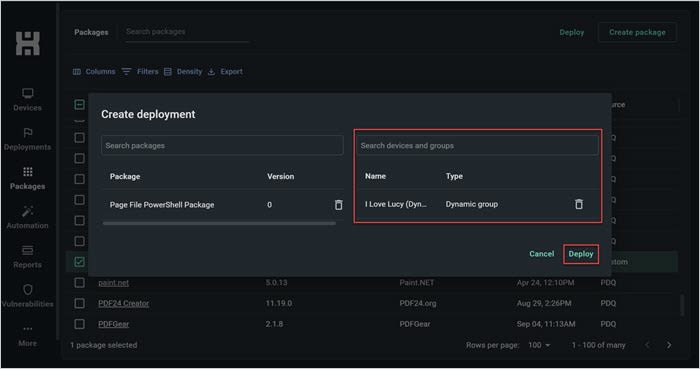


Since PDQ Connect is an cloud-based endpoint management solution, you'll be able to deploy this script to all your devices, no matter where they're located. The only requirement is a stable internet connection.
Deploying the page file script to multiple devices using PDQ Deploy
If you have PDQ Deploy, you can create a custom package to push the page file PowerShell script to as many on-prem or VPN-connected machines in your environment as needed. Here's how to create a custom PowerShell package in PDQ Deploy to distribute the page file script.
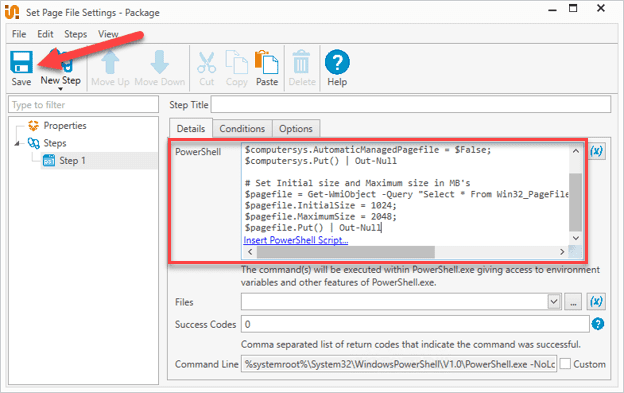
In PDQ Deploy, click New Package.
Give the package a descriptive name.
Click New Step > PowerShell.
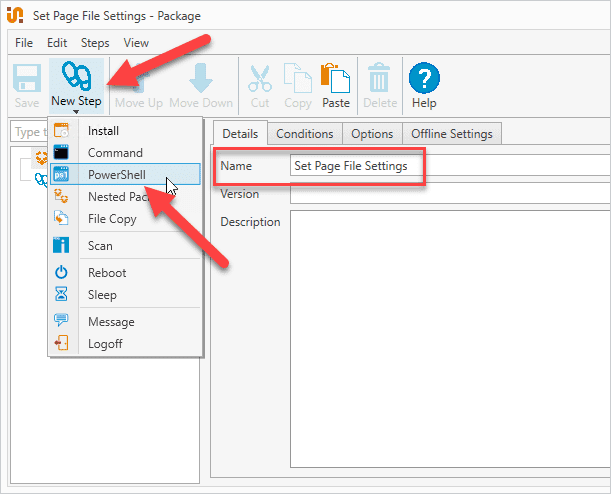
Insert the PowerShell script. You can also save the script as a file and point to the file if you prefer.
Click Save to save and close the package.


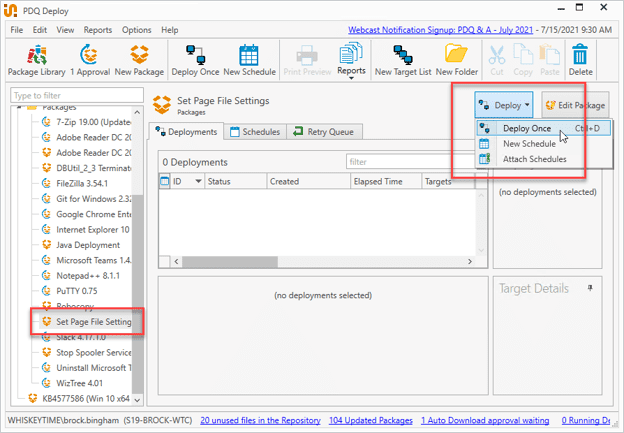
To deploy your new package, follow these steps.
Click on your page file PowerShell package.
Click Deploy > Deploy Once.
Enter the computer(s) you'd like to deploy the package to, then click Add Computer.
Click Deploy Now.
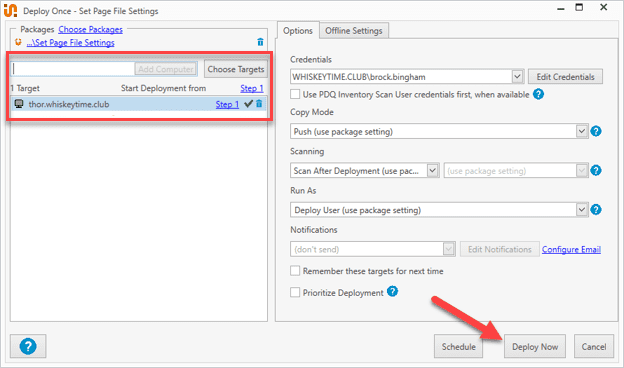


Within minutes, you can deploy this script to hundreds of devices. Just make sure you thoroughly test your script before a mass deployment.
Final thoughts: Find a page file size that works for you
Excessively large page files can be frustrating but running out of system resources and dealing with poor system performance is far worse. While there's no one-size-fits-all solution for everyone, adjusting page file settings can help maintain stability and optimize performance. If all else fails, large HDDs, SSDs, and even NVME drives are cheaper than ever. It might be time to consider an upgrade.
If you manage multiple machines and need to roll out page file changes, or any other system configurations, at scale, start a free 14-day trial of PDQ Connect or PDQ Deploy to streamline the process across your entire environment.


