Whether you've just purchased and installed PDQ Inventory for the first time, or you're taking it for a spin with our 14-day free trial, you may be asking yourself, "Now what?"
Well, you've come to the right place. This article will guide you through the first things you should do once you’ve got PDQ up and running, as well as some tips for you to get the most out of your time spent in PDQ Inventory.
Familiarize yourself with preferences
While this step isn't required, it's beneficial to have a solid understanding of the various settings and options available in PDQ Inventory. To access the preferences menu in PDQ Inventory, click Options > Preferences.
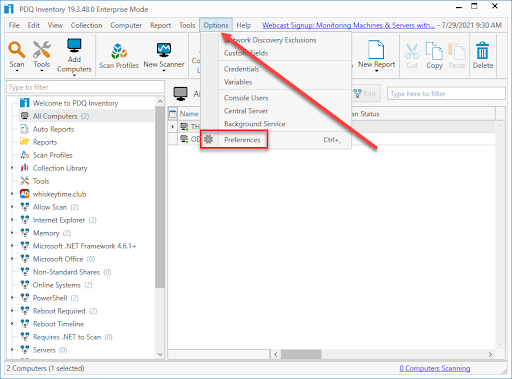
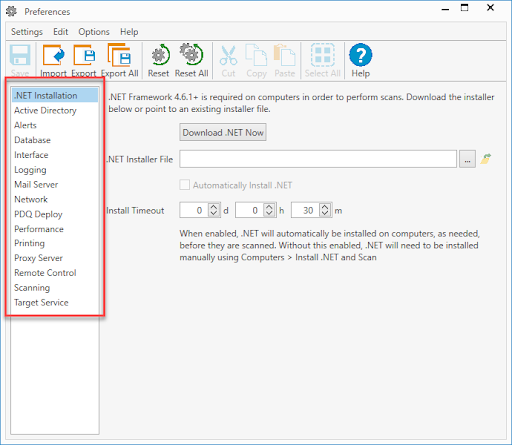
On the left, you'll see a list of available options. Here are a few key preferences that I would recommend reviewing.
Active Directory: Configure your active directory sync settings.
Database: Provides the database and backup database locations. Access the Optimize Database option through this menu.
Mail Server: Set up your SMTP settings to email reports.
Network: Configure your Heartbeat interval settings.
Performance: Configure scan and WMI timeouts as well as the number of concurrent scans you can run.
Scanning: Configure options for offline computers.
Import computers
The next thing you'll want to do is to import your computers into PDQ Inventory so you can start collecting all that glorious data.
While there are a few ways to add computers to PDQ Inventory, the most common method is to synchronize it with your Active Directory environment. Synchronizing with Active Directory allows PDQ Inventory to stay current with changes in your environment.
To sync PDQ Inventory with Active Directory:
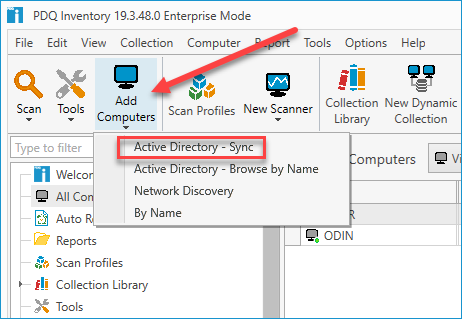
1. Click Add Computers > Active Directory Sync.
2. Ensure Auto Sync Enabled is checked and configure your sync schedule and Delete Mode.
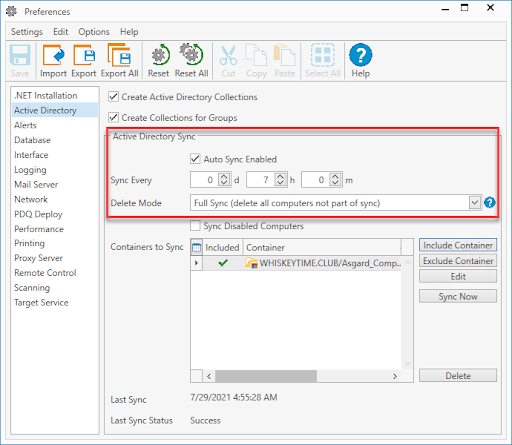
3. Click Include Container and select the AD containers you want to sync with PDQ Inventory. You can use SHIFT or CTRL to select multiple containers. When you are finished, click OK.
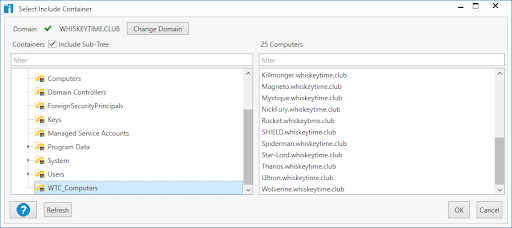
4. Optional: If you need to exclude any containers, click the Exclude Containers button and select the containers you want to exclude. Click OK when finished.
5. With your containers configured, click Save, then click Sync Now.
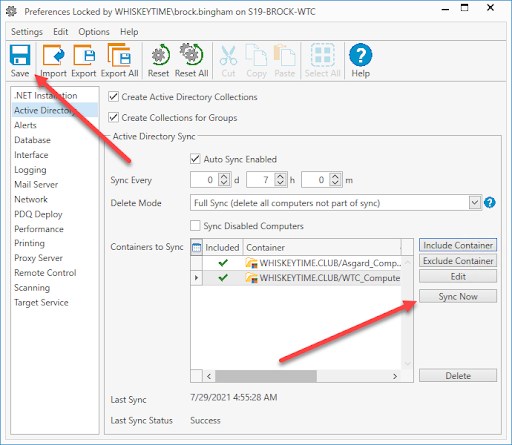
After clicking Sync Now, you should start to see the computers populating into PDQ Inventory.
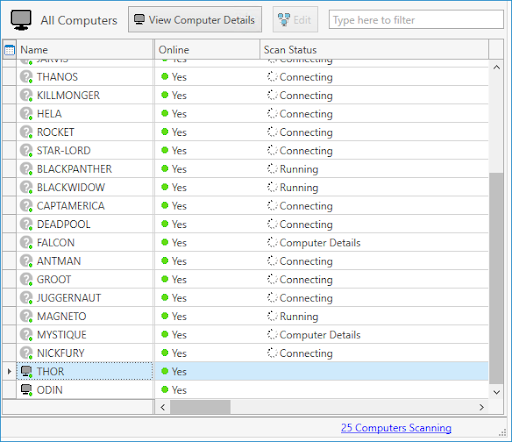
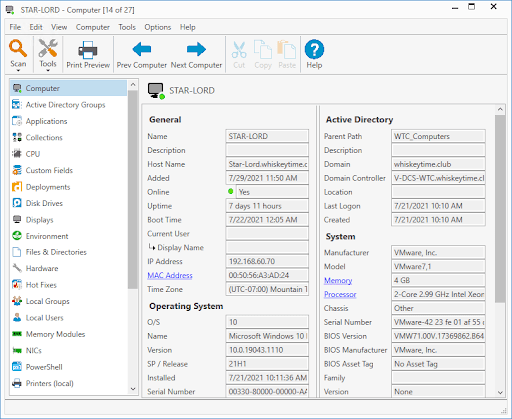
PDQ Inventory will attempt to connect and scan each new computer. Once the scans finish, you can double click on a computer to view all the information that was collected.
If you want to learn more about the other methods of adding computers to PDQ Inventory, check out our blog on finding non-scannable devices, where we cover adding devices with network discovery.
Dive into collections
Once you've scanned your computers, PDQ Inventory will filter those computers into dynamic collections. If a computer matches the criteria for a collection, it will automatically join that collection.
If you have a computer with Chrome installed, you'll find it's been added to the Collection Library > Applications > Internet Browsers > Chrome Enterprise collection. If it's an outdated version of Chrome, it will join the Chrome Enterprise (Old) collection. If it's the latest version, it will join to the Chrome Enterprise (Latest) collection. If it doesn't have Chrome installed, you'll find it in the Chrome Enterprise (Not Installed) collection. All of this happens automatically.
You'll find the collection library has an extensive list of categories and applications. From internet browsers and media players to hardware and operating systems, you'll most likely find a collection for whatever you're looking for.
Create custom collections
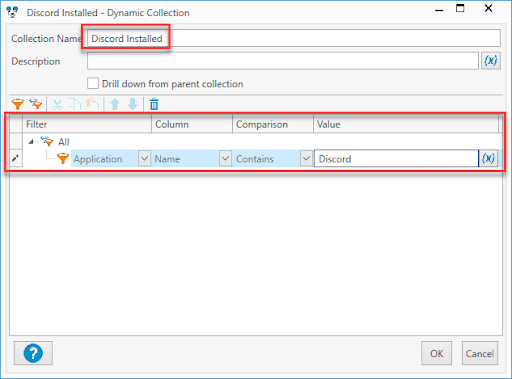
If you find yourself in need of a collection that doesn't already exist in PDQ Inventory, we give you all the tools you need to create your own custom collection. You can create collections for just about anything, including applications and data returned from scans. Let's set up a collection for Discord, so we can see which computers have it installed.
Click New Dynamic Collection.
Give the collection a descriptive name, for example, Discord Installed.
Setup your filter as shown in this image
4. Click OK
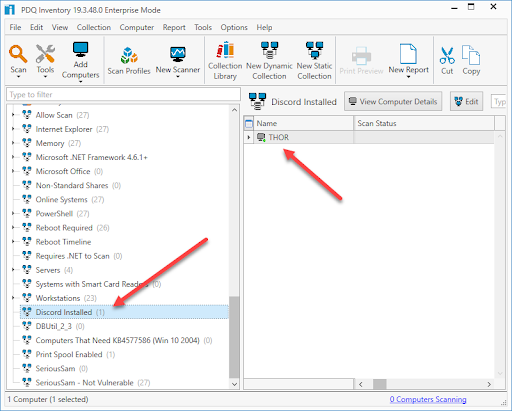
That's all there is to it. You can click on the collection to view which computers have Discord installed.
Generate reports
Similar to collections, PDQ Inventory comes packaged with several useful reports to get you started. However, you can also generate custom reports to ensure you're returning only the data you want. Let's build a report for the Discord Installed collection we just created.
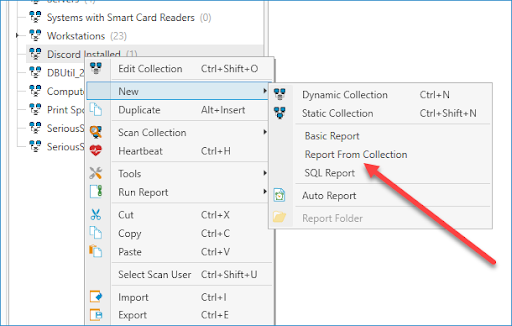
Right-click on the Discord Installed collection
Click New > Report From Collection
3. When the report window opens, review the data being returned. The computer name will be added to the report by default, but we can include more information by clicking on the new column button.
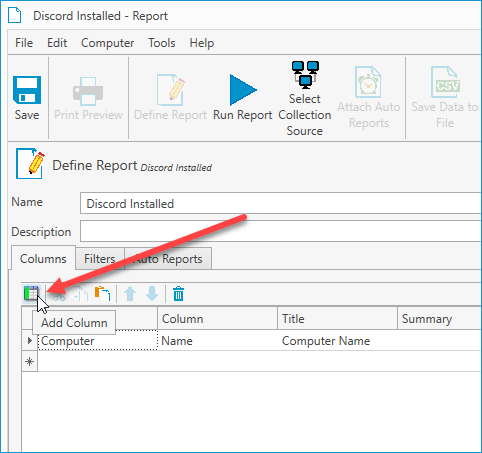
4. Let's add the IP address to the report with the following entry: Computer > IP Address > Computer IP Address.
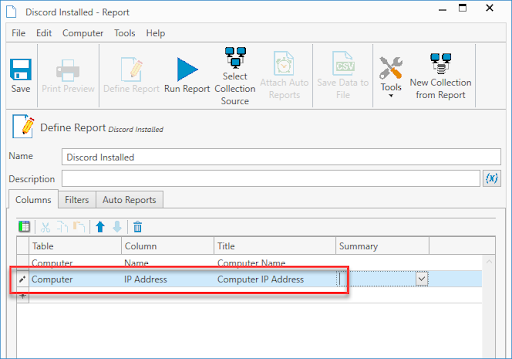
5. If you click on the filter tab, you'll see that the report uses the same filter we set up for the collection.
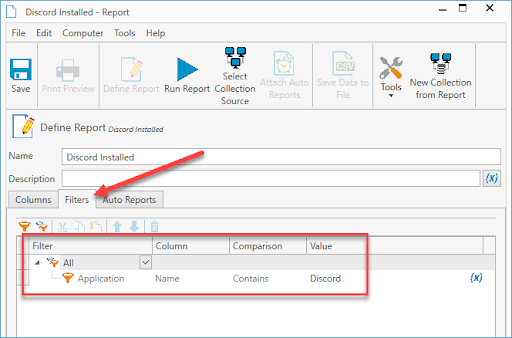
6. When you are finished, click Save and Run Report.
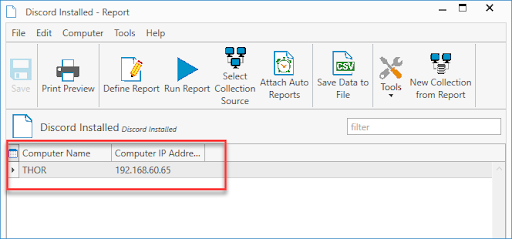
Building reports from existing collections makes the process extremely easy. With just a couple of clicks, we were able to create and define a new report.
Create custom scanners
Scanners are the not-so-secret secret sauce of PDQ Inventory. All of the data that was initially pulled into Inventory was because of the Standard scan profile. You can view it and the rest of the included scanners by clicking the Scan Profiles button.
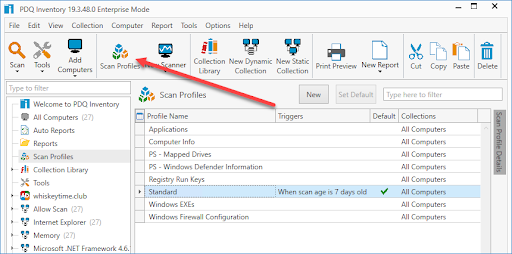
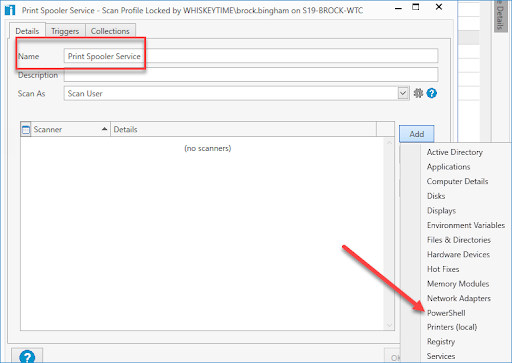
While the Standard scanner is great at returning tons of awesome data, there may be something specific you'd like to return that the Standard scanner doesn't collect. Let's create a scanner that will return the status of the Print Spooler service.
4. Enter a name for the scanner. It can be the same name you used for the scan profile.
5. Select Script
6. Enter the following script.
Get-Service Spooler | select name, status, starttype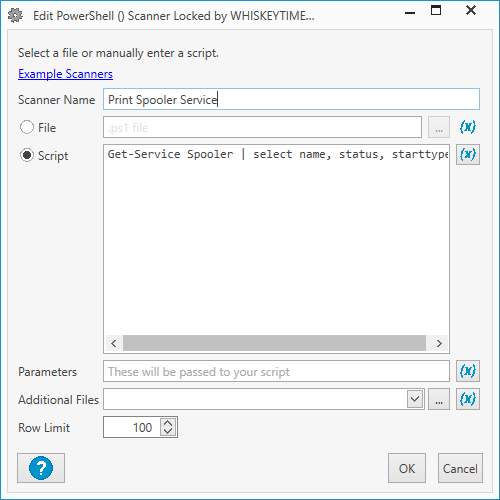
7. Click OK twice.
8. Right-click on All Computers.
9. Click Scan Collection > Print Spooler Service.
10. Double-click on a computer when the scan finishes.
11. Click PowerShell in the menu on the left.
12. Click the drop-down arrow and select PowerShell (Print Spooler Service)
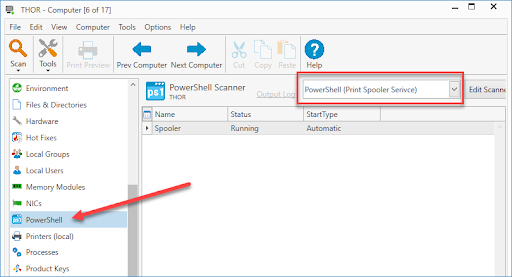
As you can see, the scanner returned the status and startup type for the Print Spooler service. We can now use that information to build additional collections and reports. With Microsoft's track record of Print Spooler vulnerabilities, this scanner may be a good one to keep around.
Once you've familiarized yourself with the scanners in PDQ Inventory, head over to our PowerShell Scanner repository on GitHub. With over 30 additional scanners in the repository and more being added all the time, you'll be scanning all the things in no time.
Every tool you need, plus room for customization
PDQ Inventory is the MacGyver of sysadmin utilities. With an abundance of scanners, collections, and reports built in, plus the ability to create your own, PDQ Inventory is the ultimate systems management tool.
Try PDQ Deploy and Inventory today with a 14-day free trial!


