Loops are an essential part of programming, and PowerShell is no exception. By using loops like for, foreach, while, do while, and do until, you can iterate through collections and execute code until a condition is met. Loops can drastically enhance your PowerShell scripts and take your automation to the next level.
Join me as I break down the different types of loops in PowerShell — all without throwing you for a loop. (Hopefully.)
What are the different types of loops in PowerShell?
PowerShell utilizes many of the same loop mechanisms you’ll find in other programming languages, with some variations unique to PowerShell. Here are the different types of loops in PowerShell:
forloopforeachloopwhileloopdo whileloopdo untilloop
Let’s review them to see how they function, what makes them unique, and when you should use them.

PowerShell power user?
Check out The PowerShell Podcast: a weekly exploration of tips and tricks to help you step up your PowerShell game.
PowerShell for loop
The for loop in PowerShell is used to execute a block of code a specific number of times. It's ideal when the number of iterations is known beforehand.
This loop is very common in programming and functions much the same way in PowerShell as it does in other programming languages. For loops run as long as the specified condition evaluates to $true. When the condition evaluates to $false, the loop terminates. The for loop is excellent for iterating through a statement a fixed number of times.
Here is the basic structure of a for loop:
for (<Init>; <Condition>; <Repeat>) {
<Statement list>
}
Parentheses contain the for loop statement, and semicolons separate each component of the statement. The first component, represented by <Init>, represents one or more commands that run before the loop begins. Typically, <Init> is used to initialize a variable with a starting value that is utilized in the test condition.
The <Condition> placeholder represents a conditional expression that resolves to a $true or $false Boolean value and typically evaluates the initialized value at the beginning of the loop. The loop and its command block continue to run as long as the value of the condition returns $true. The loop terminates when the condition returns $false.
The <Repeat> placeholder represents one or more commands that execute each time the loop repeats. Typically, this portion of the statement is used to increment the value of the variable used in the conditional expression.
<Statement list> represents the set of commands that repeat as the loop iterates.
Here's an example of a for loop in its most basic form:
for ($i = 1;  $i -lt 10; $i++){
	Write-Host $i
}
In this example, we’re initializing the variable $i with the value of 1. Next, we’re using the less than (-lt) comparison operator to check if the value of $i is less than 10. If the comparison returns $true, the commands in the statement list execute. In this case, we run the command Write-Host $i. Next, we increase the value of $i by one with the expression $i++. This process repeats until the value of $i is 10, at which point the condition $i -lt 10 returns false, and the loop terminates.
Now, let’s look at a more practical example. Let’s say I have a CSV file with six entries. However, due to a processing error, each entry has a duplicate entry resulting in a CSV file with 12 total entries. I can use a for loop to iterate through the CSV file and return only every other entry to weed out the duplicates. Here's my CSV file:
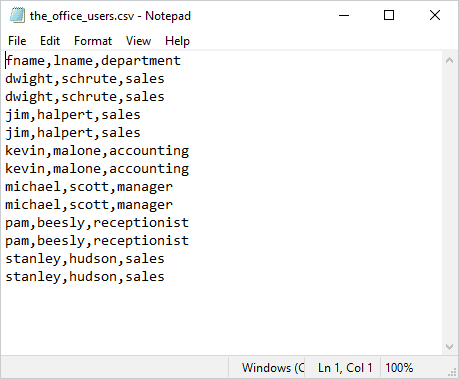
fname,lname,department
dwight,schrute,sales
dwight,schrute,sales
jim,halpert,sales
jim,halpert,sales
kevin,malone,accounting
kevin,malone,accounting
michael,scott,manager
michael,scott,manager
pam,beesly,receptionist
pam,beesly,receptionist
stanley,hudson,sales
stanley,hudson,sales
And here is the PowerShell script to return every other line of the CSV file:
$users = Import-Csv -Path "C:\CSV\the_office_users.csv"
for ($i = 0; $i -lt $users.count; $i+=2){
    $users[$i] | Export-Csv -Path "C:\CSV\updated_office_users.csv" -Append
}
Here is the resulting CSV file after running the script:
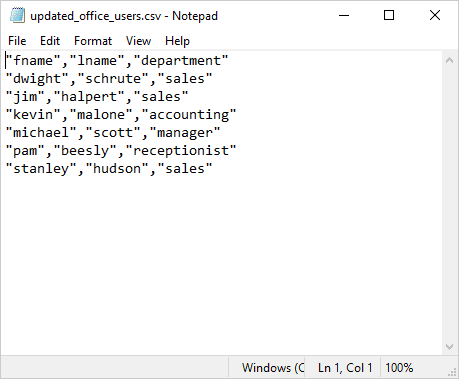
"fname","lname","department"
"dwight","schrute","sales"
"jim","halpert","sales"
"kevin","malone","accounting"
"michael","scott","manager"
"pam","beesly","receptionist"
"stanley","hudson","sales"
This example is a little trickier than the last one, so bear with me. In this example, we’re importing all the data from the CSV file and assigning it to the $users array. In the for loop, we’ve set $i to a value of 0 to correspond to the index value of the $user array. For the comparison, we’re comparing $i to $users.count, which goes to 11 since the CSV file contains 12 entries and the array starts at 0. The command statement $users[$i] then executes, which grabs the user data assigned to the current array index, then exports that information to a new CSV file. We add the -Append parameter to the Export-Csv command to ensure each value is added to the file as it loops through the statement. The value of the initialization variable then increases by two using the expression $i+=2. Increasing the initialization variable by two for each loop lets us return every other row of data.
Now, I know what you’re thinking: This sure seems like a lot of work for just a CSV file with 12 rows of data. You’re not wrong. But if this CSV file had 1,200 rows of data, this would be a lifesaver.
PowerShell foreach loops
The foreach loop in PowerShell is used to iterate through a collection of items, executing a block of code for each one. It’s simple and powerful, but let’s be honest — it can also be a bit... weird.
That’s because when we’re talking about the foreach loop, it could mean one of four things:
foreachstatementforeachmethodForEach-ObjectcmdletForeachalias
Confused yet? Good. That means you’re paying attention.
There are four flavors of foreach in PowerShell, each with its own quirks, strengths, and best use cases. We’ll walk through each one to help you choose the right loop for the job.
foreach: The statement
foreach, the statement, is my personal favorite of the foreach loop varieties. It’s also the one people use the vast majority of the time. Here’s the basic syntax of the foreach statement:
foreach ($<item> in $<collection>){
	<statement list>
}
Let’s dive right into a simple example to examine how the foreach statement works.
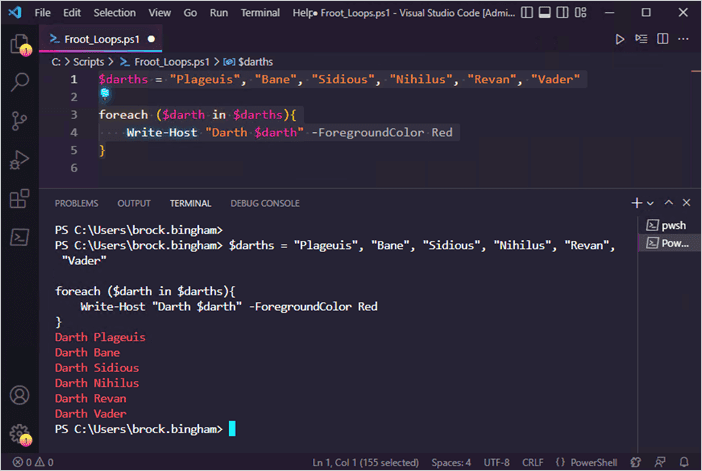
$darths = “Plageuis”, “Bane”, “Sidious”, “Nihilus”, “Revan”, “Vader”
foreach ($darth in $darths){
    Write-Host “Darth $darth” -ForegroundColor Red
}
In this example, we assign several Sith Lord names to the $darths variable. Then, we start the foreach statement and assign the $darth (no “s”) variable as a placeholder to contain the current item being iterated on from the $darths collection. Lastly, we’re using Write-Host (because we don’t care what the internet thinks of us) and displaying the list of Darths in red, which seems suitable. Here’s the result.
While there are instances when the other foreach loops would be more efficient, the foreach statement will likely be your go-to foreach loop most of the time because of readability and performance.
foreach: The method
The foreach method is the newest of the foreach loops added to PowerShell. Being a method means it’s quick and easy to call this type of foreach loop, and it can often be a single line of code. The foreach method can also be considerably faster depending on the use case but can suffer with its readability. Here’s an example of the foreach method:
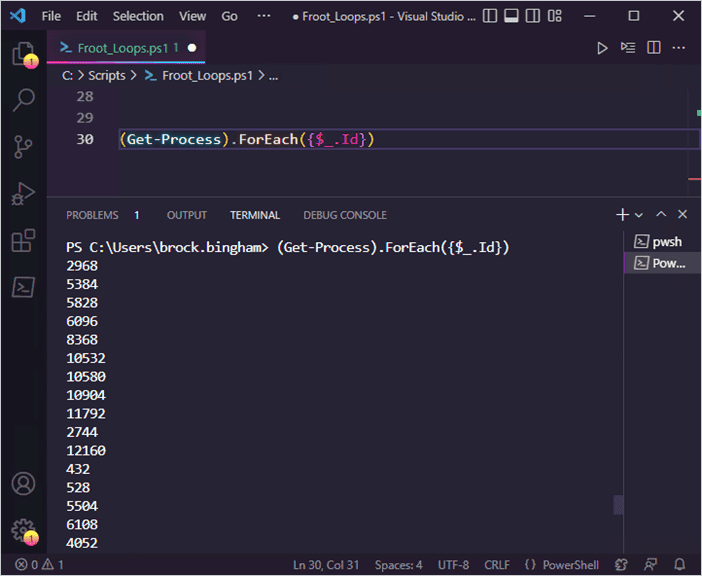
(Get-Process).ForEach({$_.Id})In this example, we’re using the foreach method to iterate through each returned object from the Get-Process cmdlet, then return the Id of each item. Here's a truncated version of the returned results.
As I mentioned, the foreach method can be considerably faster depending on the use case. For example, invoking a method on each loop iteration can be noticeably faster using the foreach method. For example:
(Get-Process -Name notepad).ForEach(‘Kill’)In this example, I’m invoking the ‘Kill’ method on each returned process with the name notepad. This command processes much faster than using a foreach statement. However, the best way to determine the efficiency of a command is to use the Measure-Command cmdlet, which can tell you exactly how long it takes for a command to run.
ForEach-Object: The cmdlet
The ForEach-Object cmdlet is a great way to integrate a foreach loop into a pipeline. The ForEach-Object cmdlet also offers advanced functionality, such as supporting the begin, process, and end function blocks. However, because ForEach-Object accepts input from the pipeline, it can be considerably slower than the other options we’ve covered.
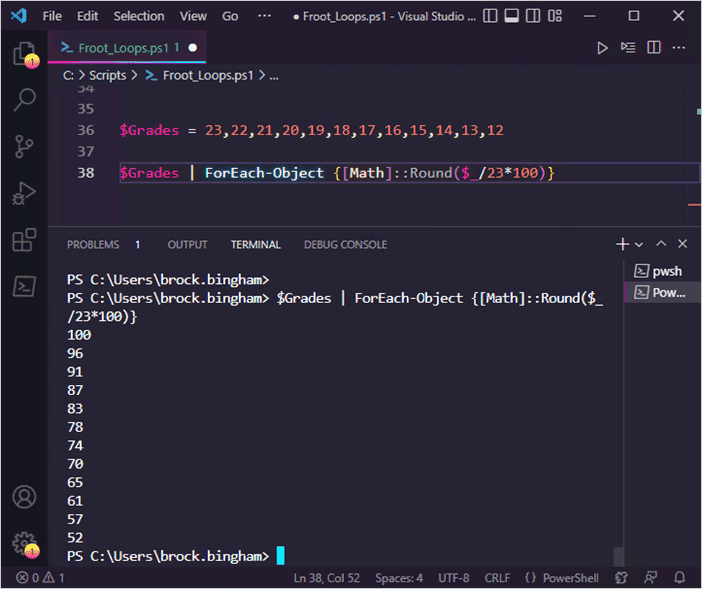
Here’s an example of a command using the ForEach-Object cmdlet.
$Grades = 23,22,21,20,19,18,17,16,15,14,13,12
$Grades | ForEach-Object {[Math]::Round($_/23*100)}
In this example, we want to determine the possible scores for an assignment with 23 questions depending on the number of correct answers. This script provides the score for anything above 50%. We’ve assigned the possible correct answers to the $Grades variable and piped that to the ForEach-Object cmdlet. Then, we utilized the Math class’s Round method, which rounds the results of our equation ($_/23*100) to the nearest whole number. Here's the result:
Foreach: The alias
Last and definitely least is the Foreach alias. The Foreach alias is the alias for the ForEach-Object cmdlet. I’m pretty sure its sole reason to exist is to confuse people about which foreach loop is being used.
When should you use the Foreach alias? Never. Okay, fine. If you want to use the alias in your one-off command because you’re too lazy to type “-Object” and can’t be bothered with tab completion, then fine. But please don’t ever use this in a script that other people may read one day. You’re just going to cause confusion, and the world is a confusing enough place as it is.
Whew, that felt good to get off my chest. Now that I’ve ranted, let’s move on to while loops.
PowerShell while loops
The while loop in PowerShell is simple, readable, and great when you need to repeat a block of code based on a condition rather than a fixed count.
Unlike the for loop, which is ideal when you know how many times to iterate, a while loop runs as long as a condition evaluates to $true. If the condition is never true, the loop doesn’t run at all. Here is the basic structure of a while loop:
while(<condition>){
	<statement list>
}
PowerShell evaluates the condition before running anything in the <statement list> block. As long as the condition evaluates to true, the loop keeps running. Once the condition returns $false, or the loop is interrupted with something like a break statement, it stops.
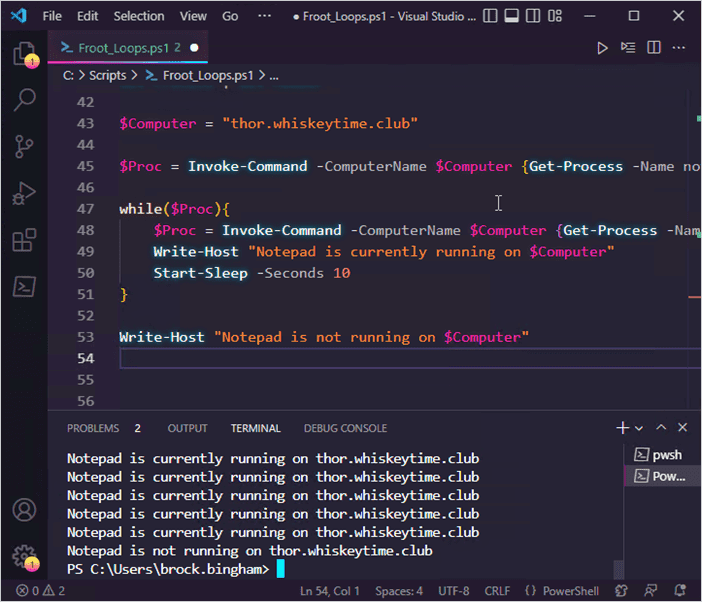
Here’s an example of a while loop:
$Computer = "thor.whiskeytime.club"
$Proc = Invoke-Command -ComputerName $Computer {Get-Process -Name notepad -ErrorAction SilentlyContinue}
while($Proc){
    $Proc = Invoke-Command -ComputerName $Computer {Get-Process -Name notepad -ErrorAction SilentlyContinue}
    Write-Host “Notepad is currently running on $Computer”
    Start-Sleep -Seconds 10
}
Write-Host “Notepad is not running on $Computer”
In this example, we’re checking to see if the Notepad process is running on a remote computer. If it is, we enter the while loop, which checks to see if the process is still running. It then writes the status of the remote process to the console. The script then sleeps for 10 seconds. After 10 seconds, the loop reevaluates the condition, repeating until the condition is false, meaning the process is no longer running on the remote computer. Once the loop exits, we indicate that the Notepad process is no longer running on the remote computer.
PowerShell do while loop
The do while loop in PowerShell is similar to the while loop, but with one key difference: it’s bottom evaluated. A bottom-evaluated loop just means that the condition is not evaluated until after the statement block has run at least once.
Here’s the syntax of a do while loop:
do {
	<statement list>
} while(<condition>)
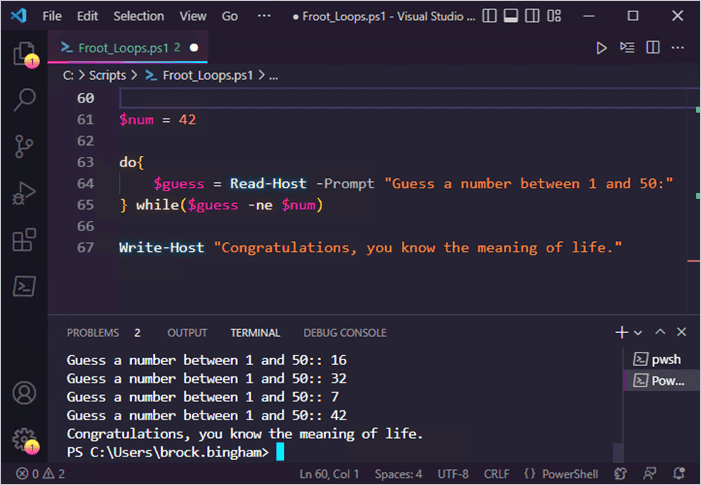
And here’s a simple example of a do while loop where the user has to guess the correct number between 1 and 50. If they guess the correct answer, the loop terminates.
$num = 42
do{
    $guess = Read-Host -Prompt “Guess a number between 1 and 50:”
} while($guess -ne $num)
Write-Host “Congratulations, you know the meaning of life.”
And here's the result:
PowerShell do until loop
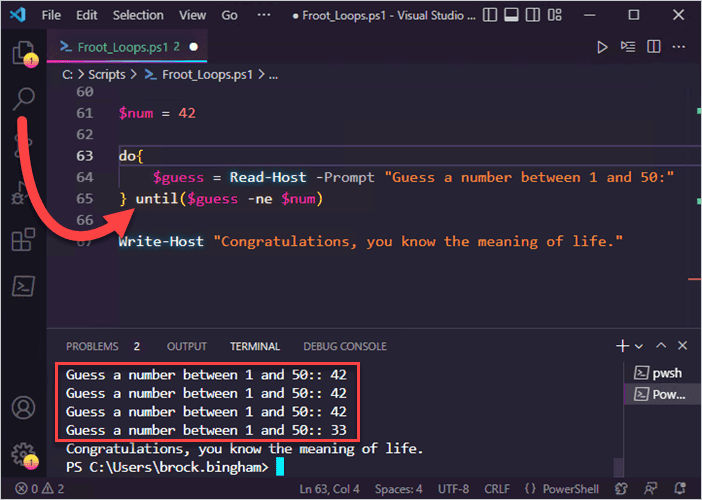
The do until loop in PowerShell is the opposite of a do while loop. It runs the code block at least once, then continues looping until a specified condition evaluates to $true.
In other words, a do until loop keeps running as long as the condition evaluates to $false. Once the condition becomes true, the loop stops.
If we were to use the previous example and switch it for a do until loop, the first time a user guessed the wrong answer, the loop would terminate.
PowerShell has a loop for every occasion
I don’t know about you, but that was enough loops to get my head spinning.
PowerShell loops are incredibly handy, especially when dealing with repetitive tasks or extensive collections. If you want to get really advanced, you can play around with embedded loops and combine them with if statements for more complex logic.
Once you get the hang of PowerShell loops, you can use that knowledge to build your own custom PowerShell scanners in PDQ Inventory. With PowerShell scanners, you can query your managed computers and return loads of valuable information. Try it out for yourself with a 14-day free trial.
Oh, and if you want to spruce up your Visual Studio code like the screenshots in this article, we’ve got you covered with a complete guide on customizing Visual Studio code.


