

While patch management is nobody’s idea of a good time, it’s just one of those things that comes with the territory. It’s even less fun when you manage remote devices that you rarely (if ever) see. But knowing how to automate software updates to remote devices can be a game changer for sysadmins. Because, you know, automation is the key to sanity as a sysadmin.
The problem with managing remote device software updates
In the past, I’ve covered how to automate software updates using PDQ Deploy & Inventory. That article is a great resource for administering devices that live on your managed network. However, IT departments are managing more remote devices than ever before, a trend almost guaranteed to increase.
Remote device management is inherently more difficult to keep up with. Sysadmins have limited control over the infrastructure remote devices use to connect to company resources. Using a VPN is one way to secure greater control over remote devices, but VPNs have been known to introduce their own issues, including unreliable connectivity.
To truly overcome the hurdles of remote device management, an agent-based solution, like PDQ Connect, is the best option. An agent-based solution provides sysadmins with almost the same level of control as a local solution, and the only requirement is a steady internet connection, giving sysadmins a reliable system to manage remote devices and their patching requirements.
How to automate remote patch management with PDQ Connect
Automated patch management for your remote devices with PDQ Connect is incredibly simple. However, the process varies slightly if your organization doesn’t have access to prebuilt groups.
Prebuilt groups are a newer feature in PDQ Connect, and they're guaranteed to make your life as a sysadmin easier. If you don’t currently have access to prebuilt groups, don’t worry. I’ll show you how to build your own groups using just a couple of filters in PDQ Connect.
Just announced: Three new time-saving features in PDQ Connect
PDQ Connect now offers an automatic deployment trigger, bandwidth management, and package duplication. No more manually deploying packages to new devices or bogging down devices with too many simultaneous downloads! Read the announcement post to see how these new features will save you time and frustration.
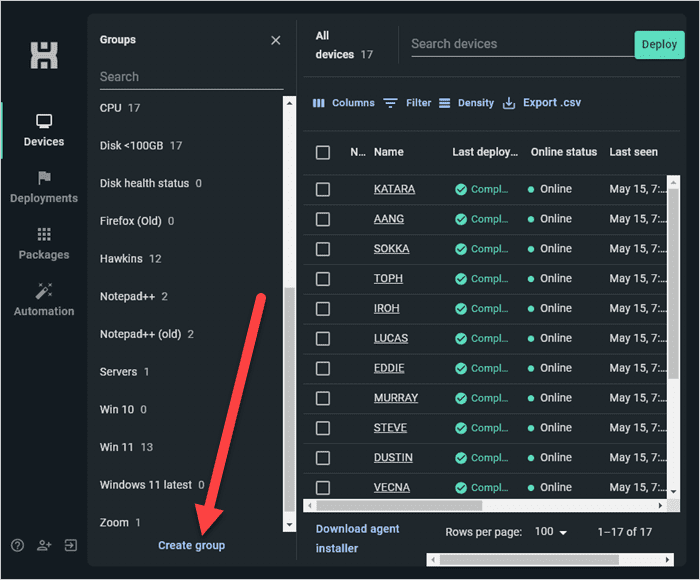
Creating custom groups in PDQ Connect
Creating custom groups in PDQ Connect is easy and usually only involves adding a couple of filters. For this example, we’ll create a custom group that identifies computers running old versions of PowerShell 7-x64.
In PDQ Connect, ensure the Devices tab is selected, and click Create group.
Add the filter Where | Software | Name | contains | PowerShell 7-x64.
Click Add filter, then set the additional filter to AND | Software | Version | is less than | $(AppVerPowerShell7).
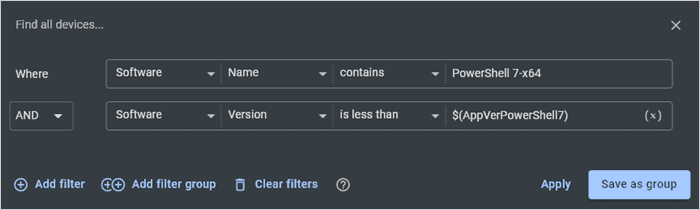
Click Save as group.
Name the group PowerShell 7-x64 (Old), then click Save.


This new group should contain all endpoints with an old version of PowerShell 7-x64 installed. In my instance of Connect, I have three devices that match this group’s filters.

It’s important to note that this group does not contain computers that don’t have PowerShell 7 installed. Additional filters would be necessary to include devices missing PowerShell 7.

Static vs. dynamic groups in PDQ Connect
Need to organize the devices in your PDQ Connect instance? Learn about static and dynamic groups — and when to use them.
Creating automations in PDQ Connect
With our group created, we’re now ready to configure an automated deployment. Setting up an automatic update in PDQ Connect is as simple as selecting your packages, targeting your groups, and configuring a schedule. Here’s how it works:
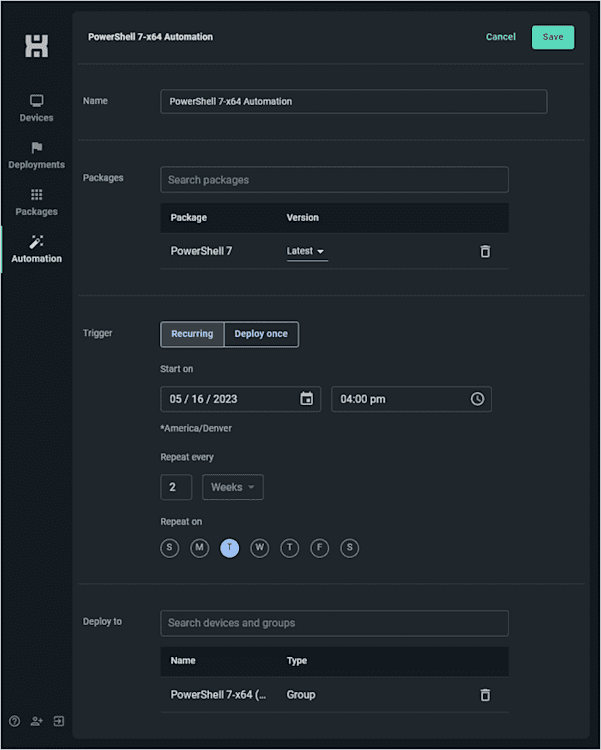
In PDQ Connect, click Automation, then click Create automation.
Add a name to the automation. For this example, I’ll name mine PowerShell 7-x64 Automation.
In the Packages field, search for and add the PowerShell 7 package, and ensure the version is set to Latest.
Select Recurring for the trigger.
Configure your deployment schedule. I’ve set my schedule to repeat every two weeks on Tuesdays.
Add the PowerShell 7-x64 (Old) group we created in the previous section, then click Save to save the new automation.

Now that we’ve created the automation, the latest version of PowerShell 7 automatically deploys to any workstations that are members of the PowerShell (Old) group we created. And because PDQ maintains the PowerShell package, it automatically updates when a new version is released, so you can spend more time listening to your favorite PowerShell Podcast.
Automation: The key to enjoying patch management
If you ever meet a sysadmin who loves managing patches, it’s probably because they’ve automated the entire process. Nothing is quite as satisfying as automating away your least favorite tasks. If you’ve yet to discover the joy of automation, PDQ Connect can help. Try PDQ Connect for free with a 14-day trial. Your future self will thank you as they enjoy all their free time.


