

Whether you’re a potential customer, new customer, old customer, or an enthusiastic fan of Jordan and Tara on PDQ Live, our demos are a great way to get to know PDQ's products. Our experts are equipped to answer all your burning questions, from product implementations and best practices to whiskey pairings. Having experience with countless unique network configurations, from the largest global enterprises to the smallest of the small business setups, it’s safe to say we’ve been around the block a few times. With thousands of demos under our belt, here are answers to our top five most frequently asked questions about PDQ Deploy & Inventory.
Can I manage non-Windows devices with PDQ Deploy & Inventory?
While PDQ Inventory can’t natively scan non-Windows devices, it can still be used as a centralized platform to manually store data and run tools against devices such a Macs, Linux boxes, firewalls, switches, printers, and more. If you have any of these devices located in Active Directory in a container that PDQ Inventory scans, they will show up in Inventory, but they will not be scanned. If these devices are not in AD, you can still add them to Inventory using network discovery
Before you start populating every device under the sun that has anything remotely resembling an RJ45 port into Inventory using network discovery, we need to ensure we have our Active Directory sync settings configured correctly.
With PDQ Inventory open, click Add Computers > Active Directory Sync
Change the Delete Mode to Mixed Sync (do not delete computers not part of sync)

This setting ensures devices added to PDQ Inventory by name or network discovery and are not found in Active Directory will not be automatically deleted. With this configured, we can start to scan our network for non-Windows devices.
Click Add Computers > Network Discovery
In the Network Discovery window, you can select either IP Address or Subnet or IP address range
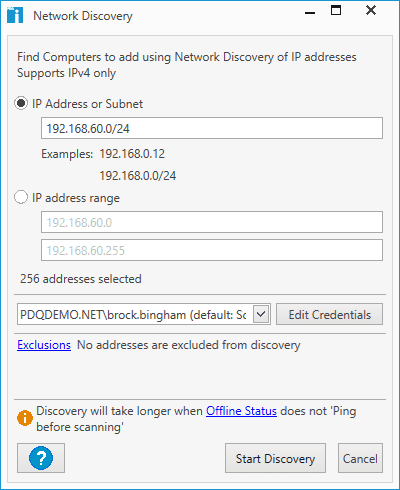
Once you’ve got your settings configured, click Start Discovery
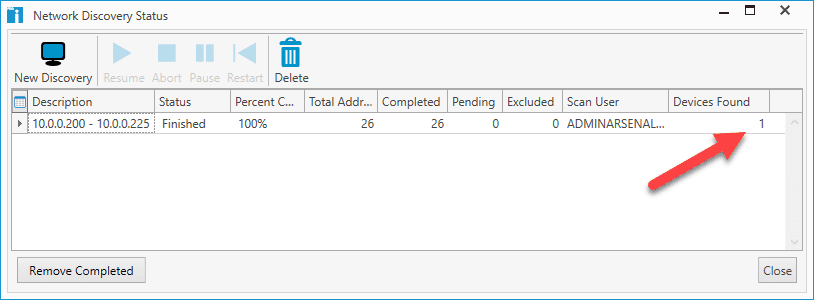
The network discovery will begin trying to locate devices according to the network settings you configured in step 3. If any devices are found, they will be added to PDQ Inventory.
With the devices in Inventory, we need to disable them from scanning in the future. Right-click on the devices and uncheck Allow Scan
Now when you double-click on a device to view its properties, you can manually add information about the device.


Populating these devices into PDQ Inventory not only lets you save their information but also allows you to run tools against them. PDQ Inventory comes with several useful networking and administrative tools built-in, and more are available to download from the Tools Library.
Can I build my own custom packages and make them deploy silently?
We at PDQ.com take great pride in helping you be as lazy as possible. That’s why we have dedicated staff building and validating hundreds of packages for you. We strive to cover as many popular applications as possible. However, despite our best efforts, there may come a time when you need to install something that isn’t in the package library. Now, before you go and tender your resignation, let me assure you that with PDQ Deploy, you have the power to build custom packages that you can deploy silently across your network. Let me show you how it’s done.
In PDQ Deploy, click New Package
Under the details tab, add a name for the package
If you need to add any conditions such as architecture or O/S version, you can do that under the Conditions tab. I’ve set my O/S Version to Windows 10 only
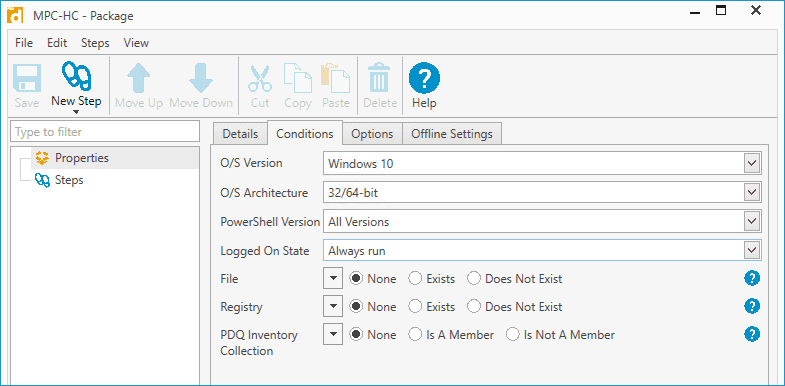
With those settings configured, click New Step > Install
Add a name to the Step Title field
In the install file field, locate the installer you intend to push out by clicking on the ellipsis button or manually enter the file path. In this example, I am installing Media Player Classic - Home Cinema which I have saved to my repository folder
Next, add your installation parameters making sure to include a silent install parameter
Add any success codes to the Success Codes field
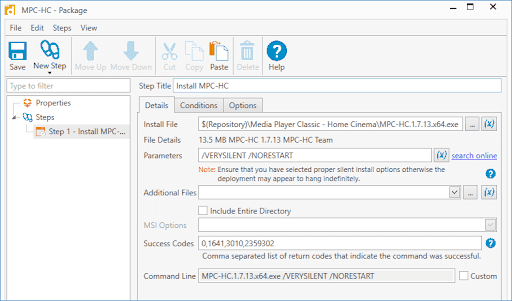
Review your package and when you’re ready, click save


Boom! Your new package is ready to rock. You can push that package out to your users silently, like a networking ninja. We have a ton of tutorials going over this exact topic if you want to learn more about custom deployments. Why not start with this one?
What is PDQ Inventory, and why can’t I live without it?
So you know about PDQ Deploy, and you’ve seen how it comes with a massive package library, and you know it can automatically deploy packages for you so you can sit back and relax while sipping on your latte. Well, Deploy is only one piece to the ultimate lazy sysadmin puzzle. If you really want to reach the upper echelon of sysadmin greatness and perhaps even replace Lex as the laziest sysadmin in history, then you need to take advantage of PDQ Inventory.
We all know that one person at the office that wears a ton of different hats. They’re the over-achiever who seems to be able to do it all. They’re the person that your boss always compares you to. That’s PDQ Inventory. PDQ Inventory is extremely versatile. There’s not much it can’t do when it comes to managing Windows systems. For funsies, I’ll make a list of just a few of the things that PDQ Inventory is great at.
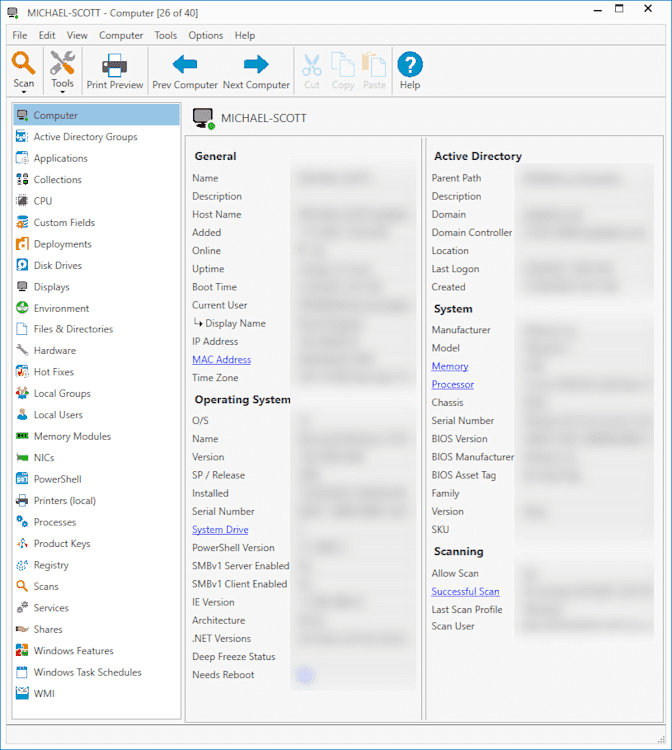
Inventorying systems: This one may be a bit obvious since Inventory is part of its name. Still, PDQ Inventory is unmatched when it comes to scanning and collecting data about the systems on your network. Here’s a screenshot for proof.
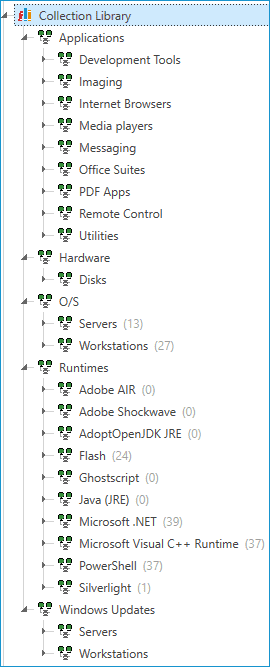
Dynamic Collections: We don’t just collect all that data and let it sit there; we put it to good use. PDQ Inventory comes jam-packed with a ton of dynamic collections. Dynamic collections organize your computers into groups based on configured filters. Being dynamic means that computers will move between collections as their settings change. If a computer is in the Chrome Enterprise (old) collection, it means it has an old version of Chrome installed. If you update Chrome on that computer, it will automatically move into the Chrome Enterprise (Latest) collection.
Dynamic collections are the secret sauce to what makes Auto Deployments great in PDQ Deploy. By targeting dynamic collections with your deployments, you only target the computers that meet specific criteria. As with pretty much everything else in Inventory, you can create your own custom dynamic collections with endless possibilities.
Reports & Auto Reports: All that data Inventory just collected can be configured into reports, and you know how much your boss and auditors love reports. Of course, we did most of the work for you by including a bunch of pre-built reports. The cherry on top is that you can configure these reports as auto reports that will auto-generate and can automatically be sent off via email or saved to a network share. You can take all the credit while PDQ Inventory does all the work. If you need a report that wasn’t included by default, no sweat, it’s super easy to build your own reports.
Scanners & Scan Profiles: Scanners and scan profiles are where the magic happens in Inventory. Scanners are the actual functions that scan systems and return data such as hardware configurations, installed applications and versioning, registry settings, OS information, users and group data, etc. Basically, scanners are what return all that glorious data. As always, we’ve got you covered with several different scanners pre-configured and ready to go out of the box. Didn’t find a scanner that returns the data you need? You may have guessed this already, but you can create your own custom scanners. This is where Inventory’s power really ramps up. When you make a new scanner, you have four options, a files & directories scanner, a PowerShell scanner, a Registry Scanner, and a WMI scanner. There is basically no part of a Windows system that you can’t scan with these four scanners. We even have an entire YouTube playlist dedicated to the PowerShell scanner, which you can check out here. Let’s go over the basic steps by building a scanner to see if the Windows firewall is enabled.


With PDQ Inventory open, click New Scanner > Registry
Select HKEY_LOCAL_MACHINE as the hive
Add these three values
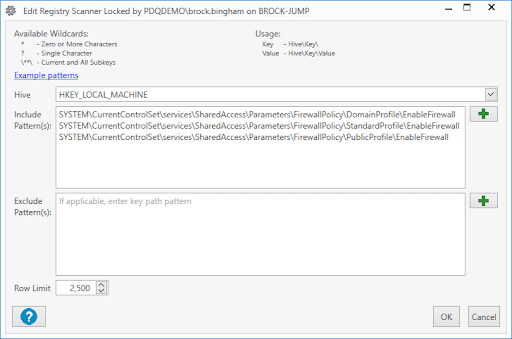
Click OK
The new Scan Profile window should appear. Enter a name in the Name field
If you want to configure this scan to run on a schedule, you can click the Triggers tab to configure that. If you want to only assign this scan profile to a specific collection, you can select the collections in the Collections tab
Once you are done, click OK
You should see your new scanner when you click the Scan button
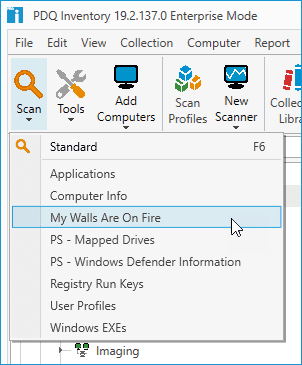
Here you can see my new scan profile, My Walls Are On Fire
To use the new scanner, right-click on a computer in Inventory and click Scan Computers > YOUR_NEW_SCANNER
To view the scan results, double-click on the computer you just scanned and click on the Registry option in the menu tree


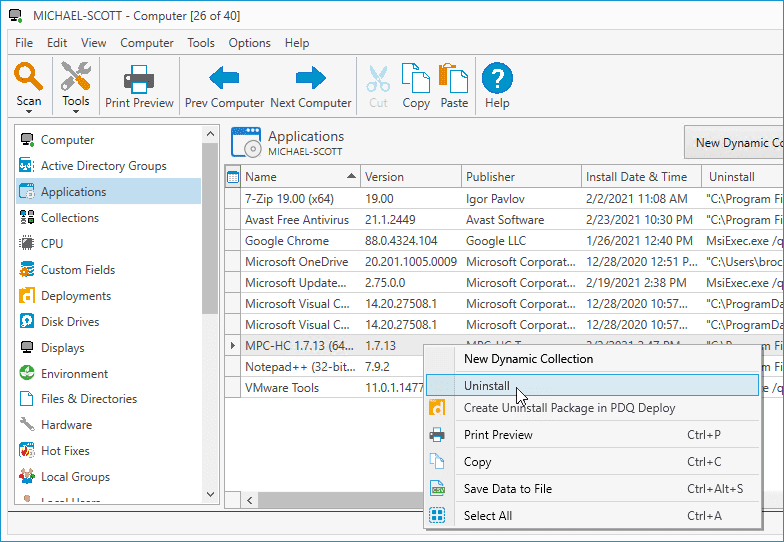
Uninstalling Application: One of the lesser-known PDQ Inventory features is that you can uninstall an application with just a few clicks. To do this, simply double-click on a computer in Inventory, then click the Applications menu option. Next, right-click on the application you want to uninstall and click Uninstall. A tool window will then open. Click Execute, and you’re done. Yes, it’s really that simple.


Tools: The last PDQ Inventory feature I quickly want to mention are tools. Tools are networking and administrative utilities that you can run against computers from within Inventory. Once again, Inventory comes with several useful tools by default. To access the tools menu, click on Tools > Customize. If you want even more tools, just click on the Tools Library tab. Here you can select any or all of the available tools and download them into Inventory.
Still not enough tools? We've gotchu. Click on the New button and select Tool. This will launch the new tool window where you can build as many tools to your heart's content. Tools utilize CMD or PowerShell commands which means you have almost limitless possibilities with what you can make. Also, if you have an application with command line functionality, you can create a tool that will run that application against a remote computer.

How can I manage offline machines?
A common concern with many sysadmins is how to manage machines remotely when the computers are turned off. With the pandemic and many users working from home, this dilemma has only gotten worse. Here are a few tips for managing devices that are offline with PDQ Deploy & Inventory.
Heartbeat Schedule: A heartbeat is a PDQ Deploy schedule trigger that deploys packages to target computers when their status changes to online in PDQ Inventory. To determine if a computer is online, Inventory sends out a heartbeat ping every 300 seconds. This setting is configurable in Inventory’s preferences. Once the heartbeat ping is received, the computers will appear online in PDQ Inventory which will kick off any scheduled deployments in Deploy configured with a heartbeat trigger.

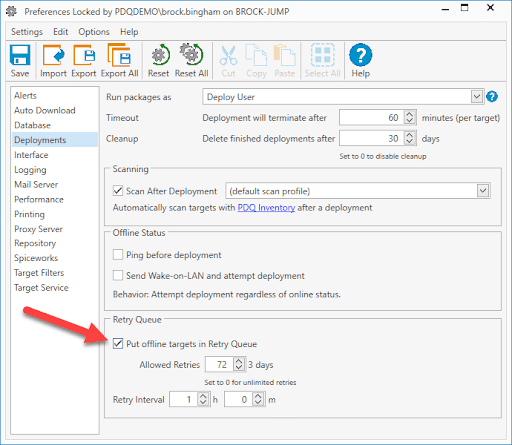
Retry Queue: The retry queue is another excellent method for managing hard-to-reach devices. The retry queue can be configured to repeatedly attempt deployments to offline targets until they come online. This setting can be configured globally under preferences or can be set specifically for each deployment or package.
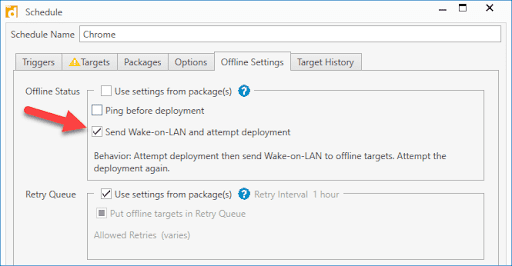
Wake-on-LAN: Another option for managing offline computers is to attempt to turn the computer on before deployments using Wake-on-LAN. This setting may have varying amounts of success depending on your network configuration and device settings and will not be able to wake computers that only connect via VPN. As with the retry queue, this setting can be configured globally or specifically for each deployment or package.


How can I automate update deployments?
Automating your deployments is when you know you’ve made it as a sysadmin. Nothing feels better than having your devices updated to the newest version of Chrome or Notepad++ without you needing to lift a finger. If you’re not afraid of putting on a few extra pounds because of all the relaxing you’ll be doing while Deploy does all the hard work, then let me show you how to configure your auto deployments.
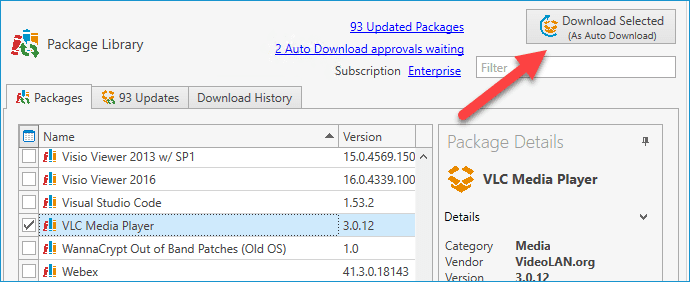
Click Package Library from within PDQ Deploy
Find and select the package you want to deploy. For this example, I’ll select and download VLC Media Player
Click Download Selected (As auto Download)
Once it finishes downloading, click on the package and click New Schedule
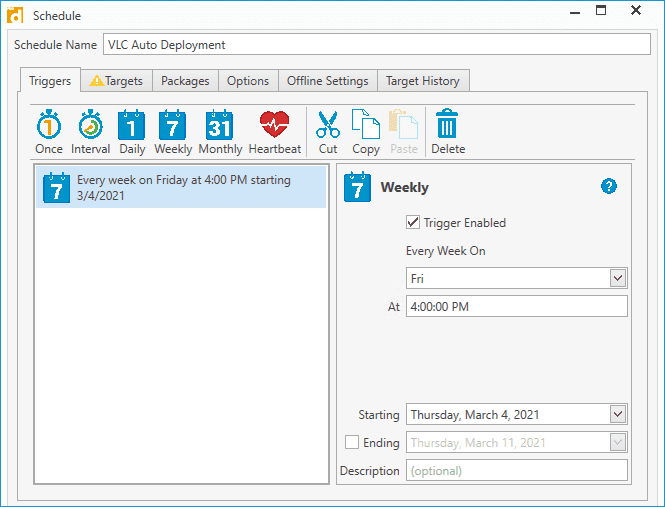
Enter a name for your schedule. I’ve named mine VLC Auto Deployment
Under the Triggers tab, configure your deployment schedule. I’ve configured mine to deploy weekly on Fridays at 4 PM
Click on the Targets tab
I’ll take advantage of the pre-built dynamic collections in PDQ Inventory which filter computers based on if they have VLC installed or have an old version. Click Choose Targets > PDQ Inventory > Collection
Click Collection Library > Applications > Media Players > VLC Media Player > VLC (Not Installed) > VLC (Not Installed - Workstations) then click OK
Repeat step 9 but this time select VLC (Old)
Click the Packages tab just to ensure you have the correct package selected
Click the Options tab and ensure Stop deploying to targets once they succeed is selected
(OPTIONAL) If you want to configure offline settings, click the Offline Settings tab and configure your Wake-on-LAN and retry queue settings here
Click OK
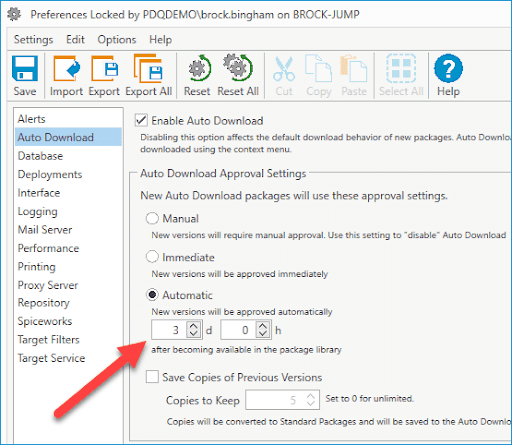
Now that we have the deployment scheduled, let’s make sure we have our auto download settings configured correctly by clicking on Options > Preferences
Click Auto Download. These settings determine if you want updated packages to be downloaded automatically and how often. Ensure Enable Auto Download is enabled and set your approval settings to Automatic. I’ve set my updates to be approved automatically 3 days after becoming available in the package library, but the default 7 days is usually a good starting point
After you’ve configured your settings, click Save


Congratulations! From this day henceforth, you shall no longer have to manually deploy VLC to your users! Repeat these steps for any additional packages you want to automate. Let me add one recommendation. Get one of those computer chairs that reclines almost all the way back. You’ll need it for all the relaxing you’re about to do.
Wrapping up
Hopefully, this article helps get a few of your questions answered. If you have questions that this blog didn’t cover, reach out to our experts by scheduling a demo, submitting a request to our amazing support staff, or by joining us for our weekly webcast. Our product experts may not be able to pass a typing test while on camera, but they love being put on the spot with in-depth technical questions!

