


As the saying goes, “you don’t know what you don’t know”. Instead of delving into the tautology of that statement, let’s just start right out by describing some great features of PDQ Inventory that may have been lost in the cracks, fallen through the weeds, been forgotten, are brand new, or have otherwise gotten lost in another mixed metaphor.
1. Advanced filter (search)
Hopefully, the regular filter hasn’t escaped your gaze. This filter appears on pretty much every page of the main console. Using the regular filter is a great way to narrow results to specific computers, data, or other objects (like collections or reports). Here is a classic example of the regular filter.
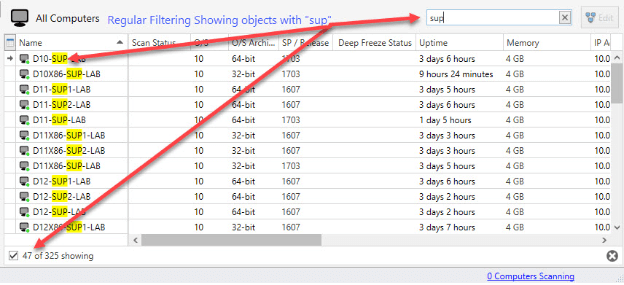
As you can see in the screenshot above, by typing in the characters sup, we are now looking at only the computers that have those characters in the name
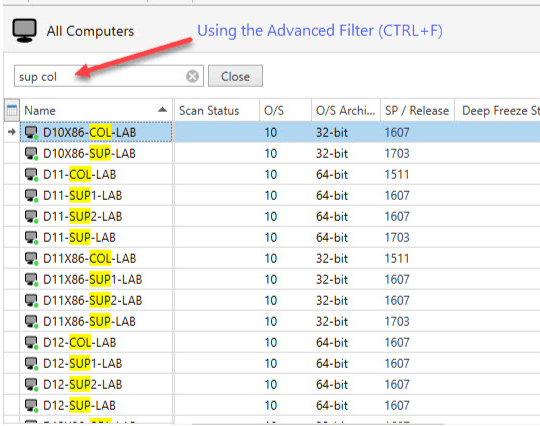
While this is handy, with the advanced filter, you can actually search for multiple data sets, search for certain criteria, and even exclude additional data. Suppose you only wanted to see computers that had either sup or col in any visible field. Sure, you could create a collection, but in many instances creating a collection for a one-time task is overkill. Instead, click any row within the grid and press CTRL+F to bring up the advanced filter. You can now type in sup and col separated by a space. PDQ Inventory interprets the space as an OR and will display the computers with EITHER sup OR col in the visible fields of the window.
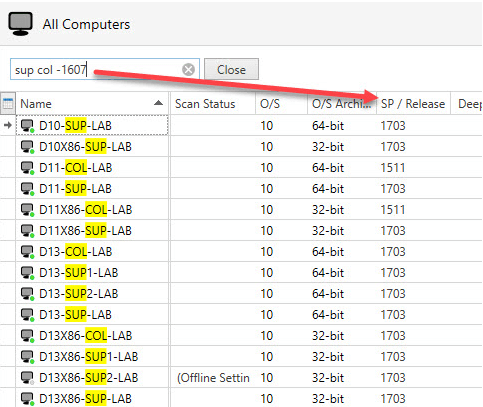
You can also exclude data from your search by using the minus sign (–) preceded by a space. Suppose you wanted to display computers with sup or col but exclude computers that had SP / Release 1607. You would use the following text in your advanced filter box:
sup col -1607
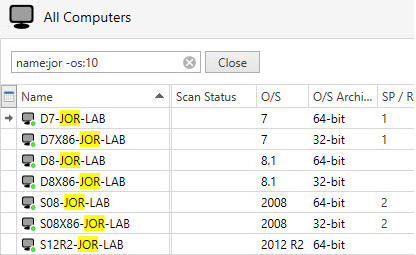
If you want to search for data that is only in a specific visible column, you would specify the column name immediately followed by a colon (:). The example below shows using the advanced filter but narrowing the focus to only specific fields. We will search for only the characters jor in the Name column but exclude any Windows 10 computers (the O/S column). (Note that we remove the slash in O/S when specifying the column name). We would type in the following:
name:jor -os:10
2. Multi-sort
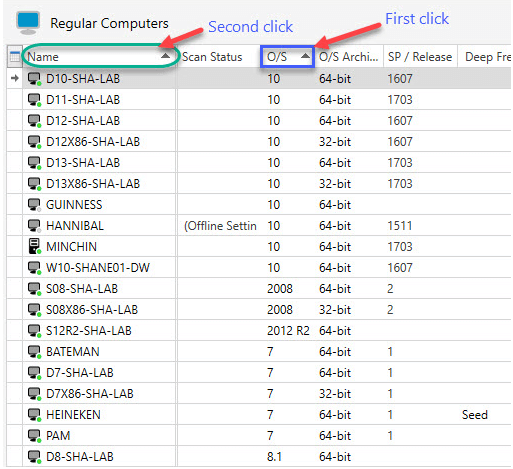
I’m sure you know that you can click on a column name to sort that column either ascending or descending (depending on how many times you click the column). But did you also know that you can use the ol’ SHIFT+CLICK to sort by multiple columns? The order of sort precedence is determined by the sequence of clicked columns. If you click the O/S column first and then SHIFT+CLICK the Name column, you will see computers ordered first by O/S (10, 8.1, 7, 2008 R2, etc.) and then alphabetically by name.
3. Recursive filters in File and Registry Scanners
While more and more of us use File and Registry scanners, too few are aware of the recursive wildcard. This wildcard is very useful when you run into situations where you don’t know the name of a folder but you know what type of file to look for (such as all the different user folders under Users). To use the File or Registry scanners, click Computer, then Scan Profiles to open the Scan Profiles window. Click New, then Add, and add either the File or Registry scanner. In the example below, we use this wildcard as we define a file scanner to find all MP3 files under the %SYSTEMDRIVE%\Users directory.
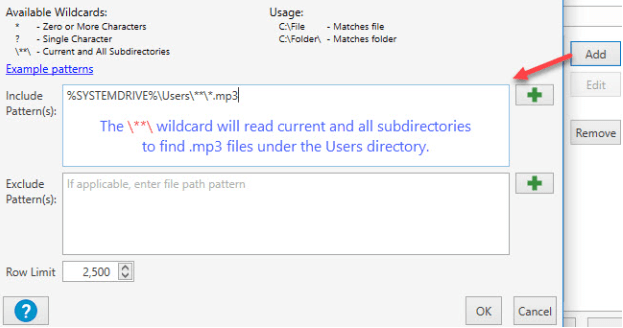
Another example pattern listed below (without using a screenshot) would find all PDF files on a user’s desktop (or subdirectories on the desktop).
%SYSTEMDRIVE%\Users\**\Desktop\**\*.pdf
4. Auto Reports
Did you know that you can run your PDQ Inventory reports on a schedule? Not only that, but after running the report, PDQ Inventory can email you (or anyone) the results or copy the report file to a file server.
Instead of breaking down the many different options available, I will simply point you to our documentation on using Auto Reports.
5. Keyboard shortcuts
Many of the features in PDQ Inventory have keyboard shortcuts already mapped. These shortcuts can save so much time when navigating PDQ Inventory. As is customary in any Windows application, the keyboard shortcut is listed right next to the menu option. Using the Tools menu as an example, take a peek at my current shortcuts. Keep in mind some of these tools may not exist in your environment since I have created some custom tools. Don’t worry — you can also create your own.
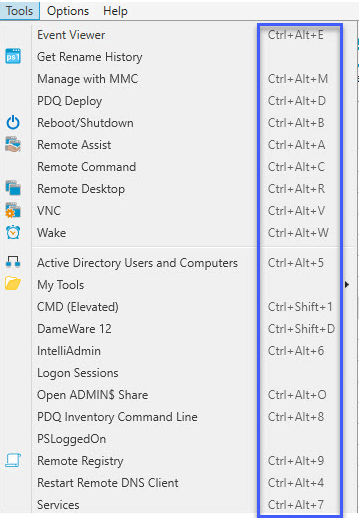
Look at the first menu option for Event Viewer. After selecting a computer in PDQ Inventory, I can immediately launch the remote Event Viewer by simply pressing CTRL+ALT+E. No mouse or menu is needed.
6. Create reports from collections (and vice versa)
Did you know you can create a basic report from any existing collection? This is possible because Reports and Collections use the same filtering mechanism. Let’s say that you want to build a report that shows you all the computers that have an old version of iTunes. If you have access to the Collection Library, drill down to Collection Library > Applications > Media Players > iTunes. With the iTunes (Old) collection selected, you can click Report > New Report > Report From Collection.
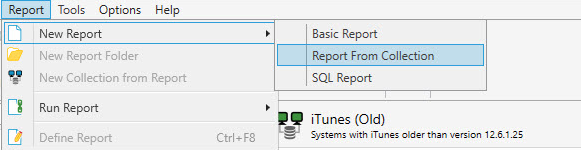
You can also just right-click the collection name and click New > Report From Collection.
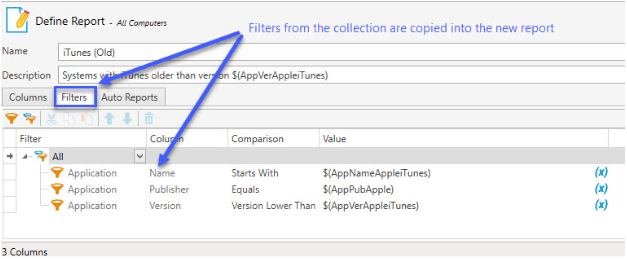
After you select this option, a new report is created. All the filters from your collection are copied to the new report. The new report will also have the same name as the collection from whence it came and it will be placed in the root of your Reports folder.
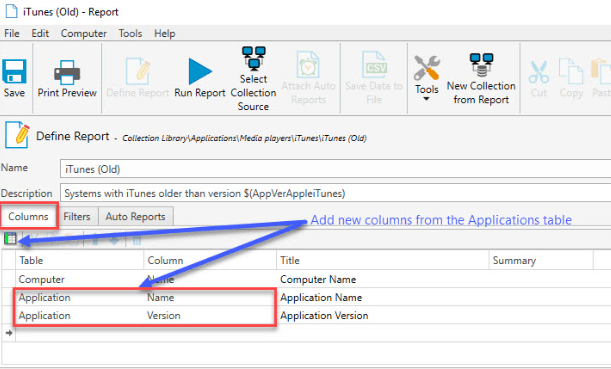
By default, the only column that will display in the report is Computer Name. No worries; you can add new columns as you need. The important part is that you don’t need to recreate the filters.
The iTunes (Old) collection only displays the computers that have older versions of iTunes. However, with a report, you can delve deeper into the data and show which version of iTunes exists on each computer. To do this, go to the new report (just created from the collection), click the Define Report button, and select the Columns tab. Click the Add Column button to add a new column. Click in the first cell and select Application from the Table drop-down, then select Name from the Column drop-down. You will notice the Title is auto-populated. Click the Add Column button again and repeat the process, but select Version from the column drop-down. See the screenshot below.
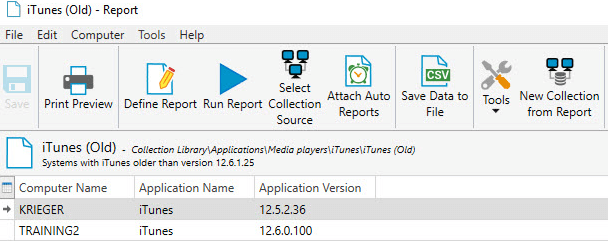
Click Save followed by Run Report. In the example below, not only does it display the computers that have an old version of iTunes, but it also displays the specific version of iTunes for each computer.
7. Grouping your data
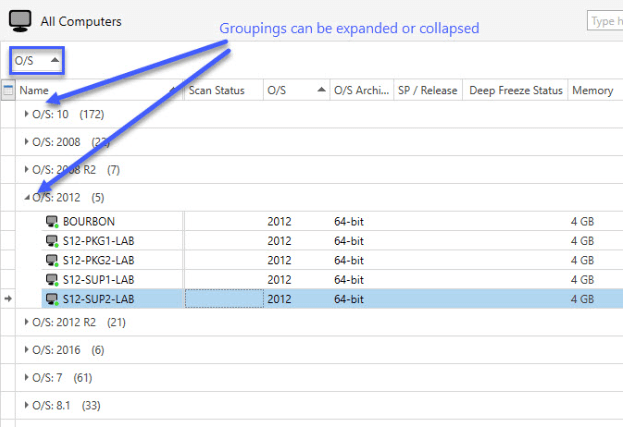
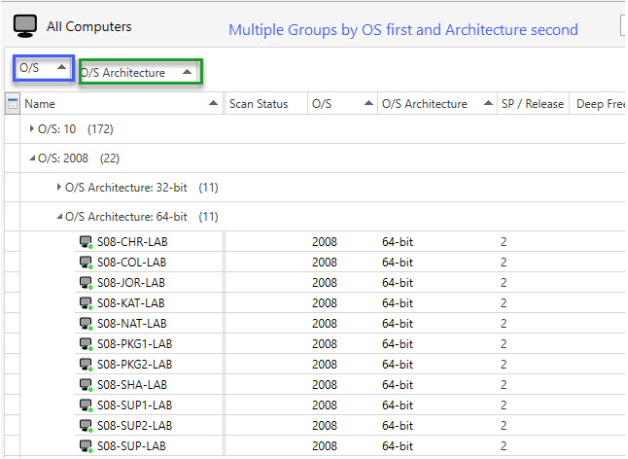
In PDQ Inventory (as well as PDQ Deploy), anytime you see a grid, you have the option of grouping one or more columns of data. Take a look at the screenshot below. Let’s say that I want to look at my computers grouped by Operating System. I can just right-click the O/S column header and click Group By This Column.

Behold, all computers are now placed into collapsible groupings.
You can also nest your groupings as shown below. Simply select a second column header and click Group by this Column. In this example, I also group by the O/S Architecture column.
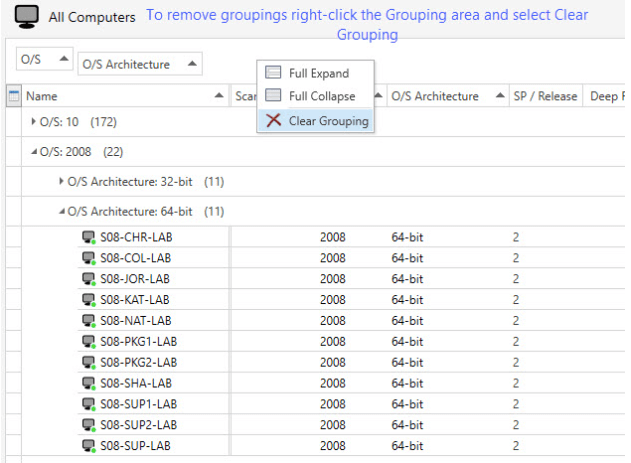
To clear your groupings, right-click the white space in the grouping bar and select Clear Grouping. You can also remove an individual grouping by right-clicking on the grouped column and selecting Ungroup.
We also have a supplementary webcast covering most of these items if you want to check it out for yourself. Watch here
Hopefully, this has satiated the desire for even more Inventory knowledge, but if you are still wanting even more, we have years of content on the PDQ Blog, host weekly live webcasts and have hundreds of videos on our YouTube channel. And if you aren’t a customer yet, get yourself on the calendar and schedule a demo today.